
|
home gallery |
| projects philosophy faq | |
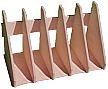 |
free plans: how to make a Vertical Organizer |
| Basic Description |
This simple organizer neatly stores papers, files, books, magazines, catalogs etc. We have provided several customization options so that you can accommodate different size items, vary the style, and alter the dimensions. It goes together very quickly with a unique production technique. The organizer must be made with plywood because it would not be able to withstand the expansion and contraction associated with solid wood. |
This step is optional, but recommended. Using the router, preferably in a router table, create an edge profile around the edges of all the pieces except the back and bottom of the vertical panels (they need to go into the dadoes). If you use a router bit with a guide bearing, ensure that it doesn't ride into the dado when profiling the back and bottom panels - if you use a router table and a fence as shown in step 4, this problem is eliminated. We used a 1/4" roundover bit but set the fence beyond the tangent of the ball bearing so that we didn't rout the full 1/4" roundover; when you repeat this on both sides of the wood, it creates a profile as shown on the right. Regardless of which profile you choose, use a test piece first - and perform the test on both sides of the wood to ensure that you achieve the desired effect. |
 |
|
© 2000-2008
terms privacy policy |
home gallery |
| projects philosophy faq | ||