
|
home gallery |
| projects philosophy faq | |
 |
free plans: how to make a Vertical Organizer |
| Basic Description |
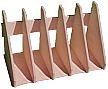
This simple organizer neatly stores papers, files, books, magazines, catalogs etc. We have provided several customization options so that you can accommodate different size items, vary the style, and alter the dimensions. It goes together very quickly with a unique production technique. The organizer must be made with plywood because it would not be able to withstand the expansion and contraction associated with solid wood. |
Let's cut the dadoes or grooves. (The term "dado" refers to a groove cut into a board going against the grain whereas the term "groove" refers to a groove cut with the grain of the wood; the grain of plywood, however, alternates with each ply so it is unclear which term to use - perhaps the the grain direction of the outermost ply should be used - we will use the term dado for the remainder of the plan). We are doing this on the table saw, but you could also use a router. Set depth at 1/2 thickness of the material, 1/4" (6mm) in our case. Remember, we are cutting dadoes for the bottom and back simultaneously. Cut your dado in a test piece first, and check for depth and fit. Ideally, the dado should allow the panel to enter snugly and slide back and forth. Any tighter will make the final assembly very difficult or impossible, and any looser will yield visible gaps in the final product. Cut the first dado through 1/2" (12mm) from the end. You can put this panel in a rabbet if you prefer, but this will make final assembly a little more difficult. Rotate the panel 180 degrees and, using the same fence setting, cut another dado 1/2" (12mm) from the other end. This system guarantees symmetricity and speeds the entire process. now using the same technique, cut the remaining dadoes. As shown in the printable accompaniment our dimensions were first cut 1/2" (12mm), second cut 7 3/8" (187mm), third cut 14 1/4" (362mm): rotating the board each time, these three fence settings yield the 6 necessary dadoes. Remember that the fence is determining the distance to the edge of the dado not to the centerline; make sure you consider this when you are making your own calculations. |
|
© 2000-2008
terms privacy policy |
home gallery |
| projects philosophy faq | ||