
|
home gallery |
| projects philosophy faq | |
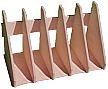 |
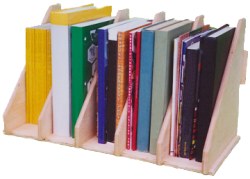
free plans: how to make a Vertical Organizer |
| Basic Description |
This simple organizer neatly stores papers, files, books, magazines, catalogs etc. We have provided several customization options so that you can accommodate different size items, vary the style, and alter the dimensions. It goes together very quickly with a unique production technique. The organizer must be made with plywood because it would not be able to withstand the expansion and contraction associated with solid wood. |
| Materials | High-grade plywood, brads, finishing oil (or paint) and wood glue. A complete material list is included in the printable accompaniment to the plan and is also listed below. |
| Tools | Table saw, dado set, router. A complete tool list is included in the printable accompaniment to the plan and is also listed below. |
| Cost | The plan itself is free! Estimated cost of materials: $15 |
| Time | 4 hours |
| Prints | Although the project plan is displayed below, certain plan elements work best on paper. We have compiled a printable accompaniment to this plan which includes a complete bill of materials, tool list, plan of procedure, and drawings. |
| Difficulty | Moderate |
| Legal Notice | Use of this website constitutes acceptance of our terms of service policy. |

The first step involves acquiring the necessary materials and proper tools. It is best to get everything prepared before commencing because this allows you to progress without unnecessary interruptions. If you haven't already done so, you need to print the printable accompaniment to this plan which includes the complete material and tool lists. These are convenient to take with you to your local supply store to pick up everything that you need. We have also provided material and tool lists below along with some links for online purchase. |
 |
| Item | Qty. | Description |
| #1 | 1 | approx. 1/2" (12mm) thick plywood, good both sides with no voids in the core plys  |
| #2 | 1 | wood glue |
| #3 | 1 | double-sided tape |
| #4 | 12 | finish brads |
| #5 | 1 | finishing oil or paint with primer |
You can make any of several alterations to the dimensions and design that we are using. Before you make any changes and purchase materials, however, we recommend that you read through the entire plan and, in particular check the design considerations section at the end of this plan.
| Tool |
| table saw |
| band saw or jig saw |
| dado set ; or router with straight bit |
| pattern-making or flush trim router bit |
| clamps see plan for details |
| brad nailer or hammer and nail set |
| disc sander or block plane |
| power sander |
We have omitted the most common tools from this list. Furthermore, some of the tools on the list are not necessarily required. If you do not have all of the tools on the list you may be able to use an alternative but you will surely need to read through the entire plan first.
|
© 2000-2008
terms privacy policy |
home gallery |
| projects philosophy faq | ||