
|
home gallery |
| projects philosophy faq | |
 |
free plans: how to make a Vertical Organizer |
| Basic Description |
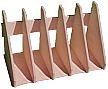
This simple organizer neatly stores papers, files, books, magazines, catalogs etc. We have provided several customization options so that you can accommodate different size items, vary the style, and alter the dimensions. It goes together very quickly with a unique production technique. The organizer must be made with plywood because it would not be able to withstand the expansion and contraction associated with solid wood. |
Next we are going to create a template out of one of the vertical panels - choose the smallest one. Draw some lines approximately 1/8" (3mm) from the cut edges; use a disc sander, block plane, or hand sander (with a course grit) to remove the necessary material. You should refrain from doing anything to the back and bottom of this panel (as shown in the graphic to the right) because you may make them out of square. Confirm that you have removed enough material by checking the template against each of the other vertical panels: there should be excess material on the remaining vertical panels in comparison to the template. Once you have the shape finalized, use a pencil to mark this vertical panel as the template. If you do use a hand sander for this step, make sure that you do not make the edge out of square (the edge of the plywood does not provide a very wide sanding surface). |
 |
|
© 2000-2008
terms privacy policy |
home gallery |
| projects philosophy faq | ||