
|
home gallery |
| projects philosophy faq | |
 |
free plans: how to make a Vertical Organizer |
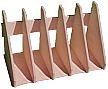
| Basic Description |
This simple organizer neatly stores papers, files, books, magazines, catalogs etc. We have provided several customization options so that you can accommodate different size items, vary the style, and alter the dimensions. It goes together very quickly with a unique production technique. The organizer must be made with plywood because it would not be able to withstand the expansion and contraction associated with solid wood. |
With the template completed we can use it to finalize the dimensions of the other vertical panels. You can complete this step with a hand router or one mounted to a router table; you can use either a flush trim bit or a pattern-cutting bit. We used a 3/4" (19mm) pattern-cutting bit on a router table with a fence for safety. We cut a notch in a piece of melamine to provide clearance for the router bit; then we lined up the outside surface of the melamine with the tangent of the ball bearing on the pattern bit. With the fence in place we will be able to push the piece firmly against the router table and fence to guarantee a good and safe cut. Securely tape the template to the piece you are working on using double-sided tape. Both pieces need to be free from dust to adequately mate them. You should align the back and bottom since these surfaces have already been squarely cut when we prepared them in step 2. You may have to flip the two boards upside down or adjust the depth of the router bit to ensure that the bearing rides against the template and not the piece to be cut. |
 |
When you are finished with the trimming operation, you can separate the two boards by carefully sliding a utility knife in between them and sliding along the gap. Try not to slice into the plywood while doing this. Trim all of the remaining panels to size using this technique. |
 |
|
© 2000-2008
terms privacy policy |
home gallery |
| projects philosophy faq | ||