
|
home gallery |
| projects philosophy faq | |
 |
free plans: how to make a Vertical Organizer |
| Basic Description |
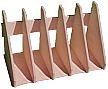
This simple organizer neatly stores papers, files, books, magazines, catalogs etc. We have provided several customization options so that you can accommodate different size items, vary the style, and alter the dimensions. It goes together very quickly with a unique production technique. The organizer must be made with plywood because it would not be able to withstand the expansion and contraction associated with solid wood. |
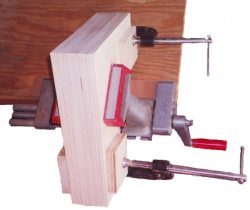
Sand the entire group of vertical panels to size. We stacked them together and clamped them with C-clamps and then put the entire group into the vise. You may want to include a few scraps of wood between the clamps and vertical panels to prevent surface marring. Stacking them all together provides a sufficient sanding surface to guide your sander but you still need to confirm that you are sanding squarely to the workpiece - periodically check this. When repositioning the stack in the vise, always keep at least one c-clamp engaged to maintain the alignment of the stack. Once you have sanded the vertical panels to matching dimensions you can unclamp the stack. |
 |
|
© 2000-2008
terms privacy policy |
home gallery |
| projects philosophy faq | ||