
|
home gallery |
| projects philosophy faq | |
 |
free plans: how to make a Plinko |
| Basic Description |
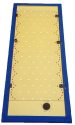
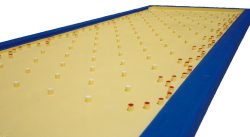
Here is a thoroughly enjoyable project that you can mount on any wall. It's a plinko display in which you place a thin puck at the top and let go. The puck randomly bounces its way amongst a series of pins to the bottom where it is held in place by some hidden magnets. While it may look simple, it takes patience and requires some precise work. We made ours to be 5' (1.5m) tall. We think that you will love making and playing with this project! |
All of the woodwork is complete, so let's prepare it for paint. We glued the magnets in place with polyurethane glue - make sure you glue them in the proper direction. You can fill all the holes in the back with wood filler, or plaster if desired. If you are going to fill in around the magnets you may want to scuff them with rough sandpaper so your filler will adhere better to them. Sand everything until it is smooth and knock off any sharp corners. Once complete, you can apply primer using a small brush. Make sure that you proceed slowly and avoid making drops of paint build up - this will affect the performance of the display. We continuously walked around checking the pegs from all sides to ensure that an even coat of primer has been applied. If you notice any drops that have dried, you can remove them with a sharp chisel. |
 |
Plywood sometimes gets rough after priming, so you may want to do some light sanding after the primer has dried. Next its ready for a final coat. We recommend using spray paint for the field of the project because it is difficult to get a good finish on all of the surfaces of the pegs. We painted the field, and when it dried we painted the frame a contrasting color with a brush. Then we found that the best way to paint the tops of the pegs was with our thumbs. If desired, you can put a few coats of polyurethane for durability. Make sure everything is completely dry before commencing, and try it out on a sample piece before committing the whole display to the coating. |
 |
|
© 2000-2008
terms privacy policy |
home gallery |
| projects philosophy faq | ||