 |
free plans: how to make a
Plinko |
Basic Description
|
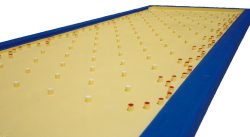
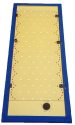
Here is a thoroughly enjoyable project that you can mount on any wall. It's a plinko
display in which you place a thin puck at the top and let go. The puck randomly bounces
its way amongst a series of pins to the bottom where it is held in place by some hidden
magnets. While it may look simple, it takes patience and requires some precise work. We made ours
to be 5' (1.5m) tall. We
think that you will love making and playing with this project! |
| Materials |
Plywood, acrylic sheet, hinges, magnets, pine lumber, dowels, paint, cabinet pull etc. A complete
material list is listed
below. |
| Tools |
A complete woodshop is required for this project including but not limited to the following tools:
bandsaw, table saw, disc sander, router.
A complete tool list is listed below. |
| Cost |
The plan itself is free! Estimated materials cost: $95 |
| Time |
16 hours |
| Difficulty |
Challenging |
| Legal Notice |
Use of this website constitutes acceptance of our terms of service policy. |
| Item |
Qty. |
Description |
| #1 |
1 |
1/2" x 21" x 60" (13 x 610 x 1524mm) birch plywood |
| #2 |
2 |
1" x 3" x 8' (20 x 60 x 2400mm) pine or similar
|
| #3 |
1 |
1/4" x 20" x 46" (6 x 500 x 1160mm) acrylic sheet, to be cut to final size in plan
|
| #4 |
3 |
self-closing cabinet hinges, that close 3/8" (1cm) below mounting surface
|
| #5 |
1 |
cabinet door pull
|
| #6 |
2 |
glass cabinet pulls |
| #7 |
5 or 6 |
25lb (11kg) pull 2" (5cm) diameter cup magnets
|
| #8 |
~ 100 |
1" (25mm) brads |
| #9 |
- |
various color paints, see plan for details |
| #10 |
- |
paint primer |
| #11 |
4 |
3/8" (1cm) diameter x 4' (122cm) dowel, see plan for details |
| #12 |
1 |
plaster or joint compound |
| #13 |
- |
wood glue |
| #14 |
- |
super glue (cyanoacrylate-based glue) |
| #15 |
- |
scrap wood or plastic, approx. 1/4" (6mm) thick, for pucks |
| #16 |
8 |
1" (25mm) diameter fender washers for puck inserts |