
|
home projects suggestions |
| philosophy faq | |
 |
free plans: how to make a Yo Yo |
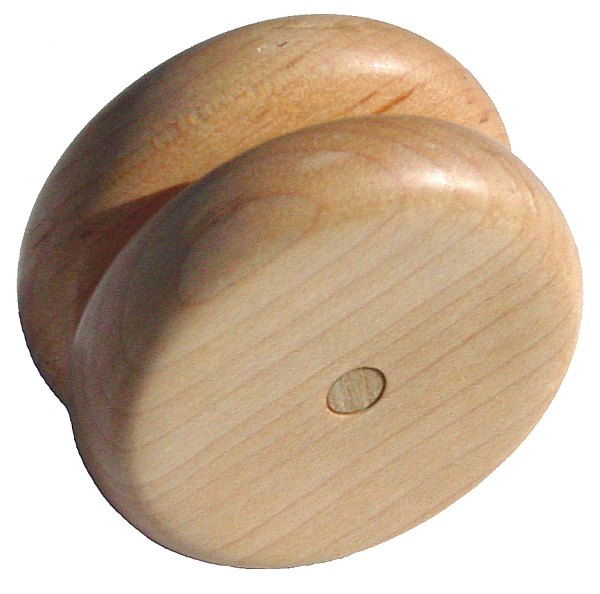
| Basic Description | Here is a great example of the power of doing it yourself. Despite also owning a few high-tech yo-yos, this homemade yo-yo is the one I use most often. The size and shape are all custom fit to my hand. Most importantly, the fact that I made it incorporates a level of satisfaction to yo-yoing that a manufactured yo-yo cannot match. This is a simple and classic project that also makes a great gift, and you won't believe the functionality that you can create. |
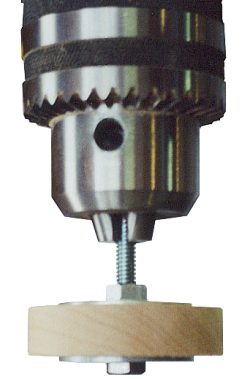
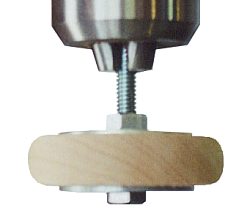
Now we are going to perform the radiused edges on the yo-yo discs. If you have a lathe, this is the perfect opportunity to use it. We are going to show an alternative for those woodworkers who do not have access to a lathe. Using a 1/4" (M6) bolt, clamp a yo-yo disk with a nut and large washers. The bolt should snugly fit into the holes that you drilled and therefore should be centered. Put this assembly in the chuck of a drill press but do not overtighten the chuck because doing so will mar the threads and make it impossible to unscrew the nut. If excessive marring does occur and you cannot remove the nut even with a wrench, use a hacksaw to cut away the marred threads. An even better solution is to use a threaded rod instead of a bolt along with an additional nut so that you can remove the yo-yo disc from beneath without having to unchuck the assembly. Using sandpaper on the trailing edge (not the edge that is spinning toward you) of the rotating disc, sand away the edges of the wood until they are rounded. You should not resize the circle because you are likely to make it out of round. Use this step just to round the edges. Make one of the yo-yo discs to the desired shape and match the other to it: keep the first one nearby when you are working on the second so you can stop the drill press and compare the profiles. You can complete the sanding of the edges while you have it in the drill press and progress through finer and finer grits of sandpaper. Once you reach 400 grit, the wood will be shiny and very smooth. Avoid providing too much force against the drill press in any direction because drill presses are not designed to withstand excessive forces in any direction except up. Proceed through this step slowly and methodically. |
|
|
© 2000-2008
terms privacy policy |
home gallery |
| projects philosophy faq | ||