
|
home gallery |
| projects philosophy faq | |
 |
free plans: how to make a Mobile Workstand |
| Basic Description |
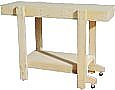
This simple workstand is both stable and mobile. It provides a great surface for cutting, routing, sanding, assembly etc. You can roll it around your workspace by simply tipping one end a few degrees to engage the wheels. In the resting position, the wheels are disengaged and this is the key to its stability. There are no obstructions on the underside of the worktop which allows for efficient clamping. These mobile workstands work very well in pairs, so after you finish your first one, you may want to build another! |
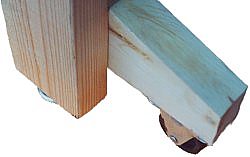
Next we need to install the casters. Adjust the leveling feet to their lowest position, so that the tabletop will be the lowest possible height. Next, cut some short pieces of lumber; we recommend about 10" (25cm). You can also trim off the exposed corner of the extension as we have done in the photograph. Once the pieces are cut, attach the casters to the caster extensions with 4 screws each at the trimmed end of the extension. |
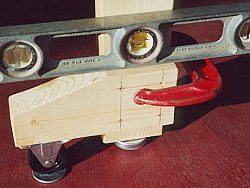 |
Predrill clearance holes for attachment to the legs. Position the caster extension on the inside of one of the legs (it doesn't matter which end you decide to put the casters on), and put a spacer under the wheel. You don't want the wheels too high or else you will have to tip the workstand significantly to engage the wheels; you also don't want the wheels too close to the ground or they will interfere with the stability of the workstand when it is at rest. A 1/8" (3mm) spacer seems to work best. Clamp the caster extensions in place by making sure that the top is level, and attach using 2 1/2" (7cm) screws. |
 |
|
© 2000-2008
terms privacy policy |
home gallery |
| projects philosophy faq | ||