 |
free plans: how to make a
Mobile Workstand |
Basic Description
|
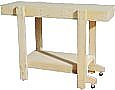
This simple workstand is both stable and mobile. It provides a great surface for cutting,
routing, sanding, assembly etc. You can roll it around your workspace
by simply tipping one end a few degrees to engage the wheels. In the resting position, the wheels
are disengaged and this is the key to its stability. There are no obstructions on the underside of
the worktop which allows for efficient clamping. These mobile workstands work very well in pairs, so after you
finish your first one, you may want to build another! |
How to use your new mobile workstand
The workstand is very easy to use. To move it, simply tip the end opposite to the casters up into
the air. If you positioned the wheels close to the ground as described in the plan, you will only need
to tip the stand a few degrees to engage the wheels. If you discover that your wheels are too
far from the ground, you can install spacers between the caster housing and the caster extensions to minimize
the distance.
The undershelf is provided more for overall stability than for storage. Almost anything
you store on it will roll away whenever you tip the stand.
We like to clamp on our spring clamps around the perimeter of the shelf.
When you have rolled the stand into the position that you would like to situate it,
we recommend that you come to a complete stop before lowering the end of the stand; failure to do
so will wear out the leveling feet adjacent to the casters. If your shop floor is uneven, you
will need to adjust the leveling feet when you move it to a new location. Rock the stand back
and forth to determine which foot is too high; rotate the foot until it comes into contact with the
ground. The entire process takes a few seconds and it yields a very stable work surface. This
system of leveling increases the length of one of the feet, and after many such processes the
entire workstand gets higher and higher until a point is reached when you must lower all of the feet.
size
The size of the workstand can be adjusted to your needs. We gave the recommendation
on the height in the project plan, but the width and length can be varied. Make sure
that the base is large enough to provide stability but not too large so that you cannot easily reach
all of the parts of the worktop.
materials
The materials can be altered. 2 x 3" (4 x 6cm) lumber is becoming increasingly available and would be
suitable for the frame and legs. We wouldn't go much smaller than that due to rigidity
concerns. The top surface can be laminated or made out of melamine to provide increased
strength. We plan to use the relatively inexpensive MDF; since the design allows for the top to
be easily replaced without dismantling
anything. We like to put all of our attention into safety
and onto the piece in question - not in preserving
an expensive worktop. If we inadvertently rout into the top surface, we will unscrew it, and flip it over or
replace it altogether.
mobility
You can increase the height of the wheels off the ground
and you can adjust the distance between the wheels and the tipping legs, but, remember that making
these type of adjustments increases the angle that you may need to tip the stand to engage the wheels
which may hinder mobility. The wheels can be omitted if mobility is not an issue. If you do so, we still
recommend that you use the leg levelers.
shelf
We positioned the shelf supports on top of the caster extensions because it was a
convenient and functional location. you can raise the shelf some and not lose any stability gained by it.
If you move it too high (i.e. above halfway), the rigidity will be decreased. You can also
make the caster extensions out of the same piece of wood as the shelf supports: they would just
extend out and act as both simultaneously. We wanted the shelf a little bit higher because
we wanted to have better access (for sweeping, vacuuming, and picking up that screw that invariably
finds its way into a tricky spot). |
One seeming oddity about our design is that the legs are on the outside of the stand.
The use of external legs yields all of the following advantages: simplifies the project; allows for
an unobstructed clamping surface on the underside of
the worktop maximizes the distance between the legs which provides for increased stability;
convenient for clamping items alongside the worktop in a vertical position;
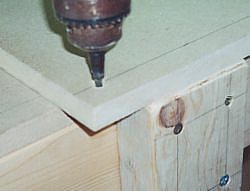
creates an inside corner (made by the top of the legs and the worktop) that provides the extra
back-up support necessary when working on smaller parts (see
image on the right).
Occasionally, you will have to shift your part to accommodate for the external legs,
but overall we are convinced
that the benefits of external legs far outweigh the rare disadvantage. To reap many of these benefits of the external legs, it is important that you make them flush to the worktop. If they
are a little high, you can grind them down flush.
If you do opt for internal legs, you can
screw them onto the inside of the frame before you attach the
panel (you will need to make a couple of cutouts) to the underside of the worktop. |
 |
additions
There are many additions that you can use to supplement your basic workstand. You can put a
rim around the shelf so that it can hold small items; alternatively you can drill holes to
store you screwdrivers vertically. If you do want to store items on the shelf, keep in mind that
the tipping required to move the workstand must be taken into consideration in your design.
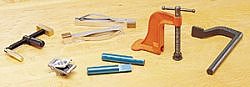
You can install bench dogs or
clamps into holes drilled into the top. We like to cut a piece of carpet to match the dimension
of the worktop. It comes in handy for project assembly and sanding. |
 |
