
|
home gallery |
| projects philosophy faq | |
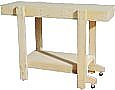 |
free plans: how to make a Mobile Workstand |
| Basic Description |
This simple workstand is both stable and mobile. It provides a great surface for cutting, routing, sanding, assembly etc. You can roll it around your workspace by simply tipping one end a few degrees to engage the wheels. In the resting position, the wheels are disengaged and this is the key to its stability. There are no obstructions on the underside of the worktop which allows for efficient clamping. These mobile workstands work very well in pairs, so after you finish your first one, you may want to build another! |
Next, we will use one of the remaining two panels and attach it to the other side of the worktop. (Before you do this, you may want to write your name, date, saying or anything else, on the inside of the frame; we are always intrigued thinking about who will read this and when, if ever). This is done in the same way that the first side was attached. Mark the holes, clamp, drill countersunk holes, and finally, drive screws. Both sides of the worktop are identical which allows you to choose the 'better' side, if there is one, for the top. This is a good time to break the sharp corners of the worktop. You can just use a rasp or file or a hand plane. If you used melamine, this step is particularly important because the edges of melamine tend to be sharp. As an alternative, you can use edge banding. |
 |
|
© 2000-2008
terms privacy policy |
home gallery |
| projects philosophy faq | ||