
|
home gallery |
| projects philosophy faq | |
 |
free plans: how to make a Computer Monitor Shelf |
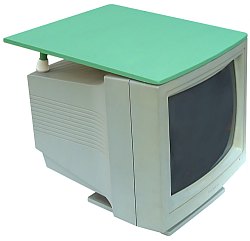
| Basic Description | The space around one's computer is often particularly valuable. At uniqueprojects, we are consistently battling with the clutter on and around our computers; below you will find one of the remedies we designed for the problem. It's a simple plan for a shelf that fits on top of most computer monitors. The shelf can be used to hold all sorts of items: picture frames, notes, papers, and lightweight peripherals (such as computer speakers, small scanners etc.) In the end, this project allows you to convert wasted space into highly usable space. |
Next you need to finish the surfaces. We lightly sanded and rounded the corners and then painted with ordinary paint. After it was completely dry, we lightly sanded to create a very smooth finish. You could apply an overcoat of polyurethane for added durability, or use an oil finish. After the finish is dry, slide the tip caps onto the ends of the shelf legs. Finally cut some adhesive-backed hook and loop fastener and apply the hook part to the top of the front of the monitor - make sure that the monitor is clean and dry before application. Apply the loop part to a corresponding part of the underside of the shelf. The adhesive on our fastener wasn't providing a particularly strong bond to the wood, so we embellished the bond with some very short brads. |
 |
|
© 2000-2008
terms privacy policy |
home gallery |
| projects philosophy faq | ||