
|
home gallery |
| projects philosophy faq | |
 |
free plans: how to make a Large Harmonograph |
| Basic Description |
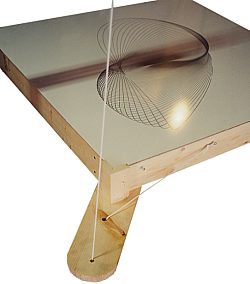
A harmonograph is a pendulum-based drawing board that produces beautiful curvaceous drawings. After you give the large hanging platform a gentle push, gravity works its magic while a pen records the results. Each swing is almost identical to its predecessor: the minute discrepancies are responsible for the remarkably sinuous curves. The version that we have detailed in the plan below allows you to make drawings on paper or on an erasable whiteboard. You can set up the harmonograph in a garage or basement and hoist it out of the way when not in use; it ends up taking virtually no space at all. We love to enjoy the mesmerizing action, but it makes a great conservation piece at a party and kids absolutely love it! It takes some patience to get everything working right, but it is definitely worth the fine tuning that this project requires; as always, we will walk you through all of the steps. |
All that is left is to complete some fine tuning and you are ready to start. Place some bricks in the drawing board, we recommend that you start with four. Place the whiteboard in place and move the pen holder to one of the corners for configuration. Pull one of the board's corners right up to the edge of the pen holder upright. Let go and check the first few cycles of the swinging. You will be very lucky if the apexes of the swing are very similar - because that is precisely what you are looking for. If not, you can adjust the weight. Start by moving the weights farther away from the center or toward the center. You will start to get a feel for how these alterations affect the action. If moving the weights does not make enough of a difference, add weights or remove them. Note that they do not need to be symmetrical, so there are an infinite number of options. |
 |
The design that we offer in this plan offers many other adjustments so you can achieve a wide variety of swinging patterns. You can alter the type of swing that you are making (is it too erratic), string length can be increased or decreased by moving the loops onto new screwheads, distance between ceiling mounting points can be increased or decreased. Once you have achieved repeatable swinging, move the pen holder to one of the sides of the drawing board so that the end of the arm is centered over the non-swinging board. Adjust the height so the arm is a few inches above the drawing board at rest. Clamp a dry-erase pen into place, start with a gentle swing and slowly lower the pen into place. You can rest a large washer on the arm in various locations to toggle between the down position and the up position. If you set the hinges as we did, the arm will rest in the back position a few degrees above horizontal. This makes it easy to engage and disengage. Enjoy! |
|
© 2000-2008
terms privacy policy |
home gallery |
| projects philosophy faq | ||