
|
home gallery |
| projects philosophy faq | |
 |
free plans: how to make a Large Harmonograph |
| Basic Description |
A harmonograph is a pendulum-based drawing board that produces beautiful curvaceous drawings. After you give the large hanging platform a gentle push, gravity works its magic while a pen records the results. Each swing is almost identical to its predecessor: the minute discrepancies are responsible for the remarkably sinuous curves. The version that we have detailed in the plan below allows you to make drawings on paper or on an erasable whiteboard. You can set up the harmonograph in a garage or basement and hoist it out of the way when not in use; it ends up taking virtually no space at all. We love to enjoy the mesmerizing action, but it makes a great conservation piece at a party and kids absolutely love it! It takes some patience to get everything working right, but it is definitely worth the fine tuning that this project requires; as always, we will walk you through all of the steps. |
Instead of providing a cutlist for the entire project, we are going to break the project down into manageable steps. We have chosen this method not only for simplicity and clarity; using the actual dimensions required by your work is superior and more accurate than precutting all of the pieces and assembling them at once. We also want to allow you to make customized changes to our design. You should consider the dimensions we provide to be close guidelines: your work will dictate the precise dimensions that you will need. |
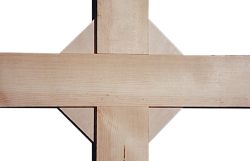 |
The harmonograph has two primary parts, a hanging drawing board and the pen support. We will start with the drawing board. The drawing board itself rests on a frame that also supports bricks that serve as counterweights. The bottom of this frame is made out of two pieces of pine that are lapped in the middle so that they form a flat "X". Each piece is 6' (1.8m) long and we rounded the corners for safety. The width is critical because a counterweight needs to be able to snugly fit on the of the bottom of the frame. The width should be about 1/8" (3mm) more than the width of a brick plus the width of the pine lumber. We made ours 4 1/2" (115mm) wide because our bricks are 3 5/8" (92mm) wide and our pine is 3/4" (19mm) thick. We ripped the 10" (25cm) wide lumber to achieve the width we required. |
|
We made the half laps in each piece using a crosscut sled on the table saw and made repeated passes until the material was completely removed; a dado set could also be used to minimize the number of necessary passes. You could perform the half laps with a miter gauge on the table saw or with a router. Once you have completed both pieces, tack them together with a few nails ensuring that they create a right angle. Next, cut a square of plywood about 12" (30cm) on a side and screw it to the joint as shown in the graphic on the right. Use plenty of countersunk drywall screws to guarantee that you have a firm joint. |
|
© 2000-2008
terms privacy policy |
home gallery |
| projects philosophy faq | ||