
|
home gallery |
| projects philosophy faq | |
 |
free plans: how to make a Large Harmonograph |
| Basic Description |
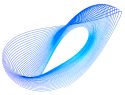
A harmonograph is a pendulum-based drawing board that produces beautiful curvaceous drawings. After you give the large hanging platform a gentle push, gravity works its magic while a pen records the results. Each swing is almost identical to its predecessor: the minute discrepancies are responsible for the remarkably sinuous curves. The version that we have detailed in the plan below allows you to make drawings on paper or on an erasable whiteboard. You can set up the harmonograph in a garage or basement and hoist it out of the way when not in use; it ends up taking virtually no space at all. We love to enjoy the mesmerizing action, but it makes a great conservation piece at a party and kids absolutely love it! It takes some patience to get everything working right, but it is definitely worth the fine tuning that this project requires; as always, we will walk you through all of the steps. |
Using a miter box saw, cut some of the same material that you used in step 3 to make some counterweight guides; these pieces will hold the brick counterweights in place and also support the drawing surface. We cut 45 degree angles on the ends so that they fit properly to the rest of the frame. You could put these high walls on all edges of the "X" but this is unnecessary and will make access to the counterweights a little more difficult. We put the guide on one side of the counterweight supports and then just fastened a small strip onto the edge of the other. See the photo on the right. |
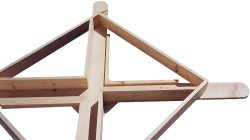 |
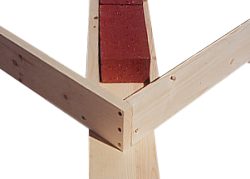
In the photo on the right, you can see how the guides on either side of the counterweight are of different heights. The taller one is screwed on top of the "X" whereas the shorter one is screwed to the edge of the "X". This will leave enough room for you to slide the counterweights back and forth and also easily add and remove them. |
 |
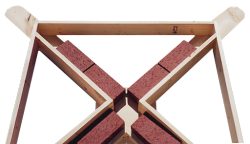
In the photo on the right, you can see the overview of the drawing board frame. Eight bricks can easily be placed and moved around; once we get to the point when we are ready to draw, these features will be convenient. |
 |
|
© 2000-2008
terms privacy policy |
home gallery |
| projects philosophy faq | ||