 |
free plans: how to make a
Large Harmonograph |
Basic Description
|
A harmonograph is a pendulum-based drawing board that produces beautiful curvaceous drawings.
After you give the large hanging platform a gentle push,
gravity works its magic while a pen records the results.
Each swing is almost identical to its predecessor: the minute discrepancies
are responsible for the remarkably sinuous curves.
The version that we have detailed in the plan below allows you to make drawings on paper or on
an erasable whiteboard. You can set up the harmonograph in a garage or basement
and hoist
it out of the way when not in use; it ends up taking virtually no space at all. We love to
enjoy the mesmerizing action, but it makes a great conservation piece at a party and kids absolutely
love it! It takes some patience to get everything working right, but it is definitely worth
the fine tuning that this project requires; as always,
we will walk you through all of the steps. |
Now let's cut the tileboard or whiteboard to size.
Ideally you can use a whiteboard made specifically
for dry-erase writing. We used smooth tileboard that is available at most home centers. Flip
the drawing board frame upside down, and trace the shape onto the back of the board. Carefully
cut with a jigsaw and confirm that it fits properly. If your frame is perfectly square you
can just measure, but tracing always guarantees a perfect fit. |
At this point, you can cut some leftover pieces of pine to act
as locators. We made two mitered pieces for each corner of the drawing board
frame. These locators should protrude about 1/2" (13mm) above the top of the whiteboard. If you didn't cut the
whiteboard accurately, you can file or rasp until you get a snug fit. You should also
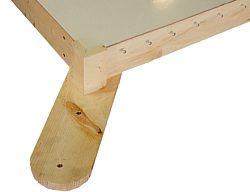
mark and predrill about 10 or 12 evenly spaced holes along two opposing sides of the drawing frame as
shown in the photo. Drive screws into these holes but leave the head about 3/8" (1cm) away from
the wood; these will act as hooks for the strings used to hang up the drawing board. Some wood
screws have smooth shanks just below the head, and these are preferred since we don't want
threads from threatening to break the string that we will loop around them. |
 |
Now is a good time to drill a couple of through holes for the
strings to pass through. We used a 3/8" (1cm) diameter drill bit and drilled a hole
1 1/2" (38mm) away from the end of the "X" and 1 1/2" (38mm) away from the whiteboard locators that we just
installed. The hole is this large to accommodate a loop that will be tied into the string
that
will be used to hang up the drawing board. The
string will pass down through the outer hole, and then up through the inner hole and then
be hooked around one of the screws that you just installed. |
