
|
home gallery |
| projects philosophy faq | |
 |
free plans: how to make a Wine Rack |
| Basic Description | Since most wine gets better with age, wine enthusiasts need a method to store their bottles. Below you
will find a free plan for a remarkably simple wall-mounted bottle storage rack that attractively displays
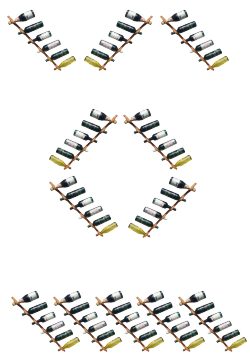
your collection. We describe several layouts to maximize
the use of available wall space. The design employs efficient use of materials; you won't believe that
you can securely hold so many bottles with so little wood. |
mounting the wine rackTo use this wall mounted wine rack, you need to firmly fasten it to a wall or other rigid surface. Finding wall studs would be ideal, but using toggle bolts is fine. If you have plaster, or brick walls, use appropriate fasteners. If you would like to hide the screw heads (nails will probably not be strong enough) you can drill a counterbore to recess the screw head below the surface of the wood; you can cover these holes with plugs. layoutThere are many layouts that you can employ to achieve different looks or to maximize the bottle-holding capacity of your wall space. You can arrange several of these racks in parallel orientation or in contrasting angles. See the images on the margin for some options: use your imagination! |
 |
This wine rack is very versatile and can handle several alterations and customizations.
Thickness: We used a standard board for our wine rack, and stability is not an issue as long as it is suitably fastened to a wall. We wouldn't recommend using thinner stock, but thicker stock is of course acceptable. You may want to test the thickness by drilling a hole in some scrap wood and testing how the bottles act. Width: The distance between the centerline of the holes and the wall should be at least 2" so that standard bottles will be accommodated. We used a larger dimension to be able to handle larger diameter bottles. Using wider boards is unnecessary and wasteful. Length:You can increase or decrease on the length that we used. Make sure that you have enough width to be able to suitable mount the rack to a wall. Distance between holes: We put our holes 6" apart. We tested many different dimensions, and discovered that 6" was a good amount
materialsWe used cherry because we had some extra after making the magazine holder. Almost any wood would be suitable. We wouldn't stray from wood though because it is strong enough to do the job, but soft enough so that you don't have to worry about scratching or threatening the glass bottles. shapeWhen you are choosing your pattern, keep in mind that you may want to minimize the interior radii to the size of your smallest sanding drum. If you cannot get into those spaces with a power sanding device, the sanding step will be much more time-consuming. Note that you can use a simple rectangular piece for this project; it would be much easier to make but use unnecessary material. The wave pattern shown in the margin may be attractive, but since it is not symmetrical, the opposing piece of wood would not have a matching pattern, so there would be wasted material. |
 |
|
© 2000-2008
terms privacy policy |
home gallery |
| projects philosophy faq | ||