 |
free plans: how to make a
Welding Table |
| Basic Description |
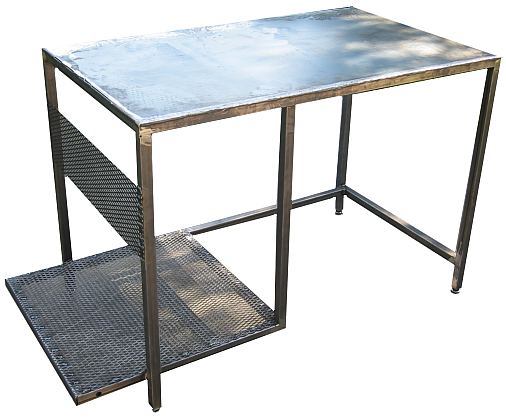
Here is a straightforward plan to make a steel table perfect for welding or other metalworking
needs. It is very sturdy and the undershelf can hold your welder, supplies, and any shielding gas that
you may need. In the review section of the plan, we also show how you can add a couple of
wheels to make this a mobile welding station. |
Material
We used scrap metal for the entire project that which made it
very inexpensive. Low carbon steel is ideally suited for this project because it is easy
to weld and very strong. Other metals are fine, but they will likely be more difficult
to weld and more costly.
Orientation
We designed the seating area to be to the right of the shelf
for the welder. Keep in mind that this can be reversed if you prefer.
Size
You can make the table any size you like. Make sure that there is enough room
for you to sit at it. 24" (60cm) between the leg and the vertical undershelf support
is about the minimum for a comfortable work area. 36" (90cm) is much more desirable. The height
of the table should be a comfortable working height. A good way to determine a proper height
is to stand straight up and set the height at the bend of your wrist. We made our table 36" (90cm) high;
you will have to have a tall chair to be able to reach this height however. If you are
going to store a gas tank on the undershelf, make sure it protrudes a sufficient amount away from the
table. If your tank is 8" (20cm) in diameter, for example, the undershelf should extend about 10" (25cm)
or more so that you can weld on brackets to prevent the bottom of the tank from moving around.
|
|
Additions
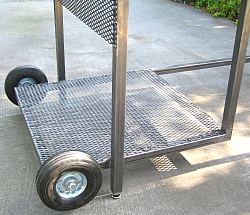
We added wheels as shown on the right to provide for mobility. When the
table is at rest, the wheels are suspended in the air, but tipping the opposite end, engages the
wheels with the ground. We used 8" (20cm) rubber wheels that we found in a surplus store. We passed
bolts through the axle and through a hole drilled in the steel tube to accommodate the wheels. Note
that if you are going to use the undershelf for wheels, it needs to be set a proper height (including
the height of the adjustable feet). You need to calculate the height of the undershelf so that
it leaves the wheels off of the ground when the table is at rest. In our case, we set the centerline
of the undershelf to be 4 1/4" (11cm) off the ground so that the wheels are disengaged unless
the table is being moved. You can also add hooks and hangers for all of your welding needs. We
like to make a plain table and then use it for awhile to determine what our needs are. After some
use, you will know exactly what you need and where it should be positioned. |
 |