 |
free plans: how to make a
Shallow Box |
Basic Description
|
This shallow box is relatively easy to make and the unique technique allows for a very
wide variety of possibilities. In the free plans below, we describe a rather complicated use of
the technique but
we will provide detailed instructions for
many other options. Expand your boxmaking
horizons beyond ordinary rectangularity! |
The shallow box has many uses and you can alter the shape to be ideally suited
for one of these uses. They can hold writing instruments, office supplies (paper clips, staples etc)
coins, small parts, jewelry, and any other small items that need organizing.
The shallow box is very versatile and can handle several
alterations and customizations. |
 |
dimensions
Thickness: We used a thin base because we like the elegant look, but you can choose
any thickness. You can also glue wood together, face-to-face, before cutting the pattern to
increase the depth of the box. Keep in mind that any increases in thickness will give you more
material to sand. If you are making a more complicated shape this may be difficult since your drum
sanding attachment may not be long enough. Width:
To make a shallow box wider than the wood you have, you will need to surface and glue them edge-to-edge.
You can glue up a wider base panel immediately after surfacing, but you may want to glue multiple
top panel pieces after cutting the pattern - this will allow you to use a bandsaw (instead of a jigsaw)
to cut the interior area. Length: The length can be as long as you like, but don't forget the
limitations of your tools, i.e. the throat of your bandsaw or jigsaw. Wall Thickness: Thicker
walls will of course, provide more strength, but we are very pleased with the strength of our shallow box and no wall
is more than 1/8" (3mm) thick. You may want to vary the width of the walls within the same box as
shown in the ovular idea on the right. |
materials
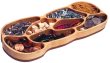
We used a walnut base and a maple top because we like the contrast. The strong
maple top provides extra strength but most woods are suitable for this project.
shape
The number of shapes you can make with this technique is only limited by imagination.
You may want to limit the size of the inside radiuses based on the smallest drum sanding attachment
that you have. It is difficult to sand in tight areas. You can also make certain interior portions
of your design to go all the way through the base panel. Several ideas of this are included in
the graphic shown on the right.
lid
If you would like to add a lid to your box, you can make a second shallow box to fit around the base.
After completing the project
as described in the plan above, trace the shape to create a customized and well-fitting lid. Avoid
making any internal walls on the lid that may interfere with internal walls on the base.
|
 |
