
|
home gallery |
| projects philosophy faq | |
 |
free plans: how to make a Shallow Box |
| Basic Description |
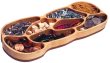
This shallow box is relatively easy to make and the unique technique allows for a very wide variety of possibilities. In the free plans below, we describe a rather complicated use of the technique but we will provide detailed instructions for many other options. Expand your boxmaking horizons beyond ordinary rectangularity! |
Let's start by preparing the wood. The box is basically made out of two boards: a base and a top. These pieces can be glued-up from smaller boards if desired, but we used a single piece for the base and a single piece for the top. To save wood and to give a more elegant look, we used a thin piece for the base. To accomplish this, we used the resawing technique; although there are many methods for resawing, we prefer using the table saw. To resaw with the table saw, simply set the fence so that an equal amount of the edge of your board falls to either side of the blade. Don't forget to account for blade thickness during this process: the centerline of the blade should align with the centerline of the end of the board you are resawing. Note that resawing on the table saw works best with a blade stabilizer. |
 |
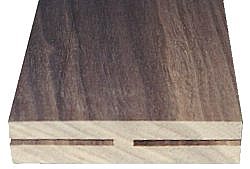
We like to mark one face of the board and ensure that it always stays next to the fence. Remove the splitter and set the height of the blade at about 1/2" (13mm). You can kiss the end of the board and measure to confirm that the kerf is in the center. Readjust the fence if necessary. Once you have the fence location finalized make a complete pass. After this pass, we like to shut off the power of the saw and set up a featherboard to ensure that the board remains tightly against the fence for the remaining cuts. Flip the board over, end over end so that you keep the side you marked earlier against the fence. Now, cut a groove on the opposite edge to the same depth. Raise the blade another 1/2" (13mm) and repeat the process, alternating cuts on the opposing edges of the board. Stop when the top of the saw blade reaches the height of the fence (any higher is unsafe), or when grooves are about 1/4" (6mm) away from eachother as shown in the photo on the right. Ripping through this small bit of material on the table saw can be dangerous. You can complete the cut using a bandsaw or with an ordinary handsaw. The deep grooves that you just made serve as excellent guides for the handsaw and the process is easy and fast. |
 |
Using the thickness planer, smooth the faces that you just cut. These resawn pieces can be glued up edge to edge if you need the extra width for a wider box, or you can use the two pieces to make two boxes. If you are gluing panels together, we recommend doing so after completing step 3.
For the top panel of the box, we used maple and simply surfaced the material so all of the surfaces were square. Finally, crosscut your two boards (the base and top board) to the same size, preferably slightly larger than your final box size.
|
© 2000-2008
terms privacy policy |
home gallery |
| projects philosophy faq | ||