 |
free plans: how to make a
Large Harmonograph |
Basic Description
|
A harmonograph is a pendulum-based drawing board that produces beautiful curvaceous drawings.
After you give the large hanging platform a gentle push,
gravity works its magic while a pen records the results.
Each swing is almost identical to its predecessor: the minute discrepancies
are responsible for the remarkably sinuous curves.
The version that we have detailed in the plan below allows you to make drawings on paper or on
an erasable whiteboard. You can set up the harmonograph in a garage or basement
and hoist
it out of the way when not in use; it ends up taking virtually no space at all. We love to
enjoy the mesmerizing action, but it makes a great conservation piece at a party and kids absolutely
love it! It takes some patience to get everything working right, but it is definitely worth
the fine tuning that this project requires; as always,
we will walk you through all of the steps. |
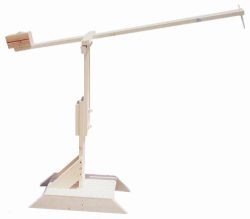
With the drawing board completed, we can focus on the pen holder.
The pen holder needs to be stable and have an adjustable height feature. It should
also accommodate for various sized pens. This part of the project is much more like a standard
woodworking project, so we have simply provided a drawing for you to use as a guide. |
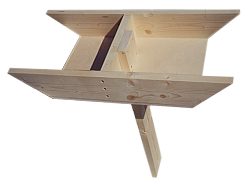 |
Begin by making the base for the pen holder. It is simply
made out of pieces of pine and spanned by a piece of plywood.
Cut a rectangular hole (drill some 1/2" (13mm) holes to make room for your jigsaw blade) in the plywood to
snugly accept the upright. You can cut the slot in the upright with a scrollsaw
or jigsaw, but making both sides of the slot parallel to each other is difficult to perform.
Therefore, we recommend that you cut a strip slightly more than 5/16" (8mm) this slot acts as
a clearance slot for the bolts) wide out of some pine, and
then glue it between two pieces ripped (on the table saw) out of the remaining piece.
After the glue is completely dry, you can send it through a thickness planer to flatten the faces. |
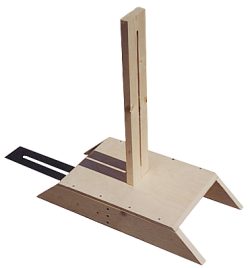 |
Firmly fasten the upright to the stretcher beneath the plywood as
shown in the image on the right. At this point, you can cut some pine to serve as gussets
for the upright. This will make it much more stable. The
vertical extension also has a half lap to accept the hinge support. By putting the hinges further
apart we are achieving drastically increased stability. Drill the two holes in the vertical
extension at the same time that you drill the holes for the backer piece, that way you
can be sure that they are in line to receive the bolts. |
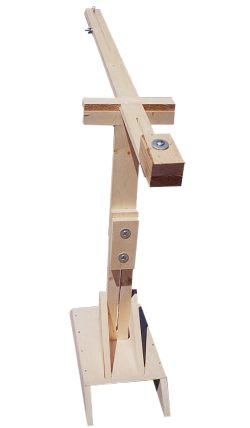 |
The arm is made in the same way as the upright. Rip a strip
of pine 5/16" thick and rip the remaining piece in half. Glue these together to get the
slot for the counterweight and the slot that will receive the pen. Once the arm is dried
you can pass it through a thickness planer to clean up the faces and then make a half lap as you did
before to accept the hinge support. Also drill a hole for the pen clamping bolt. Attach
the hinges. You can also drill some wider holes at the end of the arm to accept larger
pen diameters. Lastly drill some through holes in some dense scrap wood to create a counterbalance for
the pen. When a pen is clamped in place the arm should be very well balanced. You can use some
extra washers to fine tune the balance; just slide them over the prodruding bolt. |
 |
