 |
free plans: how to make a
Large Harmonograph |
Basic Description
|
A harmonograph is a pendulum-based drawing board that produces beautiful curvaceous drawings.
After you give the large hanging platform a gentle push,
gravity works its magic while a pen records the results.
Each swing is almost identical to its predecessor: the minute discrepancies
are responsible for the remarkably sinuous curves.
The version that we have detailed in the plan below allows you to make drawings on paper or on
an erasable whiteboard. You can set up the harmonograph in a garage or basement
and hoist
it out of the way when not in use; it ends up taking virtually no space at all. We love to
enjoy the mesmerizing action, but it makes a great conservation piece at a party and kids absolutely
love it! It takes some patience to get everything working right, but it is definitely worth
the fine tuning that this project requires; as always,
we will walk you through all of the steps. |
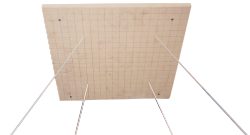
Now let's make the ceiling mount to complete the drawing board. Cut a piece
of plywood that spans the distance between the joists that you will mount to. We situated our
harmonograph in a workshop with an open ceiling. If you have a different
mounting situation, then you will have to adjust the design accordingly. A general rule that
we have been satisfied with is that the distance between the mounting points on the ceiling should be about
1/5 the distance between the mounting points on the drawing board. Accordingly we made
the ceiling mounting points about 10" (25cm) apart.
|
 |
You are trying to minimize friction so although an eyebolt will work fine,
we found that a hole, slightly larger than the diameter of the string, works better. You simply
pass the string through the hole and tie a knot in the end to prevent it from falling through. You
may be tempted to loop the string around to use one length of string for two of the lines, but it's best to have them independent because
in case one of them is compromised, the other three will be able to support the drawing board.
|
We marked a grid pattern on the ceiling mount and drilled a few
holes, that allowed us to easily alter to positioning of the strings which provides differing
drawing results. Ensure, however, that you securely fasten the mounting board to the ceiling joists: we
used four heavy screws. |
Cut four lengths of string to about 8' (2.4m) each. We have found
that the installed string length (as opposed to the overall string length) should be about
1 1/2 times the distance between the mounting
points on the drawing board. Since the distance between our mounting points is 4' (1.2m) , we aimed
for 6' (1.8m) long strings; note that the excess is for adjustment and to pass though the mounting holes
and around the hooks. If your ceiling is higher, give it a try, you will be able to make
other adjustments to make beautiful drawings. Choose string that is strong, but avoid
thick rope because of the increased resistance to bending; we used 1/8" (3mm) nylon cord,
and lightly melted the ends with candlelight to prevent fraying. |
