free plans  home    gallery
 projects    philosophy    faq


domino effect
magnify
free plans: how to create the
Domino Effect
Basic Description

watch the
domino effect
video clip
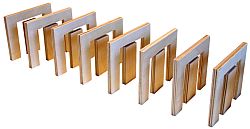
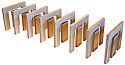
This project takes the domino effect to the extreme. Many of us have seen a large domino topple where hundreds if not thousands of dominoes are set up only to be tipped over in succession. In line with our uniqueprojects style, we wondered what would happen if we made our own dominoes; with a little creativity we stumbled across a series of unique shapes and sizes along with simple mechanical devices used to enhance the topple. The resulting topples are quite spectacular, and if you like, you can view a short video clip of a relatively simple topple.
Materials high-quality plywood or hardwood, wood glue, brads, lightweight string, wood dowels, nylon washers. A complete material list is provided below.
Tools Table saw, sandpaper, hammer, bandsaw, drill press with assorted drill bits, chop saw or crosscut sled (miter guage) for table saw, router, A complete tool list is provided below.
Cost The plan itself is free! Estimated cost of materials: $17
Time 3 hours
Difficulty Easy
Legal Notice Use of this website constitutes acceptance of our terms of service policy.
Similar Projects If you enjoy making the small blocks required for this project, you may also be interested in our block stack and impossible stack projects.


the project plan begins here


step:     1                  


The first step involves acquiring the necessary materials and proper tools. It is best to get everything prepared before commencing because you are free to progress without unnecessary interruptions. There are a wide variety of options with this project, and we are going to describe just a few to provide a starting point.
a unique domino topple

Material List

Item Qty. Description
#1 varies Wood. The quantity depends on how many dominoes you decide to make. For the topple shown in the video clip, we used about 10 square feet (1 square meter) of 3/8" (9mm) Baltic birch plywood; hardwood is also suitable.
#2 - Glue. We used polyurethane glue, but yellow glue will work fine.
#3 - 3/16" (5mm) Wooden dowel.
#4 - 5/8" (16mm) brads.
#5 - Lightweight string approximately 1/16" (2mm) diameter.
#6 - Nylon washers. The I.D. (inside diameter) should be slightly larger than the diameter of the 3/16" dowels (5mm)

Tool List

Tool
table saw  more info
drill press  more info
various drill bits  more info
sandpaper
various clamps  more info
if you are using rough lumber you will also need a jointer  more info and a surface planer  more info
bandsaw  more info
miter saw  more info or crosscut sled (miter gauge) for table saw
router  more info


step 2►


free plans © 2000-2008
terms   privacy policy
 home    gallery
 projects    philosophy    faq