
|
home gallery |
| projects philosophy faq | |
 |
free plans: how to make a Welding Table |
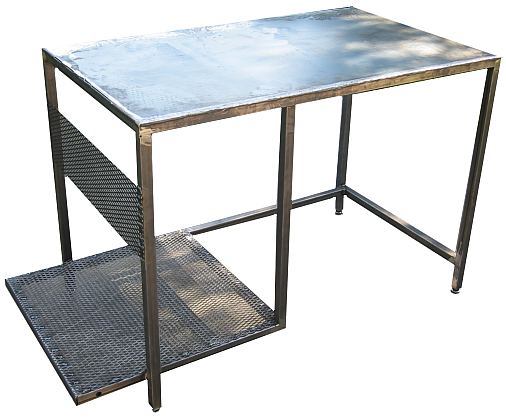
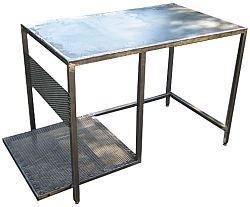
| Basic Description | Here is a straightforward plan to make a steel table perfect for welding or other metalworking needs. It is very sturdy and the undershelf can hold your welder, supplies, and any shielding gas that you may need. In the review section of the plan, we also show how you can add a couple of wheels to make this a mobile welding station. |
| Materials | Square tubing, sheet metal, expanded metal, adjustable feet. A complete material list is provided below. |
| Tools | Metal bandsaw or cutoff saw, hand grinder, clamps, metal-cutting tools. A complete tool list is provided below. |
| Cost | The plan itself is free! Estimated cost of materials: $45 |
| Time | 5 hours |
| Prints | Although the project plan is displayed below, we have provided a layout of the welding table frame to aid in construction. |
| Difficulty | Moderate |
| Legal Notice | Use of this website constitutes acceptance of our terms of service policy. |
| Similar Projects | For a wooden workbench, refer to our mobile workstand plan. |

The first step involves acquiring the necessary materials and proper tools. It is best to get everything prepared before commencing because you are free to progress without unnecessary interruptions. |
 |
| Item | Qty. | Description |
| #1 | - | Square steel tubing. We used about 50' (15m) of 1 1/4" x 1 1/4" (30 x 30cm) by 1/16" (1.5mm) thick steel tubing. All of our material was from a scrap bin at a local metal supplier. |
| #2 | - | Steel sheet for worktop. We found a scrap piece of 12 gauge steel (2.5mm) but a thinner sheet would also be suitable. You can make the table any size you like; our top is 29" x 48" (75 x 125cm). |
| #3 | - | Expanded metal for undershelf. You can also use sheet metal for the shelf, but expanded metal allows dirt and chips to fall through. For the table we made, we needed a piece 27" x 27" with a small notch cut out in one corner; see the plan below for details. |
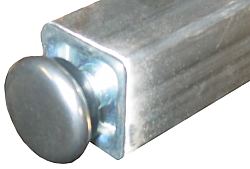
| #4 | 4 | Adjustable feet for the bottom of each leg. Industrial supply shops carry inserts for steel tubing. You can just tap these in for a nice fit. |
| Tool |
| metal bandsaw, cutoff saw or plasma cutter |
| welder |
| portable hand grinder |
| clamps. we used a set of 6 magnetic clamps almost exclusively, but c-clamps will also suffice. |
We started the table by working on the frame. The frame for the table top is a good place to start. Cut four pieces with 45 degree angles and assemble them into a rectangular frame. A set of 90 degree magnetic clamps are ideal for holding all the pieces in their proper position. Weld the frame pieces together on a flat surface - if the surface isn't flat, it will be difficult to make a flat tabletop. We performed all the welding on our shop floor which is made of concrete. We sized our frame to be slightly larger than the sheet metal that will be used for the top surface. This prevents any of the sheet metal extending beyond the frame which could be dangerous. |
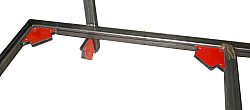 |
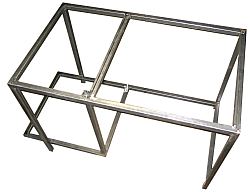
Continue cutting and welding to make the basic frame. We have provided a layout of the welding frame for your reference; printing this layout will be helpful during the construction of the frame. Notice the additional crossmember on the frame to support the tabletop; this provides additional strength to the top and provides a larger welding area to support the vertical undershelf support. After the frame for the top is complete, we worked on the legs and then the undershelf. Note that the undershelf extends beyond the edge of the table; this allows room for tall gas tanks and also provides a place to mount wheels if mobility is desired. See the design considerations section at the end of this plan for details on converting this into a mobile welding table. Note that the undershelf fits inside the legs of the table; this minimizes the amount of required welding and makes for a very strong table. The vertical undershelf support is the only part of the frame that has an exposed end, but the table top will cover the opening in the next step. |
 |
Once the frame is complete, you can add some adjustable feet. If your welder is going to stay in one place and the floor is flat, you can get by without adjustability. If, however, you will be moving the table around, adjustability is critical. We purchased inserts for square tubing at an industrial supply house. These are just tapped into the end of the legs and they include a tapped hole to accept a levellers. |
 |
The final step is is to weld the tabletop and the undershelf to the frame. You can grind down any welds that are protruding from the frame that will interfere with the top. Since the tabletop is slightly smaller that the width of the frame, there is a small valley that makes for easy welding. The expanded metal undershelf requires a small notch to be cut out from one corner to make room for the vertical support. The shelf, is tack welded to the frame every few inches (approximately every 7cm). If you are going to store welding gas or shielding gas on the shelf, you will need to weld on some extra pieces to ensure that the tank is properly stabilized. We welded an extra sheet of expanded metal to further support our gas tank. We also welded some extra pieces of square tube on top of the shelf to locate the bottom of the tank. In conjunction with a chain, the tank is very secure. |
|
MaterialWe used scrap metal for the entire project that which made it very inexpensive. Low carbon steel is ideally suited for this project because it is easy to weld and very strong. Other metals are fine, but they will likely be more difficult to weld and more costly. OrientationWe designed the seating area to be to the right of the shelf for the welder. Keep in mind that this can be reversed if you prefer. SizeYou can make the table any size you like. Make sure that there is enough room for you to sit at it. 24" (60cm) between the leg and the vertical undershelf support is about the minimum for a comfortable work area. 36" (90cm) is much more desirable. The height of the table should be a comfortable working height. A good way to determine a proper height is to stand straight up and set the height at the bend of your wrist. We made our table 36" (90cm) high; you will have to have a tall chair to be able to reach this height however. If you are going to store a gas tank on the undershelf, make sure it protrudes a sufficient amount away from the table. If your tank is 8" (20cm) in diameter, for example, the undershelf should extend about 10" (25cm) or more so that you can weld on brackets to prevent the bottom of the tank from moving around. |
|
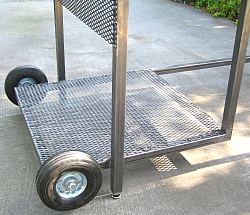
AdditionsWe added wheels as shown on the right to provide for mobility. When the table is at rest, the wheels are suspended in the air, but tipping the opposite end, engages the wheels with the ground. We used 8" (20cm) rubber wheels that we found in a surplus store. We passed bolts through the axle and through a hole drilled in the steel tube to accommodate the wheels. Note that if you are going to use the undershelf for wheels, it needs to be set a proper height (including the height of the adjustable feet). You need to calculate the height of the undershelf so that it leaves the wheels off of the ground when the table is at rest. In our case, we set the centerline of the undershelf to be 4 1/4" (11cm) off the ground so that the wheels are disengaged unless the table is being moved. You can also add hooks and hangers for all of your welding needs. We like to make a plain table and then use it for awhile to determine what our needs are. After some use, you will know exactly what you need and where it should be positioned. |
 |
|
© 2000-2008
terms privacy policy |
home gallery |
| projects philosophy faq | ||