
|
home gallery |
| projects philosophy faq | |
 |
free plans: how to make a Walnut Shell Case |
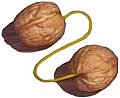
| Basic Description | This walnut shell case secretly houses a small gift, note, or poem. As we describe in the plan below, you simply crack open an inshell (or whole) walnut, remove the nut meat, insert a small item and glue the shell back together. Surprisingly, with a little care and practice, you can create a secretive walnut case that looks and feels like a completely unaltered walnut. This makes for an intriguing gift or party favor and is perhaps best given along with a nutcracker. Read on for a thorough description and several ideas. |
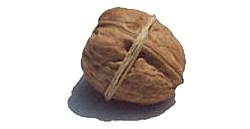
The final step is the gluing step. Cyanoacrylate-based glue works fantastically: it dries quickly and yields an incredibly strong bond. You only need to be careful not to get any of the glue on your fingers and you'll want to avoid any of the glue dripping out onto the outside of the shell - it dries shiny and it makes the shell unsightly. You also should try to avoid too much glue seeping into the walnut because that could affect whatever you inserted. Don't feel tempted to use large amounts; a small amount along with the appropriate pressure will yield a joint stronger than the walnut shell itself. We usually refrain from applying drops of glue directly from the container because it usually provides too much glue for the application. Put some of the glue on a piece of plastic or glossy magazine (so that it doesn't get soaked up); with a small scrap of paper, sop up some glue and apply it to the gluing surface. After glue application, mate the two walnut shell halves and clamp them together by twisting a rubber band around as many times as necessary to get a snug fit. If some glue squeezes out, you may be able to wipe it away with a damp cloth, but hurry, you won't have much time. |
|
Try this out several times because it takes some practice before you can achieve an invisible joint. We also like to let the glue dry and try opening a few to test the bond: if the shell breaks at the joint, its an indication that you didn't use enough glue or the surfaces weren't mating properly. With some patience and practice and you can achieve strong and invisible joints. |
 |
|
© 2000-2008
terms privacy policy |
home gallery |
| projects philosophy faq | ||