 |
free plans: how to make an
Impossible Stack Sculpture |
Basic Description
|
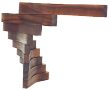
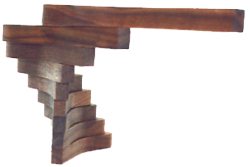
This simple sculpture flaunts itself by apparently defying natural laws. A
series of blocks are stacked in such a way that the topmost one extends beyond
its supports. Viewers are convinced that the blocks are attached to each other, but closer
inspection indicates that they are wholly independent The sculpture relies on some basic physical principles.
Read on for a thorough description and several ideas. |
Begin by aligning all of the blocks into a stack and placing them in their final location, be it
a shelf, a pedestal, or a coffee table. Begin by sliding the top block as far as it can go along the
block below it. If you are using rectangular blocks, this will theoretically be 1/2 the length of
the top block. We like to pull back about an 1/8" (3mm) from the limit or so; this prevents the stack from becoming
unstable and likely to tumble. Next move the second block in relation to the third block.
You will actually be moving both the top and second blocks as you do this. Move this second block to the point that
it is about to tip over, and then, as before pull back a bit to achieve some stability. Continue this process
until you reach the second-to-last block. Each step you take will allow you to move a decreasing
amount as the previous move.
Certain block shapes allow you to add in a slight rotation as you move the blocks
in relation to each other. This can give even more interesting results. Rectangular type shapes
do well with these slight rotations; the version that we made allows for slight rotation but
overall stability is reduced. |
|
wiseGEEK
completely free! |
|
|
|
clear answers to common questions |
|
|
This project relies on the principles of center-of gravity. To explain the physics behind
this, lets consider the use of simple rectangular blocks. When you move the top block in relation to the
second block, you can move it halfway along before it tips. This is because the center of gravity
of the top block is directly in the center. The upper edge of the second block acts as a fulcrum and if
more than half of the top block is moved beyond that point, it will tip over.
With the top block balanced on the second block, together they act as one mass, and that
mass has its own center of gravity which is 1/4 the way back from the second block; therefore you can move those
two blocks in relation to the third block 1/4 of the total length. This pattern continues: 1/6, 1/8, 1/10 etc. So
the formula is: you can move the nth block 1/2n in relation to the n+1 block. For example, you can
move the eighth block 1/(8x2) or 1/16 in relation to the ninth block. The amount that you can
move the blocks increases
if you use a different shape that concentrates the mass to one end of the blocks.
|
 |
Materials
You can use metal, plastic, matte board: any rigid and relatively dense board will
suffice. We chose wood because it is easy to work with and it looks good.
Size
Since the material you are using must be of consistent mass, the only issues with
size are rigidity, aesthetic appeal and safety. If you increase the size drastically, consider
the wind resistance: you don't want a gust of wind to knock down the blocks. If you
get really big, you need to think about safety: don't position the blocks in a place where
they can fall down on anyone
or anything of importance. Also, the rigidity of the individual blocks decreases with size so if you are making a really
big version, you will need to consider this.
Number of Blocks
Depending on the shape you use, we feel that the effect is best when the top block completely extends
beyond the bottom-most block. if you are using rectangles, this level is reached with five blocks: 1/2 + 1/4 + 1/6 + 1/8 = 25/24 which
is greater than 1 (note that these fractions represent the movement relative to the following block, so
the four movements require five blocks).
If you use the shape we used, the top block significantly extends beyond the bottom block with only three
movements (four blocks)!
|
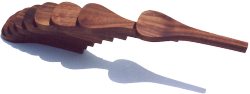 |
Shape
To exaggerate the surprising effect of this sculpture, you want most of the weight at the base, and the least at the end;
You need to balance this with stability and aesthetic appeal. The spoon-like shape we chose satisfied our preferences, but a rectangle with an
off-center hole also works very well, and is more stable than our manifestation.
Insert
To even further exaggerate the effect, you can drill holes in the
bases of the blocks and insert steel rods. This would concentrate more mass at the base thereby
allowing an even more dramatic cantilevered effect.
|
