free plans  home    gallery
 projects    philosophy    faq


mobile workstand free plans: how to make a
Mobile Workstand
Basic Description

watch the
animated intro
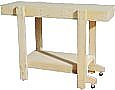
This simple workstand is both stable and mobile. It provides a great surface for cutting, routing, sanding, assembly etc. You can roll it around your workspace by simply tipping one end a few degrees to engage the wheels. In the resting position, the wheels are disengaged and this is the key to its stability. There are no obstructions on the underside of the worktop which allows for efficient clamping. These mobile workstands work very well in pairs, so after you finish your first one, you may want to build another!


step:                 7          


While the workstand is still upside down, this is a good time to attach the leveling feet. Mark the centers of the bottoms of the legs by drawing straight lines between the corners. The intersection of the lines is the center as shown in the picture to the right.


Drill the appropriate holes for the T-nuts or threaded inserts. You can tape on some masking tape around the shaft of the drill bit to notify you how deep to go. Make sure you drill deep enough for the shaft of the leveling feet. Try to drill as perpendicularly into the leg as possible.
connect the corners of the bottom of the legs with lines.  the intersection marks the  center point.  drill perpendicularly to allow  for the threaded insert or T-nut close up view of installed t-nut
Some threaded inserts are screwed in with a Allen wrench whereas T-nuts are just tapped into the hole with a hammer.


With the inserts in place, screw in the leveling feet and flip the workstand over. While you are flipping it over, try not to put too much side pressure on the legs because without the shelf in place, they are not at full strength.
install threaded inserts with an allen wrench leveling foot


◄ step 6   —   step 8►


free plans © 2000-2008
terms   privacy policy
 home    gallery
 projects    philosophy    faq