
|
home gallery |
| projects philosophy faq | |
 |
free plans: how to make a Vertical Wine Rack |
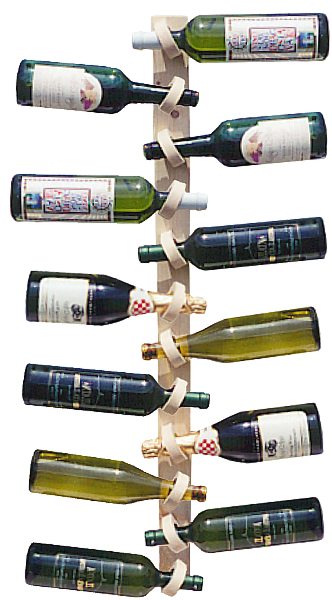
| Basic Description | Here's a free plan for a remarkably simple wall-mounted wine-bottle storage rack that makes for an attractive display. The design of the wine rack holds the bottles in a cantilevered position and employs a minimal use of materials. You can group several of these holders made to the length of your choice to hold anywhere from a few bottles to an extensive collection. In addition to wine, this holder is equipped to hold other bottles such as fine sauces or balsamic vinegar. |
| Materials | wood, screws, paint and primer. A complete material list is provided below. |
| Tools | table saw, bandsaw or jigsaw or scrollsaw, disc sander, hand drill or drill press. A complete tool list is provided below. |
| Cost | The plan itself is free! Estimated cost of materials: $6 |
| Time | 4 hours |
| Difficulty | Moderate |
| Legal Notice | Use of this website constitutes acceptance of our terms of service policy. |
| Similar Projects | Compare this plan to that for our original wine rack. |

The first step involves acquiring the necessary materials and proper tools. It is best to get everything prepared before commencing because you become free to progress without unnecessary interruptions. We recommend that you read through the entire plan and especially the design considerations section before acquiring/assembling all of the requisite tools and materials. There are several options with this project, and it is most prudent to be fully informed of them before making design decisions. |
| Item | Qty. | Description |
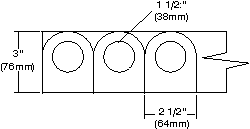
| #1 | varies | wood. amount varies based on size of rack you choose to make. with a board 3/4" x 3" x 60" (20 x 150 x 1500mm) you can make a rack that hold 10 bottles. we used pine which is very soft and easy to work with; for added durability it is better to use a harder wood such as poplar. |
| #2 | - | paint and primer |
| #3 | 3 or 4 per rack | mounting screws (length and type vary dependent on the wall you are mounting to). refer to the design considerations section at the end of this plan for more details. |
| #4 | 2 per loop | flathead wood screws. since we had ten loops on the model we made, we required 2 wood screws. if you are using 3/4" (19mm) thick wood, the screws should be about 1 1/2" (38mm). |
| Tool |
table saw  |
| drill or drill press and 1 1/2" (38mm) diameter drill bit |
| bandsaw , jigsaw or scrollsaw |
| sandpaper |
| disc sander |
| C-clamp |
| small paintbrush |
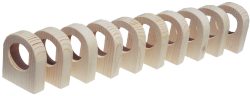
Let's begin by cutting the wood. A 3" (76mm) wide board can be used to create the two parts of the holder; the base and the loops. We cut a 32" (81cm) length to serve as the base. The loops can be cut directly from the remaining wood as shown in the drawing on the right. We cut one and then used it as a template and traced the pattern to create the others. Simply mark out the cut lines, and cut with a cut along it with a bandsaw, jigsaw or scrollsaw and then sand down to the line with a disc sander; drill the hole with a drill or drill press (preferred). We recommend that you use 1 1/2" holes (38mm). Even though the necks of most wine bottles are 1 1/10" (28mm) we want to make sure that the holder can accommodate virtually any bottle. Note that the larger hole, does not sacrifice the holding ability of the rack. Make sure you back up the piece that you are drilling through with some scrap wood so you don't get any tearout where the bit exits your wood. |
 |
 |
Next you need to lay out the location of the loops. We made a zig-zag line back and forth across the base at a 45 degree angle as shown in the photo on the right. Each loop will be fastened to the base with a pair of wood screws from behind. Mark hole locations for the loops so that the screws will not hit the large hole you created in each loop. Drill through clearance holes for the wood screws. | 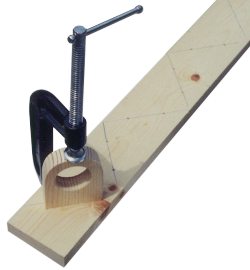 |
Clamp a loop in the proper location and using the clearance holes that you just created as a guide, drill pilot holes in the bottoms of the loop to accept the wood screws. The clamp should be firm but do not overtighten because you might crack the loop. After drilling pilot holes, drive a pair of wood screws to securely fasten each loop to the base. Since we were using pine (a soft wood) we did not have to countersink the heads of the screw. Harder woods may require countersinking because it is critical that the screwheads be completely below the surface of the wood; failure to do this will make it impossible to seat the wine rack against the wall. To complete the assembly, drill three or four through clearance holes between loops to accommodate for the mounting screws. Make sure that you provide mounting holes at the ends of the rack and in the middle. |
 |
All that is left is the coating. We lightly sanded all surfaces to make sure that there were no sharp edges or rough areas. After a coat of primer dried, we finished with some durable paint and let everything dry. You may want to recoat with paint or follow with a clear polyurethane coat to increase the durability of the coating. |
mounting the wine rackTo use this wall mounted wine rack, you need to firmly fasten it to a wall or other rigid surface. Finding wall studs would be ideal, but using toggle bolts is fine. If you have plaster, or brick walls, use appropriate fasteners. If you would like to hide the screw heads (nails will probably not be strong enough) you can drill a counterbore to recess the screw head below the surface of the wood; you can cover these holes with plugs. |
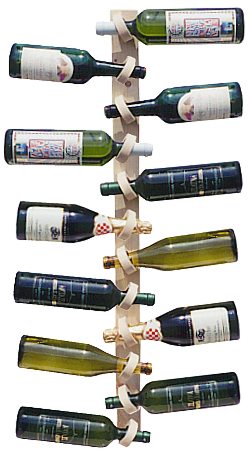 |
design considerationsdimensionsThickness: We used a standard 3/4" (19mm) thick board for our wine rack; Thinner stock would probably present stability problems and is not recommended. Width: The width of the base and loops is variable, but 3" (76mm) worked well because a simple zig-zag line worked well for the layout. Length:You can increase or decrease on the length as desired. If you increase the length, ensure that you provide enough mounting screws to securely fasten the rack to the wall. Distance between loops: We used the zig-zag layout lines as our guide; this technique provides a very pleasing and functional distance between wine bottles as shown on the right. You can position the loops further apart, but that would be a less efficient use of space. Positioning the bottles closer together is not recommended because inserting and removing bottles would become more cramped and therefore difficult. |
|
materialsWe used pine because it is easy to work with. A stronger wood would have been better, but almost any wood would be suitable. We wouldn't stray from wood though because it is strong enough to do the job, but soft enough so that you don't have to worry about scratching or threatening the glass bottles. shapeYou can embellish the design by altering the shape of the components. The version that we made used a simple rectangular shape for the base: this can be replaced with any shape you like as long as it will provide a firm base. The loops can also be altered as long as the centerline of each loop is at least 2 1/2" (65mm) from the wall. |
|
© 2000-2008
terms privacy policy |
home gallery |
| projects philosophy faq | ||