
|
home gallery |
| projects philosophy faq | |
 |
free plans: how to make a Wine Rack |
| Basic Description | Since most wine gets better with age, wine enthusiasts need a method to store their bottles. Below you
will find a free plan for a remarkably simple wall-mounted bottle storage rack that attractively displays
your collection. We describe several layouts to maximize
the use of available wall space. The design employs efficient use of materials; you won't believe that
you can securely hold so many bottles with so little wood. |
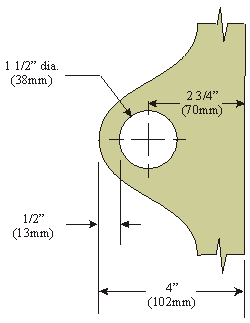
Next, you can cut the wine rack to its final shape. Essentially this project requires you to create a rigid structure with holes held out from the wall. We will make the holes in the following step, but we need to consider them now when we are preparing to cut the board. We recommend that you use 1 1/2" holes (38mm). Even though the necks of most wine bottles are 1 1/10" (28mm) we want to make sure that the holder can accommodate virtually any bottle. Note that the larger hole, does not sacrifice the holding ability of the rack. The centerline of this hole should be about 2 3/4" (70mm) (ours was a bit more; 2" (5cm) is the minimum) from the wall - this will leave you plenty of room in case you want to store wider bottles. Lastly, we recommend that you keep 1/2" (13mm) wall thickness on the outside of the hole, which means that the entire rack should be 4" (102mm) wide. |
 |
You should review the entire plan and especially the design considerations section at the end of this plan before deciding on the shape you want to pursue. We made our rack using a simple sine curve because the recessed areas are used by the opposing rack thereby efficiently using the wood. See the graphic on the right. You can use the pattern that we used by printing it out and transferring it to the wood in succession until you have the desired number of holes. Note that since the racks are offset, you need more slightly more wood than the final length of the racks. We recommend that you distance the centerlines of the holes 6" (150mm) apart, so your board will need to be 3" (75mm) more to accommodate for this offset. |
 |
After marking your line, cut along it with a bandsaw, jigsaw or scrollsaw. Note that if you are using a bandsaw, confirm that the board will not interfere with the body of the machine as you progress through any part of the cut. If you made excessively steep angles on the curve, this may become a problem. You are using both sides of this cut, so you need to be accurate: if you are not comfortable with your ability to cut right on a line, you can mark the pattern so that there is a little excess between the two halves - this way you can cut near the line and avoid having to be precise. If you are going to do this, keep in mind that you need to maintain at least 2" (5cm) between the centerlines of the holes and the edge of the rack to ensure that the bottles will not interfere with the wall that you mount the rack to.
|
© 2000-2008
terms privacy policy |
home gallery |
| projects philosophy faq | ||