
|
home gallery |
| projects philosophy faq | |
 |
free plans: how to make a Wine Rack |
| Basic Description | Since most wine gets better with age, wine enthusiasts need a method to store their bottles. Below you
will find a free plan for a remarkably simple wall-mounted bottle storage rack that attractively displays
your collection. We describe several layouts to maximize
the use of available wall space. The design employs efficient use of materials; you won't believe that
you can securely hold so many bottles with so little wood. |
| Materials | wood, mounting screws, finishing oil. A complete material list is provided below. |
| Tools | table saw, bandsaw or jigsaw or scrollsaw, drum sander or oscillating spindle sander (if you plan to surface rough boards you will also need a jointer and surface planer). A complete tool list is provided below. |
| Cost | The plan itself is free! Estimated cost of materials: $7 |
| Time | 3 hours |
| Difficulty | Moderate |
| Legal Notice | Use of this website constitutes acceptance of our terms of service policy. |
| Similar Projects | If you enjoy this project, you may also be interested in our project for another winerack. |

The first step involves acquiring the necessary materials and proper tools. It is best to get everything prepared before commencing because you become free to progress without unnecessary interruptions. |
 |
| Item | Qty. | Description |
| #1 | varies | wood. amount varies based on shape and size of rack you choose to make. with a board 3/4" x 6" x 39" (20 x 150 x 1000mm) you can make two racks that hold 6 bottles each. |
| #2 | - | finishing oil  or paint with primer or paint with primer |
| #3 | 3 per rack | mounting screws (length and type vary dependent on the wall you are mounting to). refer to the design considerations section at the end of this plan for more details. |
| Tool |
| table saw |
| drill press and 1 1/2" diameter drill bit |
| bandsaw , jigsaw or scrollsaw |
| sandpaper |
| drum sanding attachment for drill press or spindle sander |
| not required: surface planer (only required if you will be surfacing rough stock) |
| not required: jointer (only required if you will be surfacing rough stock) |
| optional: router with roundover bit
|
We recommend that you read through the entire plan and especially the design considerations section before acquiring/assembling all of the requisite tools and materials. There are several options with this project, and it is most prudent to be fully informed of them before making design decisions.
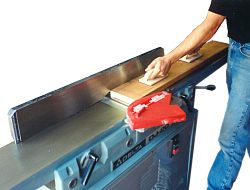
We will start by preparing the wood. If you are surfacing rough lumber, then you will have to follow the basic steps of surfacing. If you are using surfaced lumber you can omit this step. We used a 39" (1m) long piece of rough cherry and jointed a face until it was flat. As always, ensure that your board is free from any nails or staples to save your jointer blades. Position the concave side down. |
 |
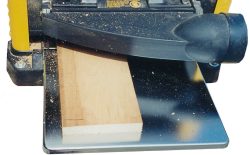
Next, plane the opposing face so that it parallel to the first side. Make several passes removing a small amount of material each time until you reach a point where the entire rough surface has been removed. |
 |
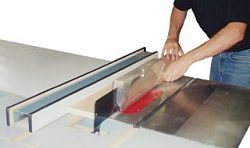
Joint one of the edges by performing several passes until it is flat. Lastly, rip the remaining edge with the table saw. You don't have to worry about the ends of the board because you can trim them after you finish the upcoming cuts. |
 |
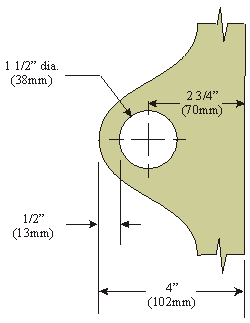
Next, you can cut the wine rack to its final shape. Essentially this project requires you to create a rigid structure with holes held out from the wall. We will make the holes in the following step, but we need to consider them now when we are preparing to cut the board. We recommend that you use 1 1/2" holes (38mm). Even though the necks of most wine bottles are 1 1/10" (28mm) we want to make sure that the holder can accommodate virtually any bottle. Note that the larger hole, does not sacrifice the holding ability of the rack. The centerline of this hole should be about 2 3/4" (70mm) (ours was a bit more; 2" (5cm) is the minimum) from the wall - this will leave you plenty of room in case you want to store wider bottles. Lastly, we recommend that you keep 1/2" (13mm) wall thickness on the outside of the hole, which means that the entire rack should be 4" (102mm) wide. |
 |
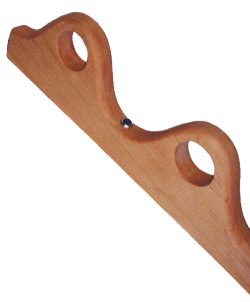
You should review the entire plan and especially the design considerations section at the end of this plan before deciding on the shape you want to pursue. We made our rack using a simple sine curve because the recessed areas are used by the opposing rack thereby efficiently using the wood. See the graphic on the right. You can use the pattern that we used by printing it out and transferring it to the wood in succession until you have the desired number of holes. Note that since the racks are offset, you need more slightly more wood than the final length of the racks. We recommend that you distance the centerlines of the holes 6" (150mm) apart, so your board will need to be 3" (75mm) more to accommodate for this offset. |
 |
After marking your line, cut along it with a bandsaw, jigsaw or scrollsaw. Note that if you are using a bandsaw, confirm that the board will not interfere with the body of the machine as you progress through any part of the cut. If you made excessively steep angles on the curve, this may become a problem. You are using both sides of this cut, so you need to be accurate: if you are not comfortable with your ability to cut right on a line, you can mark the pattern so that there is a little excess between the two halves - this way you can cut near the line and avoid having to be precise. If you are going to do this, keep in mind that you need to maintain at least 2" (5cm) between the centerlines of the holes and the edge of the rack to ensure that the bottles will not interfere with the wall that you mount the rack to.
With the pattern cut, lets drill the holes. We used a 1 1/2" diameter drill bit (38mm). You can use a smaller or larger bit, but test it out in some scrap wood before proceeding. Make sure you back up the piece that you are cutting through with some scrap wood so you don't get any tearout where the bit exits your wood. At this point, you can provide an edge detail if you like. We added a simple roundover with a roundover bit in a table router. Do not make a detail on the mounting face of the wine rack because this will compromise stability. Also, we recommend that you do not remove a significant amount of material on the inside surfaces of the holes - doing so will diminish their effectiveness. We simply knocked off the corners of the holes with sandpaper. |
Now lets finalize the shape. You can use an oscillating spindle sander, disc sander, or hand sanding to get the wine racks to the desired shape. |
 |
Next lets drill the mounting holes. We drilled three clearance holes through the valleys or lowpoints of the rack - one at each end, and one in the middle. We used toggle bolts and mounted the wine rack to a hollow wall made out of drywall. We used finish washers as shown on the image on the right, but you can also counterbore the mounting holes and cover the holes with plugs if desired. |
Next, lets prepare the wood for a finish by thoroughly sanding. We started with a 100 grit sandpaper and knocked off the corners of the holes and proceeded through the following grits: 120, 150, 180, 240, 320, 400. Remember that the beauty of the final product is highly dependent on your patience during this step.
With all of the pieces sanded, they are ready for a finish. You can use a stain and follow with a polyurethane. We used antique oil which is an oil/ varnish blend consisting of mineral spirits, oil, and a spar varnish. After wiping on with a brush and waiting for about 5 to 10 minutes, we wiped of the excess with a clean rag. We let it dry overnight and repeated this process two more times. For more information regarding finishing, consider Understanding Wood Finishing by Bob Flexner.
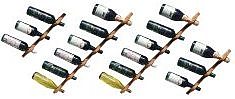
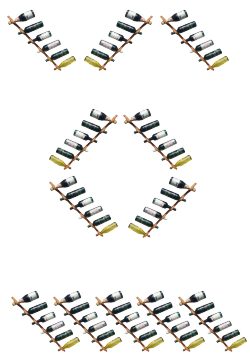
mounting the wine rackTo use this wall mounted wine rack, you need to firmly fasten it to a wall or other rigid surface. Finding wall studs would be ideal, but using toggle bolts is fine. If you have plaster, or brick walls, use appropriate fasteners. If you would like to hide the screw heads (nails will probably not be strong enough) you can drill a counterbore to recess the screw head below the surface of the wood; you can cover these holes with plugs. layoutThere are many layouts that you can employ to achieve different looks or to maximize the bottle-holding capacity of your wall space. You can arrange several of these racks in parallel orientation or in contrasting angles. See the images on the margin for some options: use your imagination! |
 |
This wine rack is very versatile and can handle several alterations and customizations.
Thickness: We used a standard board for our wine rack, and stability is not an issue as long as it is suitably fastened to a wall. We wouldn't recommend using thinner stock, but thicker stock is of course acceptable. You may want to test the thickness by drilling a hole in some scrap wood and testing how the bottles act. Width: The distance between the centerline of the holes and the wall should be at least 2" so that standard bottles will be accommodated. We used a larger dimension to be able to handle larger diameter bottles. Using wider boards is unnecessary and wasteful. Length:You can increase or decrease on the length that we used. Make sure that you have enough width to be able to suitable mount the rack to a wall. Distance between holes: We put our holes 6" apart. We tested many different dimensions, and discovered that 6" was a good amount
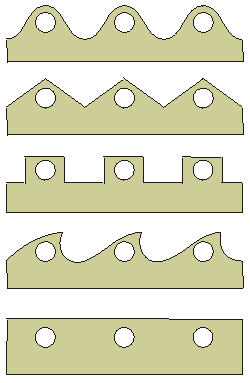
materialsWe used cherry because we had some extra after making the magazine holder. Almost any wood would be suitable. We wouldn't stray from wood though because it is strong enough to do the job, but soft enough so that you don't have to worry about scratching or threatening the glass bottles. shapeWhen you are choosing your pattern, keep in mind that you may want to minimize the interior radii to the size of your smallest sanding drum. If you cannot get into those spaces with a power sanding device, the sanding step will be much more time-consuming. Note that you can use a simple rectangular piece for this project; it would be much easier to make but use unnecessary material. The wave pattern shown in the margin may be attractive, but since it is not symmetrical, the opposing piece of wood would not have a matching pattern, so there would be wasted material. |
 |
|
© 2000-2008
terms privacy policy |
home gallery |
| projects philosophy faq | ||