
|
home gallery |
| projects philosophy faq | |
 |
free plans: how to make a Wall Mirror |
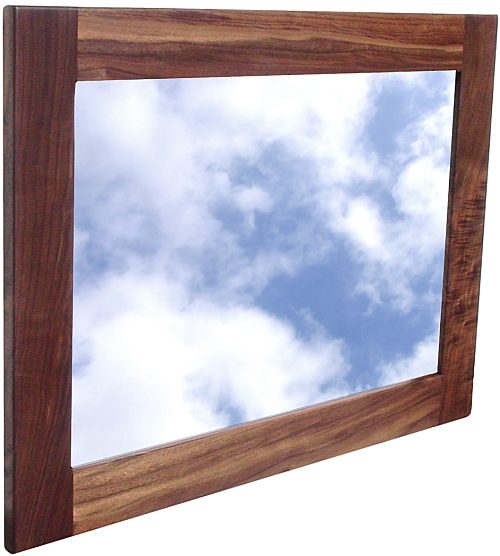
| Basic Description | Here is a free plan for a framed wall mirror that uses mortise and tenon joinery. You can use the same technique described below to display photographs or paintings. This project requires a relatively small amount of wood and with sufficient sanding and proper finishing, you can achieve a fantastic wall hanging that will make your room appear bigger and more airy. |
| Materials | Wood for frame, mirror, mounting hardware, wood glue, finishing oil, recommended: backing board (hardboard or cardboard). A complete material list is provided below. |
| Tools | Table saw, drill press, various clamps, sandpaper. optional: router with roundover bit. A complete tool list is provided below. |
| Cost | The plan itself is free! Estimated cost of materials: $20 |
| Time | 3 hours |
| Difficulty | Easy |
| Legal Notice | Use of this website constitutes acceptance of our terms of service policy. |
| Similar Projects | If you enjoy this project you may also be interested in our free plan for a framed weave. |

The first step involves acquiring the necessary materials and proper tools. It is best to get everything prepared and set-up before commencing because you become free to progress without unnecessary interruptions.
| Item | Qty. | Description |
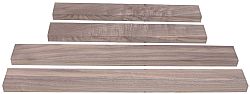
| #1 | - | Wood for frame. We cut four pieces out of one walnut board. You can use any size you like; the finished dimension of the pieces in our case was: (2) 7/8" x 2 1/2" x 22" (22 x 64 x 556mm) and (2) 7/8" x 2 1/2" x 18" (22 x 64 x 456mm). |
| #2 | 1 | Mirror. |
| #3 | - | Wood glue; we used polyurethane glue |
| #4 | - | Finishing oil |
| #5 | 1 | Recommended: backing board (hardboard or cardboard the same size as mirror) |
| #6 | 1 | Mounting hardware |
| Tool |
| table saw with miter gauge or crosscut sled |
| measuring tape |
| drill press or mortiser |
| clamps |
| sharp chisels |
| square |
| sander and varying grits of sandpaper |
| if you are starting with rough lumber, you will need a jointer and planer |
| router with rabbeting bit (optional: roundover bit) |
We recommend that you read through the entire plan and especially the design considerations section before acquiring/assembling all of the requisite tools and materials. There are several options with this project, and it is most prudent to be fully informed of them before making design decisions.
Now that you have all of the tools and materials, we can jump right into the project. Let's start by preparing the wood for the frame. We started with one piece of walnut lumber and surfaced two faces and one edge (using the jointer and planer). If you are using previously surfaced lumber, you can omit this process. Rip the board to the width that you want the frame to be. Then crosscut to length. Squareness is critical here, so we recommend that you confirm that your tools and fences are square. If you have a planer you may want to send all pieces through on edge and side-by-side to guarantee that they are identical. |
 |
Now you are ready to work on the joinery. In our plan for the framed weave, we used a half lap joint and such a joint ends up being surprisingly strong. To try something different, we are going to use mortise and tenon joinery in this frame. There are plenty of ways to create the mortises and tenons but we are going to show you one simple way. |
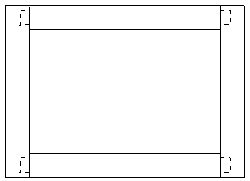 |
One critical step in creating the mortises and tenons is marking. If you precisely mark what material you need to remove, mistakes are less common. We like to make the mortises about 1/3 the thickness of the material, so we used a 1/4" (7mm) bit in the drill press. A forstner bit is recommended. You may want to make a simple fence that you clamp to the table on the drill press to stabilize the pieces you are drilling into. Make a sequence of holes next to eachother until you have removed the material within your markings. You can clean up the missed areas with a hand chisel. |
 |
Next you need to make the tenons. There are many ways to accomplish this, but we prefer using a crosscut sled on the table saw and making repeated passes to complete this process. Set the table saw blade as high as the thickness of the mortise walls, and then back off a little bit. Make a test cut, flip the piece of wood over and repeat. Test this tenon in the mortise and increase the blade height until you have a snug fitting tenon. With proper planning, you can use this same setup for all four faces of the tenons. |
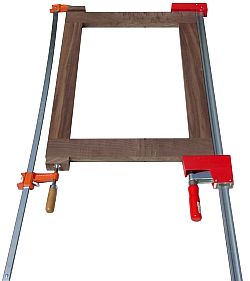
Check the fit of everything and confirm that all the pieces mate snugly. Before assembly, you could perform some sanding at this stage. There are some areas that will be difficult to sand after assembly so you can sand at this stage, but you need to be careful not to excessively sand the joints. You should also refrain from creating round-overs on those edges that will mate with another frame piece. Next you are ready for assembly. Confirm and mark the orientation of the pieces so that you don't have to worry about this when the glue is out and drying fast. We used polyurethane glue and applied a small amount on the tenons and clamped the frame together with bar clamps. Confirm that the frame is square and let it dry. A good way to check for squareness is to measure the diagonals of the frame: if the dimensions are identical, they the frame is square. |
 |
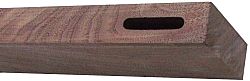
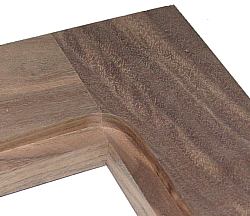
Once the glue has dried, you need to create the necessary edge profiling. We used a rabbeting bit and removed the material on the inside edge. We set up the bit in a router in a router table and moved the frame around the bit using the bearing as a guide. You should make a few passes with the router, raising the bit each time so you are not removing too much material at any given time. The corners of the rabbet (as shown to the right) need to be removed: we simply used a chisel to remove the material. You can also rout additional profiles on the other edges of the frame. We used a roundover bit to round over one of the outside edges. We knocked down the remaining edges with sandpaper. |
 |
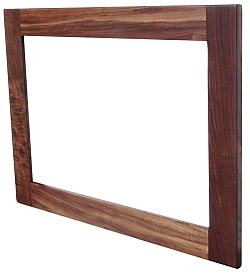
We sanded with 100 and 120 grit paper and then routed all edges with a roundover bit and then continued sanding with 180, 220, 320 and 400 grits. Once the frame has been sanded, it is ready for a finish. You should complete the finishing before you proceed with the weaving. You can use a stain and follow with a polyurethane. We used antique oil which is an oil/ varnish blend consisting of mineral spirits, oil, and a spar varnish. After wiping on with a brush and waiting for about 5 to 10 minutes, we wiped of the excess with a clean rag. We let it dry overnight and repeated this process two more times. For more information regarding finishing, consider Understanding Wood Finishing by Bob Flexner. Once the finish has dried, you can insert a mirror. Have the glass shop cut it to about 1/8" (3mm) undersized in both the length and width. Cut a backer board to be mounted behind the mirror, it can be either hardboard or cardboard. This will protect the mirror from being scratched from behind. You can mount the mirror and backer board to the frame using glazier's points or similar hardware. Finally, you simply need to attach some hanging hardware: you can use clips or wire that is used to hang paintings; these are available at most hardware stores. |
 |
design considerations |
|
sizeYou can choose any size you like, but you should make sure that the ratio of the width of the frame to the size of the frame suits your taste. If you choose a very large size you may want to use a heavier mirror than you can use on a smaller one. |
|
other ideasYou can make all sorts of variations on this project. The tops of the stiles (vertical frame pieces) can be planed thinner after you have completed the tenons - this will create a reveal between the rails and stiles. You can also set the stiles in from the ends of the rails thereby creating overhanging rails. These frames can also be used for paintings and photographs. We urge you to be creative! |
|
© 2000-2008
terms privacy policy |
home gallery |
| projects philosophy faq | ||