
|
home gallery |
| projects philosophy faq | |
 |
free plans: how to make a Vertical Organizer |
| Basic Description |
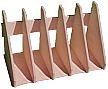
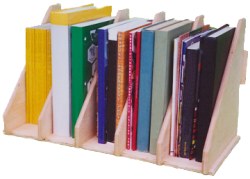
This simple organizer neatly stores papers, files, books, magazines, catalogs etc. We have provided several customization options so that you can accommodate different size items, vary the style, and alter the dimensions. It goes together very quickly with a unique production technique. The organizer must be made with plywood because it would not be able to withstand the expansion and contraction associated with solid wood. |
| Materials | High-grade plywood, brads, finishing oil (or paint) and wood glue. A complete material list is included in the printable accompaniment to the plan and is also listed below. |
| Tools | Table saw, dado set, router. A complete tool list is included in the printable accompaniment to the plan and is also listed below. |
| Cost | The plan itself is free! Estimated cost of materials: $15 |
| Time | 4 hours |
| Prints | Although the project plan is displayed below, certain plan elements work best on paper. We have compiled a printable accompaniment to this plan which includes a complete bill of materials, tool list, plan of procedure, and drawings. |
| Difficulty | Moderate |
| Legal Notice | Use of this website constitutes acceptance of our terms of service policy. |

The first step involves acquiring the necessary materials and proper tools. It is best to get everything prepared before commencing because this allows you to progress without unnecessary interruptions. If you haven't already done so, you need to print the printable accompaniment to this plan which includes the complete material and tool lists. These are convenient to take with you to your local supply store to pick up everything that you need. We have also provided material and tool lists below along with some links for online purchase. |
 |
| Item | Qty. | Description |
| #1 | 1 | approx. 1/2" (12mm) thick plywood, good both sides with no voids in the core plys  |
| #2 | 1 | wood glue |
| #3 | 1 | double-sided tape |
| #4 | 12 | finish brads |
| #5 | 1 | finishing oil or paint with primer |
You can make any of several alterations to the dimensions and design that we are using. Before you make any changes and purchase materials, however, we recommend that you read through the entire plan and, in particular check the design considerations section at the end of this plan.
| Tool |
| table saw |
| band saw or jig saw |
| dado set ; or router with straight bit |
| pattern-making or flush trim router bit |
| clamps see plan for details |
| brad nailer or hammer and nail set |
| disc sander or block plane |
| power sander |
We have omitted the most common tools from this list. Furthermore, some of the tools on the list are not necessarily required. If you do not have all of the tools on the list you may be able to use an alternative but you will surely need to read through the entire plan first.
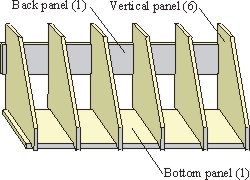
As described in the design considerations section below, there are many alterations that you can make to the basic design we will describe in this plan. We have provided dimensions for the select few who will be making exactly the version we are showing in this plan. Before we dive into the project, let's take a look at how it will be constructed. The graphic on the right shows the isometric view. There are six vertical panels set into dadoes (or grooves) in both the back and bottom panels. Note that we will cut the dadoes or grooves into a larger piece of wood, and then cut it into two pieces to create the back and bottom. This technique simplifies the process, and guarantees that all of the dadoes or grooves will line up properly. First, cut the plywood. To cut the pieces, use the drawing in the printable accompaniment as your guide; if you choose to make any variations, your cutting pattern will be different. For aesthetic reasons, the grain direction of the vertical panels should match. For the vertical panels, we will cut slightly oversized pieces which will be cut and sanded to the final dimensions in subsequent steps. The backs and bottoms of the vertical panels should be cut on the table saw to ensure that these two surfaces are square to each other. All of the other cuts can be made with a bandsaw or jig saw. |
 |
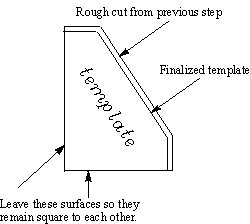
Next we are going to create a template out of one of the vertical panels - choose the smallest one. Draw some lines approximately 1/8" (3mm) from the cut edges; use a disc sander, block plane, or hand sander (with a course grit) to remove the necessary material. You should refrain from doing anything to the back and bottom of this panel (as shown in the graphic to the right) because you may make them out of square. Confirm that you have removed enough material by checking the template against each of the other vertical panels: there should be excess material on the remaining vertical panels in comparison to the template. Once you have the shape finalized, use a pencil to mark this vertical panel as the template. If you do use a hand sander for this step, make sure that you do not make the edge out of square (the edge of the plywood does not provide a very wide sanding surface). |
 |
With the template completed we can use it to finalize the dimensions of the other vertical panels. You can complete this step with a hand router or one mounted to a router table; you can use either a flush trim bit or a pattern-cutting bit. We used a 3/4" (19mm) pattern-cutting bit on a router table with a fence for safety. We cut a notch in a piece of melamine to provide clearance for the router bit; then we lined up the outside surface of the melamine with the tangent of the ball bearing on the pattern bit. With the fence in place we will be able to push the piece firmly against the router table and fence to guarantee a good and safe cut. Securely tape the template to the piece you are working on using double-sided tape. Both pieces need to be free from dust to adequately mate them. You should align the back and bottom since these surfaces have already been squarely cut when we prepared them in step 2. You may have to flip the two boards upside down or adjust the depth of the router bit to ensure that the bearing rides against the template and not the piece to be cut. |
 |
When you are finished with the trimming operation, you can separate the two boards by carefully sliding a utility knife in between them and sliding along the gap. Try not to slice into the plywood while doing this. Trim all of the remaining panels to size using this technique. |
 |
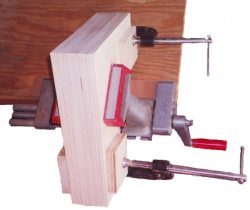
Sand the entire group of vertical panels to size. We stacked them together and clamped them with C-clamps and then put the entire group into the vise. You may want to include a few scraps of wood between the clamps and vertical panels to prevent surface marring. Stacking them all together provides a sufficient sanding surface to guide your sander but you still need to confirm that you are sanding squarely to the workpiece - periodically check this. When repositioning the stack in the vise, always keep at least one c-clamp engaged to maintain the alignment of the stack. Once you have sanded the vertical panels to matching dimensions you can unclamp the stack. |
 |
Let's cut the dadoes or grooves. (The term "dado" refers to a groove cut into a board going against the grain whereas the term "groove" refers to a groove cut with the grain of the wood; the grain of plywood, however, alternates with each ply so it is unclear which term to use - perhaps the the grain direction of the outermost ply should be used - we will use the term dado for the remainder of the plan). We are doing this on the table saw, but you could also use a router. Set depth at 1/2 thickness of the material, 1/4" (6mm) in our case. Remember, we are cutting dadoes for the bottom and back simultaneously. Cut your dado in a test piece first, and check for depth and fit. Ideally, the dado should allow the panel to enter snugly and slide back and forth. Any tighter will make the final assembly very difficult or impossible, and any looser will yield visible gaps in the final product. Cut the first dado through 1/2" (12mm) from the end. You can put this panel in a rabbet if you prefer, but this will make final assembly a little more difficult. Rotate the panel 180 degrees and, using the same fence setting, cut another dado 1/2" (12mm) from the other end. This system guarantees symmetricity and speeds the entire process. now using the same technique, cut the remaining dadoes. As shown in the printable accompaniment our dimensions were first cut 1/2" (12mm), second cut 7 3/8" (187mm), third cut 14 1/4" (362mm): rotating the board each time, these three fence settings yield the 6 necessary dadoes. Remember that the fence is determining the distance to the edge of the dado not to the centerline; make sure you consider this when you are making your own calculations. |
With the dadoes cut, we can cut the board to create the back and bottom panels. We measured the width of the vertical panels, and use this to determine the width of the bottom. We let the verticals be a little proud - 1/8" (3.5mm) in the front and the back; since our vertical panels are 8 7/8" (222mm) wide, we cut the bottom panel to be 8 1/2" (215mm) wide. The width of the back is not functionally critical and will be out of view once items are stored in the organizer. We simply used the remaining piece for the back: approx. 6 1/2" (165mm). You can also have two or more backs, but of course this complicates the assembly process. Once the back is cut, you can also give it a shape on the bandsaw as shown in the design considerations section of this plan. |
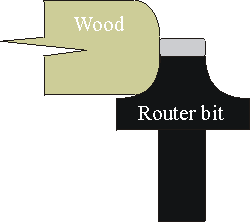
This step is optional, but recommended. Using the router, preferably in a router table, create an edge profile around the edges of all the pieces except the back and bottom of the vertical panels (they need to go into the dadoes). If you use a router bit with a guide bearing, ensure that it doesn't ride into the dado when profiling the back and bottom panels - if you use a router table and a fence as shown in step 4, this problem is eliminated. We used a 1/4" roundover bit but set the fence beyond the tangent of the ball bearing so that we didn't rout the full 1/4" roundover; when you repeat this on both sides of the wood, it creates a profile as shown on the right. Regardless of which profile you choose, use a test piece first - and perform the test on both sides of the wood to ensure that you achieve the desired effect. |
 |
Now we are ready for final sanding. Progress through the sandpaper grits stopping at 320 or preferably 400. Be careful not to oversand, especially the vertical panels because they may become too small for the dadoes. Keep in mind that it is much easier to sand these items now when they are separated; once they are glued together its almost impossible to get sandpaper into the tight corners that are created. Once everything is sanded sufficiently, confirm that everything fits together properly.
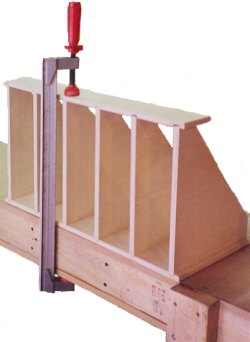
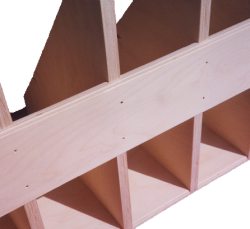
Now we are ready for final assembly and finishing. If you have a brad nailer, you can complete the assembly all at once: simply nail everything together after applying glue. If you are using a hammer and nail set, we recommend doing it in two steps as we will describe below. Glue the bottom by applying wood glue to both surfaces (the vertical panels and the dadoes). To clamp, use the back panel as a caul (see photo to the right); this provides a flat surface to clamp on and it yields the proper alignment to the panels. Wait until the glue gets gummy, approximately 30 minutes to one hour and remove any squeeze-out. Once the glue is dry, you can glue the dadoes in the back panel and tap in brads [Item #4]. Its best to glue both surfaces so you should mark where the back panel will be attached so you know where to apply glue on the vertical panels. Let the glue set and remove any squeeze-out as before. |
 |
Complete any necessary final sanding, and apply finish. You can use a stain and follow with a polyurethane. Regardless of what you use, follow the manufacturer's directions. We used three coats of antique oil which is an oil/ varnish blend consisting of mineral spirits, oil, and a spar varnish. For more information regarding finishing, consider Understanding Wood Finishing by Bob Flexner. |
 |
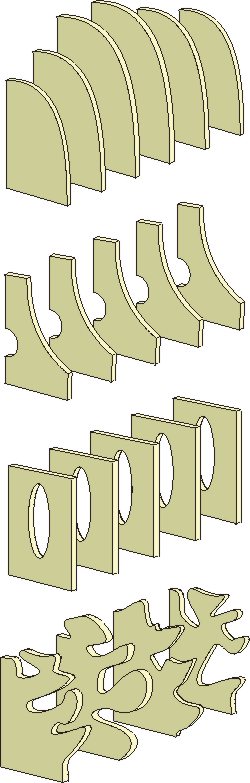
Design ConsiderationssizeWe determined the width of our organizer by measuring the shelf of a bookcase on which it will be placed; you can alter the width of the organizer drastically. The depth and height was determined by the items that we plan to store on it, namely books and catalogs. If you have an alternative use, these dimensions can be increased or decreased without much concern. Make sure that the back panel is wide enough to prevent the items you are storing from tipping backwards. If you are going to store a variety of items then the bottom of the back panel needs to be lower than the height of the shortest item you plan to store in the organizer. You can also alter the distance between the vertical panels. Remember that the purpose of the panels is to provide rigidity to the entire piece and also to ensure that items stored in the organizer remain in a vertical orientation. If you will be storing files on the organizer, you may want to minimize the dimension between the vertical panels; with heavy books that don't tend to tip over, you can increase the dimension. Anything less than 4" (10cm) will be difficult to apply finish and anything more than 12" (30cm) or 16" (40cm) will be weaker. The number of vertical panels you use should be determined by what you will store on it. If you need lots of support you should have more panels. Note that if you choose to use vertical patterns with gradually changing shape, the effect works best with many panels. See the following 'shape' section for more on this topic. shapeIn addition to altering the overall dimensions of the organizer, you can also change the shape of the panels. In the plan above, we used plain rectangles for the bottom and back panels and simple trapezoids for the vertical panels. Since the bottom panel will be supporting all of the items that you store in the organizer we recommend that you maintain the rectangular bottom panel; The vertical panels and back panels, however, can be redesigned. We have included some ideas in the margin shown without the bottom and back panels so you can focus on the differences. Whatever you choose, make sure that you don't lose sight of the function: the bottom of the back panel should be lower than the top of the smallest item that you ever will store on the organizer and the side panels should be wide and tall enough to support an item that is tipped against it. Another idea is to use altering shapes for the vertical panels; or they can be of gradually changing size. If you do opt for a gradual change from one panel to the next, make sure you have a sufficient number of vertical panels so the effect works visually. You can also trim the back panel to an alternative shape. Cut the dadoes as shown in the plan and then trim to the desired shape on the band saw. The back panel will usually be hidden by the stored items so the detailing you do here will most likely go unnoticed. Also keep in mind that if you want to use a pattern-making or flush-trim bit to size the vertical panels, there needs to be enough room in the pattern for the bit itself; certain patterns with sharp inside corners do not provide enough room for the bit. We recommend that you consider what the piece will look like in actual use. When books are placed in the organizer much of the design will be out of view so keep this in mind as you decide which shape to choose. materialsPlywood is almost a requirement in this project. Solid wood expands and contracts with weather changes and the fixed distance between the dads does not allow for this wood movement. Since plywood is a lamination of thin layers of wood in alternating grain directions, the expansion and contractions becomes negligible. You can choose between a wide variety of plywoods, but since the edges are exposed (unless you edgeband them), you will probably want to choose a variety that uses the same type of wood for the core as well as the faces. You will also want to ensure that the core is free of voids so unsightly gaps will not be visible on the exposed edges. The thickness of the plywood can be increased but we have found that the organizer can look too bulky if you go too thick. Thinner plywood would be acceptable for small organizers but would be flimsy for larger ones. |
 |
|
© 2000-2008
terms privacy policy |
home gallery |
| projects philosophy faq | ||