
|
home gallery |
| projects philosophy faq | |
 |
free plans: how to make a Shallow Box |
| Basic Description |
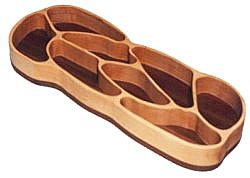
This shallow box is relatively easy to make and the unique technique allows for a very wide variety of possibilities. In the free plans below, we describe a rather complicated use of the technique but we will provide detailed instructions for many other options. Expand your boxmaking horizons beyond ordinary rectangularity! |
| Materials | wood, glue, finishing oil. A complete material list is provided below. |
| Tools | table saw, jigsaw or scrollsaw, thickness planer, disc sander, drum sander or oscillating spindle sander, clamps. A complete tool list is provided below. |
| Cost | These are free plans! Estimated cost of materials: $4 |
| Time | 2 hours |
| Difficulty | Easy |
| Legal Notice | Use of this website constitutes acceptance of our terms of service policy. |

The first step involves acquiring the necessary materials and proper tools. It is best to get everything prepared before commencing because you become free to progress without unnecessary interruptions. |
 |
| Item | Qty. | Description |
| #1 | varies | wood. amount varies based on shape and size of box you choose to make. in the version we describe in this plan, we used 1/4" x 4" x 12" (7 x 100 x 400mm) walnut and 3/4" x 4" x 12" (21 x 100 x 400mm) maple. |
| #2 | - | finishing oil  or paint with primer or paint with primer |
| #3 | - | wood glue, preferably polyurethane glue |
| Tool |
| table saw |
| thickness planer
|
| scrollsaw or jigsaw |
| drum sanding attachment for drill press
or spindle sander |
| various clamps see plan for details |
| disc sander
|
We recommend that you read through the entire plan and especially the design considerations section before acquiring/assembling all of the requisite tools and materials. There are several options with this project, and it is most prudent to be fully informed of them before making design decisions.
Let's start by preparing the wood. The box is basically made out of two boards: a base and a top. These pieces can be glued-up from smaller boards if desired, but we used a single piece for the base and a single piece for the top. To save wood and to give a more elegant look, we used a thin piece for the base. To accomplish this, we used the resawing technique; although there are many methods for resawing, we prefer using the table saw. To resaw with the table saw, simply set the fence so that an equal amount of the edge of your board falls to either side of the blade. Don't forget to account for blade thickness during this process: the centerline of the blade should align with the centerline of the end of the board you are resawing. Note that resawing on the table saw works best with a blade stabilizer. |
 |
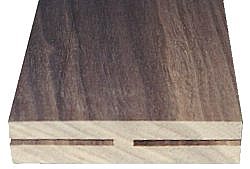
We like to mark one face of the board and ensure that it always stays next to the fence. Remove the splitter and set the height of the blade at about 1/2" (13mm). You can kiss the end of the board and measure to confirm that the kerf is in the center. Readjust the fence if necessary. Once you have the fence location finalized make a complete pass. After this pass, we like to shut off the power of the saw and set up a featherboard to ensure that the board remains tightly against the fence for the remaining cuts. Flip the board over, end over end so that you keep the side you marked earlier against the fence. Now, cut a groove on the opposite edge to the same depth. Raise the blade another 1/2" (13mm) and repeat the process, alternating cuts on the opposing edges of the board. Stop when the top of the saw blade reaches the height of the fence (any higher is unsafe), or when grooves are about 1/4" (6mm) away from eachother as shown in the photo on the right. Ripping through this small bit of material on the table saw can be dangerous. You can complete the cut using a bandsaw or with an ordinary handsaw. The deep grooves that you just made serve as excellent guides for the handsaw and the process is easy and fast. |
 |
Using the thickness planer, smooth the faces that you just cut. These resawn pieces can be glued up edge to edge if you need the extra width for a wider box, or you can use the two pieces to make two boxes. If you are gluing panels together, we recommend doing so after completing step 3.
For the top panel of the box, we used maple and simply surfaced the material so all of the surfaces were square. Finally, crosscut your two boards (the base and top board) to the same size, preferably slightly larger than your final box size.
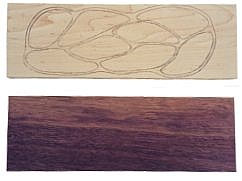
With the boards surfaced and cut to the same size, we can begin to cut the top board into the desired shape. The difficulty of this project depends mostly on the shape you choose. We chose a particularly difficult shape that has many inside curves that all need to be cut and sanded. Basic shapes are significantly easier to handle. You can draw the desired shape on your panel and cut it with the bandsaw. We have provided many ideas in the design considerations section at the end of this plan. We drew our pattern on the computer and printed it out on a laser printer. A hot iron transfers the printer toner to the wood as shown in the photo on the right. If you have another type of printer, you can make a photocopy and then use the ironing technique. Otherwise, you can tape the pattern to the wood and cut through the lines with a hobby knife and darken the scores with a pencil. |
 |
When you are choosing your pattern, keep in mind that you may want to minimize the interior radii to the size of your smallest sanding drum. If you cannot get into those spaces with a power sanding device, the sanding step will be much more time-consuming. |
 |
Next you can cut the pattern to size. If you are relatively skilled on the bandsaw, you can get quite close to the line; its safer though, to leave the line, and finish up the sizing with a disc sander (for outside curves) and a oscillating spindle sander or drum sanding attachment for a drill press (for inside curves). Only cut the interior surfaces at this time. Leave the rectangular shape to the board: this will make the gluing process much easier. You should complete all sanding of the bottom panel and inside surfaces of the top panel at this time. It is very easy to access these areas: once the pieces have been glued together, it will be much more difficult to sand. |
Now, you can glue the base and top panel together. Since they are the same size, they are very easy to align. We used plenty of clamps and melamine cauls to evenly distribute the clamping pressure and to protect the wood. We applied a very thin layer of polyurethane glue to the underside of the top panel. You can use other glues, such as yellow glue, but it will be much more difficult to remove the squeeze out. If you are using yellow glue, you shouldn't use one complete caul on the top; you will need access to remove the squeeze out about 30 minutes after gluing. If you clean up earlier the squeeze-out will be too liquid, and any later it will be very hard. Monitor the drying process and remove the yellow glue after it becomes gummy. |
 |
When the glue has dried, you can remove the cauls and any remaining glue. Polyurethane glue is much easier to remove but it is still tricky in the tight corners of the box. We used a hobby knife and tightened the blade in upside down as shown in the photo on the right. With the blade in this orientation we were able to remove the squeeze out from very difficult locations. |
 |
Next, cut the exterior surfaces of the pattern. Use the scrollsaw or bandsaw to remove all the remaining material. After cutting, you can complete the sanding on the outside curves. We like to knock off all edges at the beginning of the sanding process with a low grit sandpaper. Then proceed to finer and finer sandpaper. Remember that the beauty of the final product is highly dependent on your patience during the sanding process. |
 |
With all of the pieces sanded, they are ready for a finish. You can use a stain and follow with a polyurethane. We used antique oil which is an oil/ varnish blend consisting of mineral spirits, oil, and a spar varnish. After wiping on with a brush and waiting for about 5 to 10 minutes, we wiped of the excess with a clean rag. We let it dry overnight and repeated this process two more times. For more information regarding finishing, consider Understanding Wood Finishing by Bob Flexner. |
 |
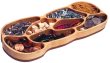
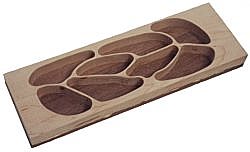
usesThe shallow box has many uses and you can alter the shape to be ideally suited for one of these uses. They can hold writing instruments, office supplies (paper clips, staples etc) coins, small parts, jewelry, and any other small items that need organizing. design considerationsThe shallow box is very versatile and can handle several alterations and customizations. |
|
dimensionsThickness: We used a thin base because we like the elegant look, but you can choose any thickness. You can also glue wood together, face-to-face, before cutting the pattern to increase the depth of the box. Keep in mind that any increases in thickness will give you more material to sand. If you are making a more complicated shape this may be difficult since your drum sanding attachment may not be long enough. Width: To make a shallow box wider than the wood you have, you will need to surface and glue them edge-to-edge. You can glue up a wider base panel immediately after surfacing, but you may want to glue multiple top panel pieces after cutting the pattern - this will allow you to use a bandsaw (instead of a jigsaw) to cut the interior area. Length: The length can be as long as you like, but don't forget the limitations of your tools, i.e. the throat of your bandsaw or jigsaw. Wall Thickness: Thicker walls will of course, provide more strength, but we are very pleased with the strength of our shallow box and no wall is more than 1/8" (3mm) thick. You may want to vary the width of the walls within the same box as shown in the ovular idea on the right. |
|
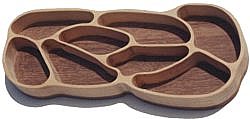
materialsWe used a walnut base and a maple top because we like the contrast. The strong maple top provides extra strength but most woods are suitable for this project. shapeThe number of shapes you can make with this technique is only limited by imagination. You may want to limit the size of the inside radiuses based on the smallest drum sanding attachment that you have. It is difficult to sand in tight areas. You can also make certain interior portions of your design to go all the way through the base panel. Several ideas of this are included in the graphic shown on the right. lidIf you would like to add a lid to your box, you can make a second shallow box to fit around the base. After completing the project as described in the plan above, trace the shape to create a customized and well-fitting lid. Avoid making any internal walls on the lid that may interfere with internal walls on the base. |
 |
|
© 2000-2008
terms privacy policy |
home gallery |
| projects philosophy faq | ||