
|
home gallery |
| projects philosophy faq | |
 |
free plans: how to make a Plinko |
| Basic Description |
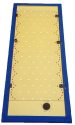
Here is a thoroughly enjoyable project that you can mount on any wall. It's a plinko display in which you place a thin puck at the top and let go. The puck randomly bounces its way amongst a series of pins to the bottom where it is held in place by some hidden magnets. While it may look simple, it takes patience and requires some precise work. We made ours to be 5' (1.5m) tall. We think that you will love making and playing with this project! |
Now lets make the pegs. Count how many you need and calculate the length that you need for each one. We want ours to stick out a little less than 3/8" (1cm) so we are cutting them to 3/4" (2cm). We made a mark on the bandsaw table as a guide and just cut all of them in one shot. If you want to use a fence for this purpose, make sure that you arrange it so the cut pieces don't get bound between the bandsaw blade and the fence. Watch your fingers! After cutting all of the pegs, we took them to the belt/disc sander and carefully sanded one end (the end that will show) and created a small chamfer to remove any burr. Once you have done a few pegs, you can become very efficient at this step. You may want to hold the piece in a pair of clamping pliers to prevent your hands from coming close to the abrasive. You can also perform this step manually by rubbing the pegs on a sheet of sandpaper that you set on a workbench. |
|
© 2000-2008
terms privacy policy |
home gallery |
| projects philosophy faq | ||