
|
home gallery |
| projects philosophy faq | |
 |
free plans: how to make a Plinko |
| Basic Description |
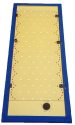
Here is a thoroughly enjoyable project that you can mount on any wall. It's a plinko display in which you place a thin puck at the top and let go. The puck randomly bounces its way amongst a series of pins to the bottom where it is held in place by some hidden magnets. While it may look simple, it takes patience and requires some precise work. We made ours to be 5' (1.5m) tall. We think that you will love making and playing with this project! |
All that is left is to create the pucks. We left this for the last step because you need to measure the distance between the pegs now that all the coatings (and their resulting thicknesses) have been applied. The puck diameter should be about 1/16" - 1/8" (15-30mm) less than the smallest distance between any two pegs. You can also make the puck smaller than this but it will move faster and its movement may not be as random. We recommend that you try out many different materials for the puck to determine which works best for your situation. We tried a scrap of the acrylic door, plywood, hardwood, wood flooring etc. Some work better than others and others tend to balance themselves on the pegs (very rare) easier than others. Mark a circle with a compass and cut it with the bandsaw. With patience you can bring it down to size on the disc sander. It doesn't need to be a perfect circle, but you may be surprised how accurate a circle you can make with the disc sander. Using a forstner bit, and preferable a drill press, drill a shallow hole to accept the washer. We used 1" diameter washers and accordingly a 1" diameter forstner bit. You should only drill to the point where the top of the washer is even with the surface of the puck. Recessing it will weaken the magnet's ability to attract it. We glued the washers in with super glue. Test the pucks before anything else. If you discover that they balance frequently, make them a little smaller; this will speed them up and diminish balances significantly. Once you have determined which material and which size works best, you can paint or varnish them. All that is left, is wall mounting. We recommend screwing them directly to the wall. Using picture hangers or similar hardware is not advisable because the plinko display has a door that you pull on and therefore needs to be fastened securely. You can also use cabinet hanging hardware - you simply mount a clip few clips on the back of the display and a few corresponding clips on the wall and slide in and remove the display as desired. |
|
© 2000-2008
terms privacy policy |
home gallery |
| projects philosophy faq | ||