 |
free plans: how to make a
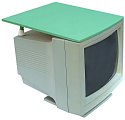
Computer Monitor Shelf |
| Basic Description |
The space around one's computer is
often particularly valuable. At uniqueprojects, we are consistently battling with the clutter
on and around our computers; below you will find one of the remedies we designed for the problem.
It's a simple
plan for a shelf that fits on top
of most computer monitors. The shelf can be used to hold all sorts of items: picture frames, notes,
papers, and lightweight peripherals (such as
computer speakers, small scanners etc.) In the end, this project allows you to convert wasted space into highly usable
space. |
| Materials |
Plywood, wood dowel, finishing oil or paint, hook and loop fastener, and wood glue. A complete
material list is provided below. |
| Tools |
Table saw, sandpaper, bandsaw or jigsaw or scrollsaw, drill with forstner bits.
A complete tool list is provided below. |
| Cost |
The plan itself is free! Estimated cost of materials: $5 |
| Time |
1 hour |
| Difficulty |
Easy |
| Legal Notice |
Use of this website constitutes acceptance of our terms of service policy. |
| Similar Projects |
If you enjoy this project, you may also be interested
in our bulletin board project. |
| Item |
Qty. |
Description |
| #1 |
varies |
Plywood 3/8" - 1/2" (9 - 13mm) thick. You will need enough to cover the top of the computer
monitor that you are customizing. For our small monitor, we used a 3/8" (9mm) thick piece
of Baltic Birch plywood about 14" x 15" (35 x 38cm). |
| #2 |
- |
Glue. We used polyurethane glue, but yellow glue will work fine. |
| #3 |
- |
Wood Dowel. We recommend using 1/2" - 5/8" (13 - 16mm) diameter dowel. The length will
be determined by the shape of your monitor; we required two pieces, 2 5/8" (67mm) long. |
| #4 |
- |
paint or finishing oil  |
| #5 |
2 |
Plastic or rubber tip caps for wood dowel. These are available at most hardware stores - they
are used at the ends of walking canes and furniture made from metal tubes. |
| #6 |
- |
Adhesive-backed hook and loop fastener (commonly known as Velcro). |


