
|
home gallery |
| projects philosophy faq | |
 |
free plans: how to make a Million Wall |
| Basic Description |
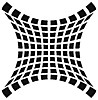
We hear about a 'million' all of the time: a million people, a million dollars, a million years etc. It's difficult, though, to get a handle on the concept of a million. This fun project addresses the issue and simultaneously transforms your wall into a conversation piece. You simply paste 100 sheets of paper in a grid pattern over a large painted square area of your wall. Each of the sheets contains 10,000 dots (from the file included below) and the whole wall yields the million dots right in front of you to ponder. Read on for all the details; the plan itself is free! |
| Materials | Paper, wallpaper paste, paint, masking tape, polyurethane (optional). A complete material list is provided below. |
| Tools | Computer printer, paintbrush, measuring tape, scissors or paper cutter. A complete tool list is provided below. |
| Cost | The plan itself is free! Estimated cost of materials: $15 |
| Time | 3 hours |
| Difficulty | Easy |
| Legal Notice | Use of this website constitutes acceptance of our terms of service policy. |

The first step involves acquiring the necessary materials and proper tools. It is best to get everything prepared before commencing because this allows you to progress without unnecessary interruptions.
| Item | Qty. | Description |
| #1 | 105 | heavy paper: it needs to be opaque enough to block out the painted background color, but thin enough to make it through your computer printer. Regardless of what color you choose, make sure that the black printed dots will be visible. |
| #2 | 1 | clear wallpaper paste: enough to cover approx. 60 square feet (6 square meters) |
| #3 | 1 | paint: to cover approx. 60 square feet (6 square meters) |
| #4 | 1 | masking tape: 1 roll approx. 1 1/2 - 2" wide (4 - 5cm) |
There are several options with the million wall, so we recommend that you read through the plan first, decide precisely what you want to make, and then purchase/assemble the necessary materials.
| Tool |
| computer printer |
| paintbrush |
| measuring tape |
| paper cutter, scissors or hobby knife with a cutting board. |
recommended: level  , or plumb bob
or weight attached to a string , or plumb bob
or weight attached to a string |
| optional: wallpaper smoothing brush , to remove bubbles or wrinkles |
Let's begin by printing out the sheets of paper. You are going to need 100 sheets and perhaps a few extra in case you make a mistake on the cutting etc.
We have provided two different files, one for letter-sized paper and the other for A4 paper: click the appropriate graphic on the right for the page to be launched. You will need the Acrobat Reader installed on your computer. If you do not have the reader, you will need to install the free program before proceeding. There should be a 1/2" (12mm) border between the dots and the top and sides of your paper; if your printouts are giving less than this, make sure that the "Fit to page" option is unselected in the dialog box that appears after you click on 'print'. If you are having any other difficulties with the download or printout, you should visit the Adobe Reader troubleshooting page. |
 |
 |
We recommend that you test this printing step on a few sheets before printing all of the remaining pages. You should confirm that there are 10,000 dots on the pages by individually counting each one - just kidding; but you should confirm that there is a grid of 10 x 10 smaller grids and that the grids on the periphery (top, bottom, left and right) each have ten rows and ten columns. This is mainly to check that your printer was able to fit the image within the printable area. When you are ready to print the bulk of the pages, you should periodically check the quality of the printout, to make sure that your printer is not running out of toner or ink.
Now that the sheets are printed, they need to be cut. The printouts should include a thin line directly below the 10,000 dots which serves as a cutting guide; you can cut just inside of the lines so they will not appear on your wall. It is tempting to cut huge batches of paper all at once, but we urge you to refrain from doing this unless you have a high-quality paper cutter. If you are using scissors or a knife and a straight edge, do one at a time: your patience will pay off. |
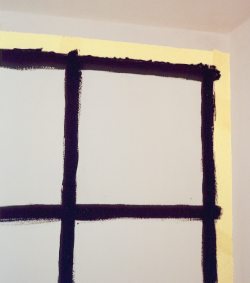
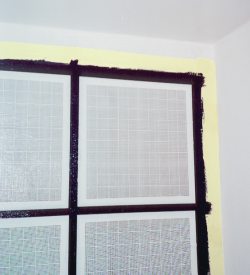
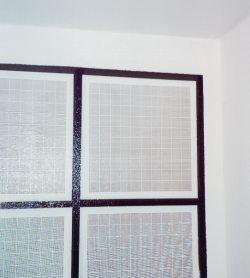
Now we are going to paint the wall. A contrast between the color of the wall and the paper sheets provides significant visual interest to this project. You'll need to tape off a large square using the dimensions shown below. You will probably want to position the display on a free wall, one without obstructions (windows, doors, outlets); you may also want to center it vertically so that it is evenly spaced between the floor and ceiling. To mark off the area you can use a level or a plumb bob on a string. Make sure you firmly press the edge of the masking tape against the wall to ensure that paint will not be able to creep below the tape and therefore outside of the masked area. Here are the dimensions you will need to mask off: Next, following the paint manufacturer's instructions, paint the square inside the masked area. If you are using a dark color over a light background you may need two coats. Check the design considerations section at the end of this plan for more ideas for this step. To save paint, we simply painted those areas that will appear between the sheets: if you choose to use this method instead of painting the entire square, it is critical that your paper is opaque enough to prevent the paint color from showing through. |
 |
Once the paint is thoroughly dry, we are ready to paste the sheets into place. Before you begin pasting, however, you need to mark out the location of the sheets in the square you just painted. You cannot paste a row of sheets and then move over the gutter dimension and paste the next row: if you are off by even the smallest amount, the errors will add up and by the time you reach the tenth row, there will either be too large or too small a border. You need to measure and mark for all 100 sheets before pasting a single sheet. Note that making the marks by snapping a chalk line is not recommended because the chalk will mix with the wallpaper paste and change its color. |
 |
Once the paint is thoroughly dry, we are ready to paste the sheets into place. Before you begin pasting, however, you need to mark out the location of the sheets in the square you just painted. You cannot paste a row of sheets and then move over the gutter dimension and paste the next row: if you are off by even the smallest amount, the errors will add up and by the time you reach the tenth row, there will either be too large or too small a border. You need to measure and mark for all 100 sheets before pasting a single sheet. Note that making the marks by snapping a chalk line is not recommended because the chalk will mix with the wallpaper paste and change its color. We used a pencil and a measuring tape to mark the corner locations of of each sheet. As we progressed through this marking step, we constantly checked our progress by measuring the distance between our mark and with the other edges of the painted square - this allows you to minimize any accumulation of measurement errors. |
| 10 sheets x 8 1/2" | 85" |
| 9 gutters x 1/2" | 4 1/2" |
| left (and top) border x 1/2" | 1/2" |
| right (and bottom) border x 1/2" | 1/2" |
| total (for height and width of square) | 90 1/2" or 7' 6 1/2" |
| 10 sheets x 210mm | 2100mm |
| 9 gutters x 13mm | 117mm |
| left (and top) border x 13mm | 13mm |
| right (and bottom) border x 13mm | 13mm |
| total (for height and width of square) | 2243mm |
Once the locations are properly marked, you can begin to paste the sheets. It is best to keep the masking tape in place during this step. We found it easiest to apply the wallpaper paste to small sections of the wall and placing the sheets on top of it. Then we brushed additional paste on top of the paper to saturate the paper and guarantee good adhesion. This technique provides an interesting matte finish because the paste doesn't dry completely clear. If you are not interested in a matte look, you can apply paste to the back of the sheets and apply them to unpasted walls, but this is much more difficult. You can use a wallpaper brush to remove any wrinkles or bubbles in the paper. We noticed that some small wrinkles that could not be brushed away tightened up and disappeared during the drying process. Optional: When the wallpaper paste is completely dry (per the paste manufacturer's directions), you can coat everything with polyurethane: this will seal the surface and will make it easier to clean. Most retailers offer matte, satin and gloss polyurethanes so you can choose the finish you prefer. Once everything is dry, you can carefully remove the masking tape: it may help to run a hobby or utility knife along the edge to make sure that paint is not lifted off with the tape. We recommend that you do this slowly and methodically. |
 |
Design Considerations
|
 |
|
 |
|
© 2000-2008
terms privacy policy |
home gallery |
| projects philosophy faq | ||