
|
home gallery |
| projects philosophy faq | |
 |
free plans: how to make a Marble Paper Holder |
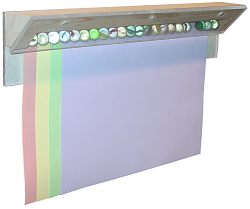
| Basic Description | Here is a free plan for a unique paper holder that you can mount on any flat surface. A line of marbles is wedged between two pieces of clear plastic and their weight holds photos, cards, notes or any other paper up against a wall. In addition to the interesting look of this project, there is a great feature: you can insert and remove papers with one hand without fumbling with clips, clamps or magnets. |
| Materials | Wood, acrylic plastic, wood glue, finishing oil or paint, screws, marbles. A complete material list is provided below. |
| Tools | Table saw (with tilting arbor), drill with various bits. A complete tool list is provided below. |
| Cost | The plan itself is free! Estimated cost of materials: $6 |
| Time | 1 hour |
| Difficulty | Easy |
| Legal Notice | Use of this website constitutes acceptance of our terms of service policy. |
| Similar Projects | If you enjoy this project, you may also be interested in our curved photo stand or bulletin board projects. |

The first step involves acquiring the necessary materials and proper tools. It is best to get everything prepared and set-up before commencing because you become free to progress without unnecessary interruptions. |
 |
| Item | Qty. | Description |
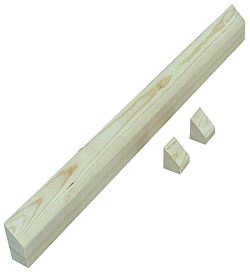
| #1 | - | Wood 3/4" x 2" (19 x 51mm) x desired length of holder. We used some pine about 16" (40cm) long. |
| #2 | - | Acrylic or Plexiglass: 3/16" - 1/4" (5 - 6mm) thick x 6" (15cm) wide by desired length of holder. |
| #3 | - | Wood glue; we used polyurethane glue but yellow glue is acceptable. |
| #4 | - | Optional: Finishing oil or paint; we left the wood unfinished. |
| #5 | varies | 5/8" (16mm) diameter glass marbles; you will need enough to create a line that spans the length of the holder. |
| Tool |
| table saw with tilting arbor |
| drill with various drill bits |
| sandpaper |
| small clamps |
We recommend that you read through the entire plan and especially the design considerations section before acquiring/assembling all of the requisite tools and materials. There are some options involved with this project, and it is most prudent to be fully informed of them before making design decisions.
Now that you have all of the tools and materials, we can jump right into the project. Let's start by preparing the wood for the project. Begin by printing the associated drawing for this step. The length of the wood is determined by how long you want the holder to be. We made a small holder that is about 16" (40cm) wide. Tilt the blade on the table saw to 45 degrees and rip a trapezoidal shape so that the long edge is 1 15/16" (49mm). In addition to this "top" piece, make two side pieces as shown. |
 |
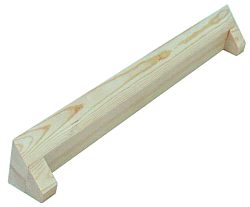
With the wood cut, you can lightly sand and then glue the pieces together as shown in the image on the right. Make sure that the angled faces line up smoothly. We used polyurethane glue, but yellow wood glue would also work fine. While the glue is drying you can proceed to the next step, and once it does dry, you can paint or finish the pieces. We left our wood unfinished. |
 |
With the top and sides completed, you can begin working on the front and back panels which are made out of acrylic or plexiglass. We used 1/4" (6mm) thick material but 3/16" (5mm) thick is also suitable. The length is determined by the overall length of the holder. The back panel is to be cut to 3 3/8" (86mm) wide and the front panel is 2 3/8" (60mm) wide. Note that you can use ordinary woodworking tools to cut the acrylic. Once they are cut to size, drill some counterbored holes for assembly. The back panel requires a series of holes (we made three for our length) for mounting to the wood. It also requires a series of counterbored holes for mounting to a wall ( again we made three). The front panel, requires a series of counterbored holes for mounting to the front of the wood as shown in the image on the right. |
|
With all the pieces completed, you are ready for final assembly. Begin by screwing the back panel to the wood and then tip that assembly back so that you can place some marbles against the wood and between the sides. Place enough marbles in the space between the sides so that there is just enough room for one additional marble - a little extra space is better than too little. Finally screw on the front panel so that the marbles are held in place. Now you are ready to mount the holder to any wall or flat surface. |
design considerations |
||
materialWe tried making this project out of different materials, but low friction surfaces for the front and back panel work best. We recommend acrylic, but sheet metal would probably work well too. If you experimented with wood, make sure that it is highly sanded and finished to create a low friction surface. sizeThe angles and dimensions of the pieces are built around standard 5/8" (16mm) marbles. Everything would work for slightly smaller marbles as well. The holder can be made as long as you like. |
|
© 2000-2008
terms privacy policy |
home gallery |
| projects philosophy faq | ||