
|
home gallery |
| projects philosophy faq | |
 |
free plans: how to make a Magazine Holder |
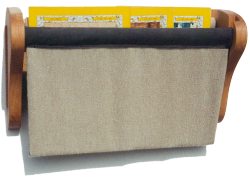
| Basic Description | This holder will organize your magazines in a simple and elegant way. A hanging pouch neatly holds your reading material so that it is off the table, but always within easy reach. The fabric is easily removable for cleaning and the whole project goes together rather quickly. You can customize the look to compliment your decor or add extra tiers for increased capacity. |
| Materials | Wood, dowels, glue, screws, fabric, finishing oil. A complete material list is provided below. |
| Tools | Table saw, jigsaw or bandsaw, disc sander, sewing machine or thread and needle. If you are using rough lumber you will also need a jointer and thickness planer. A complete tool list is provided below. |
| Cost | The plan itself is free! Estimated cost of materials: $18 |
| Time | 3 hours |
| Difficulty | Easy |
| Legal Notice | Use of this website constitutes acceptance of our terms of service policy. |

The first step involves acquiring the necessary materials and proper tools. It is best to get everything prepared before commencing because you become free to progress without unnecessary interruptions. |
 |
| Item | Qty. | Description |
| #1 | varies | wood. amount varies based on shape and size of holder you choose to make. in the version we describe in this plan, we used 3/4" x 6" x 36" or 1 1/2 board feet (2 x 15 x 90cm) cherry. |
| #2 | 3/4" x 48" (2 x 120cm) |
hardwood dowel rod  (doesn't need to exactly match the wood in the rest of the project because most of
the dowel surface is covered by fabric).
(doesn't need to exactly match the wood in the rest of the project because most of
the dowel surface is covered by fabric). |
| #3 | - | wood glue, preferably polyurethane glue |
| #4 | - | finishing oil or paint with primer |
| #5 | 6 | #8 x 1 1/2" (M4 x 40mm) wood screws |
| #6 | 2 - 4 | mounting screws and finish washers - the length and number depends on your mounting situation |
| #7 | 1/2 sq. yd. (1/2 sq. meter) |
fabric |
| #8 | - | thread |
| Tool |
| table saw |
| jointer and thickness planer if you are using rough lumber |
| scrollsaw or jigsaw |
| drum sanding attachment for drill press or spindle sander |
| drill press or drill with 3/32" (2.5 mm) drill bit |
| disc sander |
| router , preferably mounted in a router table, along with a 3/4" (20mm) straight router bit
|
We recommend that you read through the entire plan and especially the design considerations section before acquiring/assembling all of the requisite tools and materials. There are several options with this project, and it is most prudent to be fully informed of them before making design decisions.
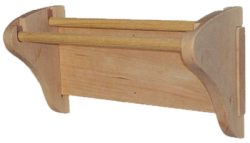
Let's start by preparing the wood. The magazine holder is constructed from a left panel, a right panel and a back panel. We started with rough lumber that needed to be surfaced; if you are using lumber that is already surfaced, then you can omit most of this step. After removing the ends of the board that were weakened by checking, we cut our 6" (15cm) wide rough cherry lumber into two pieces, one 20" (51cm) for the back panel, and one 16" (39cm) for the two side panels. Note that we are surfacing the board for the side panels now, when it is big enough to run through the jointer and thickness planer. We surfaced the lumber by jointing one face, surface planing the opposing face so that it is flat and parallel to the first face; then we jointed one edge and ripped the opposing edge so that the surfaces were flat and square to eachother. Note that the back panel will be about 1" (25mm) wider than your two dowel rods, so if you shorten it a little, you may be able to get by with the 36" (1m) dowel rods that are also commonly available. |
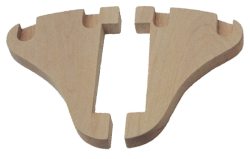
With the boards surfaced and cut, we can begin to work on the side panels. Use the smaller board for the side panels. You can choose any shape that will rigidly hold two dowels in a parallel orientation away from a wall. Both side panels, at this point, are identical, so you don't have to worry about making two right or left hands just yet. Make sure that you have enough wood for the pattern you select. You can flip the pattern over for one of the side panels to fit on the board you have. |
 |
We will be laying out grooves for the dowels in the following step, but their location comes into play now when you are finalizing the side panels. The wider the space between the dowels the more room you have for the magazines, but an extremely wide pouch fails to neatly hold the magazines. Anywhere between 3" (75mm) and 6" (150mm) is suitable. We let the wood we had dictate the width. After accounting for the back panel to protrude through the side panels, we were able to have a dowel center to center distance of 3 1/2" (9cm) which holds a suitable number of magazines. Choose a shape that satisfies you. Also note, that the two dowels should be parallel but they do not have to be at the same height. Our front dowel is slightly lower than the rear one so that it is a little easier to access the magazines. Raising the front dowel higher than the rear, on the other hand, would be counterproductive. | |
Mark one of the patterns that you will be using and confirm that you have enough room to cut an identical pattern with the remaining wood. Cut this pattern with a bandsaw or a jigsaw and finalize the shape with a disc sander and/or an oscillating spindle sander (or drum sanding attachment for your drill press) if you have interior curves. Once you have one of the panels finalized, you can trace the shape you just created to make the second panel. |
Next you need to rout the grooves that will accept the dowels in the side panels. Keep in mind throughout this step that the left and right panels are not identical - one is left handed and one is right handed. To avoid a mistake, clearly mark where you want the grooves to go so you don't make the all-too-common mistake of making either two left or two right sides. |
 |
Using a router and a straight router bit that has the same diameter as the dowel you will be using, rout some grooves about as deep as half of the thickness of the panels. So for example, if you panels were 3/4" (2cm) thick, rout the groove about 3/8" (1cm) deep. We made a couple of passes on the router table to achieve the desired depth: routing to the full depth puts undue strain on the router and the bit. You can also do this with a free router, but your guide will be slightly more difficult to set up. If the dowels do not fit into the grooves, you can sand the ends of the dowels to the proper size; its easier to resize the dowel than it is to resize the grooves. Note that we will be cutting the dowels to size after assembly. |
Now you need to sand. While you are on the lower grits, we suggest that you round over every single edge in the project: the cutouts that will receive the back panel, the rear side of the side panels, even the corners of the grooves that accept the dowels. This rounding over gives a handmade touch to the piece. We sanded using the following sandpaper grits: 100, 120, 150, 180, 240, 320, 400. |
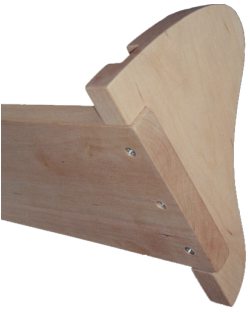 |
Once the sanding is complete, you are ready for assembly. Begin the assembly by predrilling some holes for screws through the back panel and into the side panels. We like to make the ends of the back panel to stick out just a bit so that it is proud. An 1/8" or 1/4" (3 - 6mm) satisfies us. We used two screws on each side. You will need to creatively clamp the pieces in a vice but you should be able to figure it out. Now you can glue up the back panel into the side panels. and immediately drive the screws. These redundant fastening methods will ensure that your magazine holder will have a long life even if it is handled roughly. The screws prevent the need to clamp the project together during drying. |
When the glue has dried, remove any squeeze out. If you used yellow glue as opposed to polyurethane glue, you should remove squeeze-out about 30 minutes after gluing, just when it becomes gummy. Complete any final sanding and measure and cut the dowels. We like to make them just slightly undersized so they can just slide in and do not come out too easily. We are cutting the dowels now because its only now that you know exactly the dimension that you need. Sand the dowels and gently round over the ends as well. |
 |
Next you can drill holes in the back panel to allow for mounting. There are many ways to mount this project but we recommend that you fasten it to something very firm. If your home has wooden studs, you can just drill two clearance holes in the center. Or if your back panel is wide enough, you can span between two studs. You don't have to be too concerned about the appearance of these holes, because the fabric pouch will keep them out of view. |
With all of the pieces sanded, they are ready for a finish. You can use a stain and follow with a polyurethane. We used antique oil which is an oil/ varnish blend consisting of mineral spirits, oil, and a spar varnish. After wiping on with a brush and waiting for about 5 to 10 minutes, we wiped of the excess with a clean rag. We let it dry overnight and repeated this process two more times. For more information regarding finishing, consider Understanding Wood Finishing by Bob Flexner.
While the finish is drying you can begin on the fabric pouch. You are basically sewing a rectangle of fabric with two loops at either end much like our hammock project. There are many ways to do this and all of them are relatively straightforward. You need to make sure that after you have sewn in the loops at either end, the hanging loop will have enough material to hold the magazines of your choice. We wanted a loop of 10" (25cm) deep by 14" (35cm) wide so we made our fabric to be 14" x 24" (35 x 60cm) - this accounts for 2" (5cm) loops on each end. There are many options with the pouch and we discuss them in detail in the design considerations section at the end of this plan. |
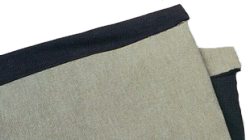 |
design considerationsThe magazine holder is very versatile and can handle several alterations and customizations. dimensionsWidth: We made our magazine holder wide enough to hold two magazines. This dimension can be increased to accommodate more, but of course the diameter of the dowels would need to be increased as the span that they cover increases. Height: If you make the pouch too deep it becomes very difficult to access the contents. You can, however, increase the capacity by adding more tiers of magazine holders. You could either position several of the holders one above the other, or you could modify the side panel design so that they extended vertically to accommodate for additional pairs of dowels. You could also add a third or fourth parallel dowel and modify the fabric pouch so that you have a few holders in succession shapeThe side panels can be of varying shapes. We chose a simple and straightforward shape to illustrate the basic technique. The side panels simply need to be strong enough to hold the dowels in a parallel orientation away from the wall. pouchThere are many varieties of pouches that you can make, all that will work well. We wanted to add a little color detail so we sewed two contrasting pieces of fabric back to back and then sewed the loops at the end. One layer of fabric is plenty as long as the fabric is durable and you seam all the edges to prevent fraying. |
|
© 2000-2008
terms privacy policy |
home gallery |
| projects philosophy faq | ||