
|
home gallery |
| projects philosophy faq | |
 |
free plans: how to make a Large Harmonograph |
| Basic Description |
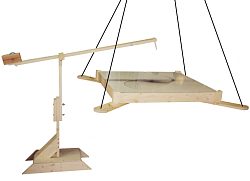
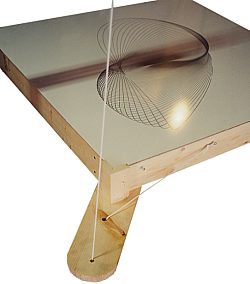
A harmonograph is a pendulum-based drawing board that produces beautiful curvaceous drawings. After you give the large hanging platform a gentle push, gravity works its magic while a pen records the results. Each swing is almost identical to its predecessor: the minute discrepancies are responsible for the remarkably sinuous curves. The version that we have detailed in the plan below allows you to make drawings on paper or on an erasable whiteboard. You can set up the harmonograph in a garage or basement and hoist it out of the way when not in use; it ends up taking virtually no space at all. We love to enjoy the mesmerizing action, but it makes a great conservation piece at a party and kids absolutely love it! It takes some patience to get everything working right, but it is definitely worth the fine tuning that this project requires; as always, we will walk you through all of the steps. |
| Materials | pine lumber, plywood, bolts, wingnuts, smooth tileboard, screws, string, hinges, bricks or other counterweight, dry-erase markers. A complete material list is listed below. |
| Tools | jigsaw, table saw, miter box saw, drill, clamps. A complete tool list is listed below. |
| Cost | The plan itself is free! Estimated materials cost: $55 |
| Time | 10 hours |
| Difficulty | Challenging |
| Legal Notice | Use of this website constitutes acceptance of our terms of service policy. |

The first step is to acquire all of the necessary materials and to make sure that you have all of the proper tools. It is best to get everything prepared before commencing because then you can work without unnecessary interruptions. We are listing the materials for the version of the harmonograph that we chose to make. You can alter the dimensions as discussed in the plan and in the design considerations section at the end of this plan. If you are going to make any changes to our design, it is imperative that you thoroughly read through the plan to ensure that you are considering everything. |
 |
| Item | Qty. | Description |
| #1 | 5 | 3/4" x 4" x 8' (19 x 100 x 2430mm) pine or similar |
| #2 | 1 | 3/4" x 10" x 8' (19 x 250 x 2430mm) pine or similar |
| #3 | 6 | 1/2" x 2' x 4' (13 x 600 x 1200mm) birch plywood or similar |
| #4 | - | various colors dry erase markers, fine tip works best |
| #5 | ~ 20 | #8 x 1" (M4 x 25mm) drywall screws |
| #6 | ~ 30 | #8 x 1 1/4" (M4 x 32mm) drywall screws |
| #7 | 4 | #10 x 1 3/4" (M5 x 45mm) wood screws |
| #8 | ~ 24 | #8 x 1 1/2" (M4 x 38mm) wood screws, preferably without threads below screw head |
| #9 | 1 | 3' x 3' (1m x 1M)smooth white tileboard or dry-erase board (whiteboard) |
| #10 | 50' (15m) | 1/8" (3mm) diameter nylon cord |
| #11 | ~ 20 | 3/8" (1cm) I.D. fender washers |
| #12 | 4 | 5/16"-18 (M8) wingnuts |
| #13 | 1 | 5/16"-18 x 5" (M8 x 13cm) bolt for pen holder counterweight |
| #14 | 3 | 5/16"-18 x 4" (M8 x 10cm) bolt for pen clamp and for vertical adjustment on pen holder |
| #15 | 8 | bricks or similar weights |
| #16 | 4 | rubber furniture glides |
| #17 | 1 | wood glue, preferably polyurethane glue because it is faster drying than yellow glue |
| #18 | 2 | small butt hinges with mounting screws |
You can make any of several alterations to the dimensions and design that we are using. Before you make any changes or purchase materials, we recommend that you read through the entire plan and, in particular check the design considerations section at the end of this plan.
| Tool |
hand drill  and various drill bits and various drill bits |
| table saw |
| square |
| miter saw |
| various clamps |
| jigsaw |
| drill press recommended |
| level recommended |
| thickness planer recommended |
We have omitted the most common tools from our tool list. Furthermore, some of the tools on the list are not necessarily required. If you do not have everything on the list you may be able to use an alternative but you will surely need to read through the entire plan first.
Instead of providing a cutlist for the entire project, we are going to break the project down into manageable steps. We have chosen this method not only for simplicity and clarity; using the actual dimensions required by your work is superior and more accurate than precutting all of the pieces and assembling them at once. We also want to allow you to make customized changes to our design. You should consider the dimensions we provide to be close guidelines: your work will dictate the precise dimensions that you will need. |
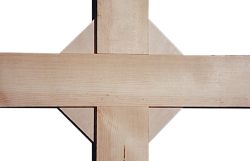 |
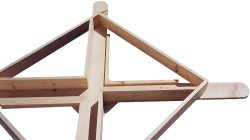
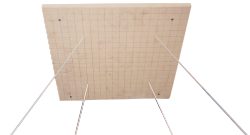
The harmonograph has two primary parts, a hanging drawing board and the pen support. We will start with the drawing board. The drawing board itself rests on a frame that also supports bricks that serve as counterweights. The bottom of this frame is made out of two pieces of pine that are lapped in the middle so that they form a flat "X". Each piece is 6' (1.8m) long and we rounded the corners for safety. The width is critical because a counterweight needs to be able to snugly fit on the of the bottom of the frame. The width should be about 1/8" (3mm) more than the width of a brick plus the width of the pine lumber. We made ours 4 1/2" (115mm) wide because our bricks are 3 5/8" (92mm) wide and our pine is 3/4" (19mm) thick. We ripped the 10" (25cm) wide lumber to achieve the width we required. |
|
We made the half laps in each piece using a crosscut sled on the table saw and made repeated passes until the material was completely removed; a dado set could also be used to minimize the number of necessary passes. You could perform the half laps with a miter gauge on the table saw or with a router. Once you have completed both pieces, tack them together with a few nails ensuring that they create a right angle. Next, cut a square of plywood about 12" (30cm) on a side and screw it to the joint as shown in the graphic on the right. Use plenty of countersunk drywall screws to guarantee that you have a firm joint. |
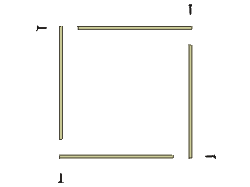
Next, we will build the frame on top of this "X" that you have just created. Start with 4 pieces of the pine lumber cut to 36" each. Countersink some holes in the ends of the boards and screw them together; use a square to ensure that they are at right angles to each other. This process is easier if you set one board vertically in a vice and fasten the adjacent board to it. |
 |
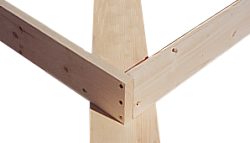
Center this square at a 45 degree angle to the "X" that you made in step 2. This will take some careful measuring. Once you have it properly positioned, clamp and securely screw the frame in from the underside of the "X" - the plywood stiffener should be on the opposite side of the "X" from the square frame is. |
 |
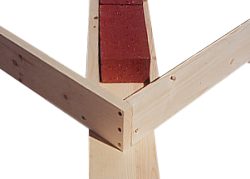
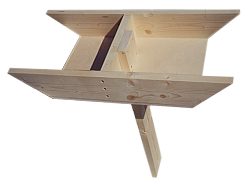
Using a miter box saw, cut some of the same material that you used in step 3 to make some counterweight guides; these pieces will hold the brick counterweights in place and also support the drawing surface. We cut 45 degree angles on the ends so that they fit properly to the rest of the frame. You could put these high walls on all edges of the "X" but this is unnecessary and will make access to the counterweights a little more difficult. We put the guide on one side of the counterweight supports and then just fastened a small strip onto the edge of the other. See the photo on the right. |
 |
In the photo on the right, you can see how the guides on either side of the counterweight are of different heights. The taller one is screwed on top of the "X" whereas the shorter one is screwed to the edge of the "X". This will leave enough room for you to slide the counterweights back and forth and also easily add and remove them. |
 |
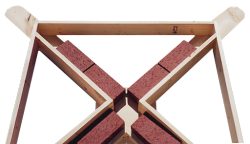
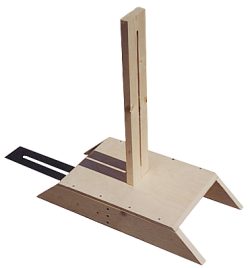
In the photo on the right, you can see the overview of the drawing board frame. Eight bricks can easily be placed and moved around; once we get to the point when we are ready to draw, these features will be convenient. |
 |
Now let's cut the tileboard or whiteboard to size. Ideally you can use a whiteboard made specifically for dry-erase writing. We used smooth tileboard that is available at most home centers. Flip the drawing board frame upside down, and trace the shape onto the back of the board. Carefully cut with a jigsaw and confirm that it fits properly. If your frame is perfectly square you can just measure, but tracing always guarantees a perfect fit. |
|
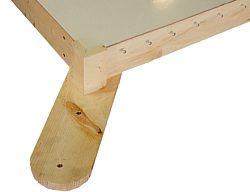
At this point, you can cut some leftover pieces of pine to act as locators. We made two mitered pieces for each corner of the drawing board frame. These locators should protrude about 1/2" (13mm) above the top of the whiteboard. If you didn't cut the whiteboard accurately, you can file or rasp until you get a snug fit. You should also mark and predrill about 10 or 12 evenly spaced holes along two opposing sides of the drawing frame as shown in the photo. Drive screws into these holes but leave the head about 3/8" (1cm) away from the wood; these will act as hooks for the strings used to hang up the drawing board. Some wood screws have smooth shanks just below the head, and these are preferred since we don't want threads from threatening to break the string that we will loop around them. |
 |
Now is a good time to drill a couple of through holes for the strings to pass through. We used a 3/8" (1cm) diameter drill bit and drilled a hole 1 1/2" (38mm) away from the end of the "X" and 1 1/2" (38mm) away from the whiteboard locators that we just installed. The hole is this large to accommodate a loop that will be tied into the string that will be used to hang up the drawing board. The string will pass down through the outer hole, and then up through the inner hole and then be hooked around one of the screws that you just installed. |
Now let's make the ceiling mount to complete the drawing board. Cut a piece of plywood that spans the distance between the joists that you will mount to. We situated our harmonograph in a workshop with an open ceiling. If you have a different mounting situation, then you will have to adjust the design accordingly. A general rule that we have been satisfied with is that the distance between the mounting points on the ceiling should be about 1/5 the distance between the mounting points on the drawing board. Accordingly we made the ceiling mounting points about 10" (25cm) apart. |
 |
You are trying to minimize friction so although an eyebolt will work fine, we found that a hole, slightly larger than the diameter of the string, works better. You simply pass the string through the hole and tie a knot in the end to prevent it from falling through. You may be tempted to loop the string around to use one length of string for two of the lines, but it's best to have them independent because in case one of them is compromised, the other three will be able to support the drawing board. |
|
We marked a grid pattern on the ceiling mount and drilled a few holes, that allowed us to easily alter to positioning of the strings which provides differing drawing results. Ensure, however, that you securely fasten the mounting board to the ceiling joists: we used four heavy screws. |
|
Cut four lengths of string to about 8' (2.4m) each. We have found that the installed string length (as opposed to the overall string length) should be about 1 1/2 times the distance between the mounting points on the drawing board. Since the distance between our mounting points is 4' (1.2m) , we aimed for 6' (1.8m) long strings; note that the excess is for adjustment and to pass though the mounting holes and around the hooks. If your ceiling is higher, give it a try, you will be able to make other adjustments to make beautiful drawings. Choose string that is strong, but avoid thick rope because of the increased resistance to bending; we used 1/8" (3mm) nylon cord, and lightly melted the ends with candlelight to prevent fraying. |
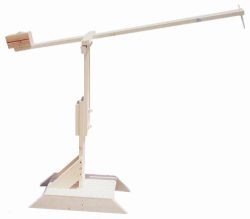
With the drawing board completed, we can focus on the pen holder. The pen holder needs to be stable and have an adjustable height feature. It should also accommodate for various sized pens. This part of the project is much more like a standard woodworking project, so we have simply provided a drawing for you to use as a guide. |
 |
Begin by making the base for the pen holder. It is simply made out of pieces of pine and spanned by a piece of plywood. Cut a rectangular hole (drill some 1/2" (13mm) holes to make room for your jigsaw blade) in the plywood to snugly accept the upright. You can cut the slot in the upright with a scrollsaw or jigsaw, but making both sides of the slot parallel to each other is difficult to perform. Therefore, we recommend that you cut a strip slightly more than 5/16" (8mm) this slot acts as a clearance slot for the bolts) wide out of some pine, and then glue it between two pieces ripped (on the table saw) out of the remaining piece. After the glue is completely dry, you can send it through a thickness planer to flatten the faces. |
 |
Firmly fasten the upright to the stretcher beneath the plywood as shown in the image on the right. At this point, you can cut some pine to serve as gussets for the upright. This will make it much more stable. The vertical extension also has a half lap to accept the hinge support. By putting the hinges further apart we are achieving drastically increased stability. Drill the two holes in the vertical extension at the same time that you drill the holes for the backer piece, that way you can be sure that they are in line to receive the bolts. |
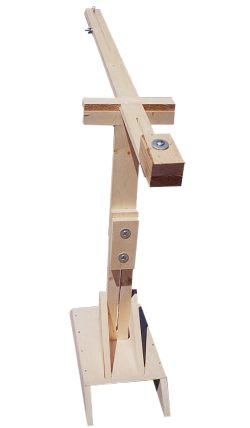 |
The arm is made in the same way as the upright. Rip a strip of pine 5/16" thick and rip the remaining piece in half. Glue these together to get the slot for the counterweight and the slot that will receive the pen. Once the arm is dried you can pass it through a thickness planer to clean up the faces and then make a half lap as you did before to accept the hinge support. Also drill a hole for the pen clamping bolt. Attach the hinges. You can also drill some wider holes at the end of the arm to accept larger pen diameters. Lastly drill some through holes in some dense scrap wood to create a counterbalance for the pen. When a pen is clamped in place the arm should be very well balanced. You can use some extra washers to fine tune the balance; just slide them over the prodruding bolt. |
 |
All that is left is to complete some fine tuning and you are ready to start. Place some bricks in the drawing board, we recommend that you start with four. Place the whiteboard in place and move the pen holder to one of the corners for configuration. Pull one of the board's corners right up to the edge of the pen holder upright. Let go and check the first few cycles of the swinging. You will be very lucky if the apexes of the swing are very similar - because that is precisely what you are looking for. If not, you can adjust the weight. Start by moving the weights farther away from the center or toward the center. You will start to get a feel for how these alterations affect the action. If moving the weights does not make enough of a difference, add weights or remove them. Note that they do not need to be symmetrical, so there are an infinite number of options. |
 |
The design that we offer in this plan offers many other adjustments so you can achieve a wide variety of swinging patterns. You can alter the type of swing that you are making (is it too erratic), string length can be increased or decreased by moving the loops onto new screwheads, distance between ceiling mounting points can be increased or decreased. Once you have achieved repeatable swinging, move the pen holder to one of the sides of the drawing board so that the end of the arm is centered over the non-swinging board. Adjust the height so the arm is a few inches above the drawing board at rest. Clamp a dry-erase pen into place, start with a gentle swing and slowly lower the pen into place. You can rest a large washer on the arm in various locations to toggle between the down position and the up position. If you set the hinges as we did, the arm will rest in the back position a few degrees above horizontal. This makes it easy to engage and disengage. Enjoy! |
The drawing board itself doesn't need to be a dry erase board, you can use regular plywood, but you will be required to use paper. On the dry erase board, we just tape large sheets of paper from a roll with masking tape when we want paper drawings. The dry-erase board also allows you to erase parts of the drawing with a finger or cloth to embellish the designs. We tried using a chalkboard but, of course, the friction needed drains the swinging energy and the effect was not as dramatic. You can use several different colors and draw curves on different sections of the whiteboard or paper. You can also redirect the pendulum midswing to see what happens. Other things to experiment with include, waiting a few swings before engaging the pen, and disengaging the pen before it comes to a stop. We also love to grab the taut string between thumb and forefinger at varying locations and plucking it to play one-string bass.
The size can be altered as desired, but it would be wise to maintain the ratio of dimensions we have shown in the plan. The best alternative is to design your version with adjustability so you can try all sorts of arrangements.
frictionKeep in mind that friction and disruption is the enemy to the harmonograph. As long as you are free from wind, earthquakes (the harmonograph acts as a great seismograph) and other disturbances, friction is the primary consideration. As we described, if you use narrow cord strung through holes, as opposed to eyebolts, friction is reduced. The only other culprit then, becomes the tip of the pen against the drawing surface. Adjust the counterweight on the pen holder so that just enough pressure is applied for the pen to write. Excessive pressure slows down the swinging action. A pen tip sliding along a dry erase marker has minimal friction and that is critical to the success of the design. If you are using paper, glossier paper and smooth writing pens are the best option. locationThe harmonograph can be located anywhere as long is shielded from the wind. Indoors is best, but an outdoor area protected from the wind will work fine too. We found that 6' (1.8m) strings worked well, but you can experiment with longer ones if your ceiling is higher. If there isn't a ceiling where you are placing your harmonograph, you will have to build a structure to hold it up. You could attach some tarp or canvas around this structure to block the wind. |
|
Unfortunately, few of us have enough room to keep the harmonograph set up at all times. The pen holder has been designed so that when you raise it to the highest point, the arm can be tilted downwards. This angled surface acts as a perfect rest for the drawing board. You can tuck the whole thing away up against a wall. Its best to mark your string locations and counterweight locations before dismantling the setup; that way, you will be ready to go right away when you set up again
Many strings stretch and knots may slowly give, so you may have to change your settings after periods of heavy use or disuse. Check your knots occasionally to ensure that they are firm. It is also critical for the pen holder to be stable: if you notice any rocking during the drawing process, you can stack a few bricks on the base.
|
© 2000-2008
terms privacy policy |
home gallery |
| projects philosophy faq | ||