
|
home gallery |
| projects philosophy faq | |
 |
free plans: how to make a Hammock |
| Basic Description | It's easy to make this simple hammock with durable fabric and some basic sewing. It is a lightweight, stable and comfortable accompaniment to any time spent in the outdoors. We will also show you a wonderful knot that will allow you to quickly tie up your hammock without causing damage to the trees or posts that you use as supports. You can also include mosquito netting to protect against insects. There is something so pure about swinging in a hammock out in nature: read on for all the details. |
| Materials | Fabric, thread, rope. A complete material list is provided below. |
| Tools | Sewing machine (or sewing needle), scissors, measuring tape. A complete tool list is provided below. |
| Cost | The plan itself is free! Estimated cost of materials: $18 |
| Time | 2 hours |
| Difficulty | Easy |
| Legal Notice | Use of this website constitutes acceptance of our terms of service policy. |

The first step involves acquiring the necessary materials and proper tools. It is best to get everything prepared before commencing because you become free to progress without unnecessary interruptions. |
 |
| Item | Qty. | Description |
| #1 | 3 yards (3m) | durable fabric, at least 36" wide (1m). (see design considerations section of this plan for details) |
| #2 | - | sewing thread |
| #3 | approx 50 ft. (15m) | non-strechable and strong rope; we recommend 3/8" (1cm) diameter polypropylene rope (see design considerations section of this plan for details) |
This project is remarkably simple if you have access to, and are familiar with a sewing machine. If not, you can perform the sewing by hand, but you will need a little more patience.
| Tool |
| sewing machine, or sewing needle |
| scissors |
| measuring tape |
We recommend that you read through the entire plan and especially the design considerations section before acquiring/assembling all of the requisite tools and materials. There are several options with this project, and it is most prudent to be fully informed of them before making design decisions.
Now that you have all of the tools and materials, we can jump right into the project. Let's cut the fabric to size. We recommend that you mark the cut-line and try to cut squarely and straight because it will make the sewing step a little more straightforward. We started with 36" (1m) wide fabric and used a little of this width to make seams on each edge. While this was a good width it was at the narrow end of the scale. If you make your hammock too wide, on the other hand, the sides tend to completely envelop you - while this is comfortable (some people actually prefer this), your view of the surroundings becomes limited. We recommend anywhere between 36" and 46" (1 - 1.2m). Choose a narrower dimension if the users will be small or medium size; the wider version works for almost anyone. |
 |
The ideal length of the hammock seems to be about 24" (60cm) longer than the tallest user. They can be made longer with similar functionality, but doing so adds unnecessary weight. Any shorter and your head and/or feet will be become cramped up at the ends. We cut our fabric to 36" x 8' (1 x 2.5m). |
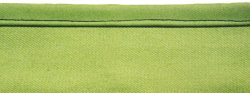
With the fabric cut to the desired dimension, you need to sew seams on the edges; if you fail to sew seams, the fabric is likely to fray and slowly fall apart. As shown in the picture on the right, we folded about 3/8" (1cm) of the edges of the fabric twice, and then sewed along the edge of this fold. If you only fold once, the exposed edge of the fabric will fray up to your sew-line which is unsightly. Note that making the seams for the ends is incorporated into the following step. |
 |
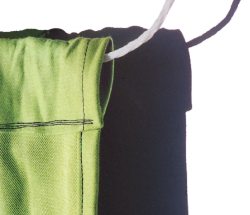
Next we need to sew a loop at each end to accept the rope that will be used to hold up the hammock. While performing this step, we also need to protect against fraying. We folded over about 3/8" (1cm) of fabric, and then folded over another 2" (5cm) in the same direction. Sewing along the end of the loop you just made yields a loop that will not fray. There are other techniques to achieve the same result, and they are acceptable as long as you create a strong loop that won't fray. |
 |
If you make the loop too narrow, it will be difficult to slide rope through; making it too wide, simply wastes material and makes the hammock heavier than it needs to be. A 2" - 3" (50 - 75mm) loop seems adequate. Although double stitching may be suitable, we sewed along the loop three times to ensure that we were making a very strong and long-lasting hammock. Repeat this step for the other end of the hammock. |
At this point, you may be surprised to discover that the hammock itself is finished! All you need to do is cut the rope in half and thread it through the two loops that you just sewed. We recommend cutting more rope than you intend to use because doing so increases the possible locations for setting up your hammock. We cut our 3/8" (1cm) wide polypropylene rope in half to create two pieces that are 25 feet (7.5m) each. |
 |
You can thread the rope through the loops by tying a knot in one end and slowly feeding it along with your fingers. A much better solution is to push a stick (or dowel) through the loop, tie an end of the rope to the end of the stick, and pull the dowel and rope back through the loop. Once you have the rope through the loop, pull it so that it is centered. Repeat this step for the other loop. |
The hammock is very versatile and its only limitation is that it needs to be held up by two supports. Trees work well, as do posts or poles. Some people set up posts with eyebolts in their backyards precisely for this purpose. Regardless of what you use, ensure that the supports are rigid and strong. |
|
Of course the supports will need to be close enough for your rope to reach. In theory though, you can tie your hammock between two distant supports as long as your rope is strong and long enough, and that you can reach high enough (the further the supports are apart, the higher you will need to tie the rope). Ground conditions like roots, rocks, slope, or even water, are irrelevant to positioning your hammock; if you do set up over water, try not forget that fact when you exit the hammock after your nap! |
|
Ideally the supports should be about 5 paces apart, and the space between them should be clear of obstacles. The hammock should hang in a mild arc with the bottom just low enough for you to be able to stand up tall and sit in it. You should tie the ropes about as high as you can reach. |
Since you will be hanging from this rope, you'll want to make sure that you have made a suitable knot. A few simple knots usually suffice, but they can be extremely difficult to untie after your nap. Although most hammocks are made to have one rope that is tied around the support with a bowline or series of half hitches, we like to take both ropes coming out of the hammock, loop them around the support and then tie them to each other. This technique still allows you to rock back and forth but provides added stability. |
 |
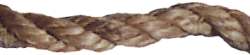
Take one end of one rope and pull it and wrap it twice around your support (to prevent damaging the support or your rope). Then, tie one end of the rope to the other end using the Carrick bend shown below. The Carrick bend (also known as the Josephine knot) looks good, its fun to make, its strong, and its easy to untie when you are done. |
 |
With some practice, this isn't too difficult to perform the Carrick bend, but you need to get everything right. We have provided a printed version of the procedure so you can take it with you. The ends of the rope have to be on opposite sides and the rope crossings always are alternating up/down/up/down. After you have pulled the knot tight, ideally you should seize the ends to the rope - this will virtually prevent any chance of loosening. Just tie the ends of the rope to the rest of the rope with some small string - this doesn't have to be too tight, you simply are seizing the ends. |
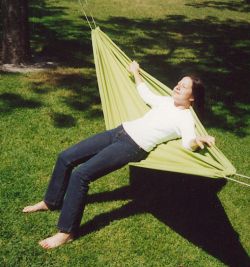
If you follow these guidelines, getting in and out of your hammock is easy. As shown in the picture on the right, sit on one edge of the hammock with the other edge high on your back or over your head. Allow your weight to descend into the hammock as you rotate your body and swing your legs up. Continue twisting your legs into the hammock and leaning back until you are completely in. The hammock is so stable, that you wouldn't be able to fall out unless you tried. |
 |
Getting out of the hammock, is identical to getting in except you do the whole process in reverse. As you slide your legs off the side, rotate your body up so that you are sitting on the edge of the hammock with your legs hanging off. All that's left is to stand up. Most people become very proficient at entering and exiting the hammock after just a few tries. |
The hammock that we have shown in this plan is very versatile and can handle several alterations and customizations
The most critical characteristic for the fabric is that it be strong. Warmth and breathability are also issues; since you are hovering above the ground, you are completely surrounded by air and more susceptible to wind. If it is cold, you need to insulate yourself from the bottom as well as the top. We recommend using a lighter fabric; you can put a blanket at the bottom of the hammock before you enter, if the weather deems it necessary. Sleeping bags also take care of insulating you from all sides. We used heavy cotton fabric for the hammock shown in this plan.
Keep in mind that dark colors tend to absorb heat and lighter color remain cooler; the heat absorption of darker colors seems to attract mosquitoes.
The rope needs to be strong but not flexible and it should accept knots well. There are a variety of ropes that meet these criteria, but we recommend using polypropylene because it is inexpensive and won't mildew. Rope strength is often specified as either tensile strength or working load. These are very different things. Tensile strength refers to the breaking point of new rope in laboratory conditions, and working load is a safe load that can be applied to a given rope - often as little as 15% to 25% of the tensile strength. When selecting rope, check the working load and ensure that it is significantly above the weight of the heaviest person that will use the hammock. We were satisfied with rope that had twice the working load of the heaviest user. |
 |
The dimensional options are discussed in step 2.
There are many items that you can make and add to get additional functionality our of your hammock. flying insect nettingIf mosquitoes or other flying insects are a problem, you can sew mosquito netting to the entire periphery of the hammock; a zippered side entry allows easy access and complete protection from biting insects. You will need to hook (you can use clothes pins) the mosquito netting to a rope strung above the hammock to keep the netting off of your body. |
rain and sun protectionIf you want some protection from rain, sun or wind, you can tie a tarp above your hammock. This is a great way to add a 'roof' to your hammock, but remember that a tarp will block the view. drip linesIf you will be in the hammock in the rain, you may want to tie some short strings at strategic locations to divert water from running down the support ropes and into your hammock. Simply tie the strings onto the hammock support ropes near the hammock itself; the majority of rainwater running down the ropes will be diverted down to the ground. other accessoriesThe simplest accessory is a rope that you tie above the hammock - you can tie excess rope from support to support; this rope allows you to hang a backpack, flashlight or anything else where it is in easy reach. You can use clothes pins to hang items onto the rope. Another simple addition is to sew a pocket to the underside to hold any items that you might need while you are resting. |
|
© 2000-2008
terms privacy policy |
home gallery |
| projects philosophy faq | ||