
|
home gallery |
| projects philosophy faq | |
 |
free plans: how to make a Framed Weave |
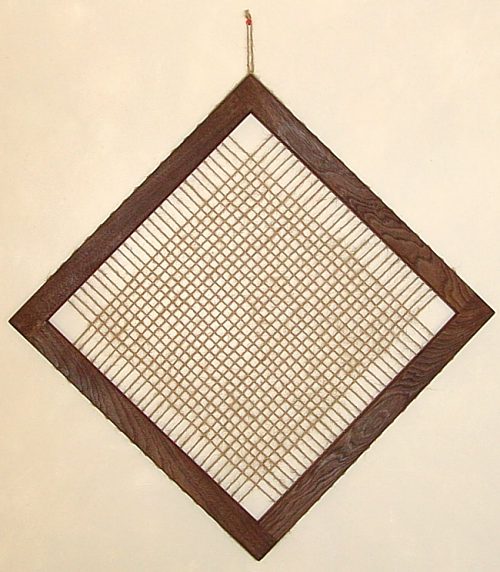
| Basic Description | Here is a plan for a unique wall hanging made out of one piece of wood and one length of string. We are all surrounded by fabrics, but the thread used in most cloth is pulled so tight that you might not even realize that it is woven. This project pays homage to the ancient craft of weaving through a pleasant and thought provoking display. The frame is relatively straightforward, but the weaving will take some patience. |
| Materials | Wood for frame, jute string, wood glue, finishing oil. A complete material list is provided below. |
| Tools | Table saw, drill press, various clamps, sandpaper. optional: router with roundover bit. A complete tool list is provided below. |
| Cost | The plan itself is free! Estimated cost of materials: $10 |
| Time | 3 hours |
| Difficulty | Easy |
| Legal Notice | Use of this website constitutes acceptance of our terms of service policy. |
| Similar Projects | If you enjoy this project you may also be interested in our free plan for a wall mirror. |

The first step involves acquiring the necessary materials and proper tools. It is best to get everything prepared and set-up before commencing because you become free to progress without unnecessary interruptions.
| Item | Qty. | Description |
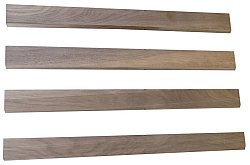
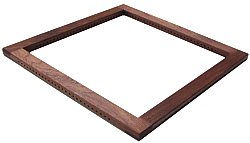
| #1 | - | Wood for frame. We cut four identical pieces out of one walnut board. You can use any size you like; the finished dimension of each of the four pieces in our case was: 7/8" x 1 3/4" x 21" (22 x 44 x 432mm). |
| #2 | - | Jute string. You will need one length long enough for the entire weave. Our frame required 105 feet (32m). |
| #3 | - | Wood glue; we used polyurethane glue |
| #4 | - | Finishing oil |
| Tool |
| table saw with miter gauge or crosscut sled |
| measuring tape |
| drill press and drill bit slightly larger than diameter of string. |
| scrap wood for drilling jig |
| small brad for drilling jig |
| clamps |
| square |
| if you are starting with rough lumber, you will need a jointer and surface planer |
| optional: router with roundover bit |
We recommend that you read through the entire plan and especially the design considerations section before acquiring/assembling all of the requisite tools and materials. There are several options with this project, and it is most prudent to be fully informed of them before making design decisions.
Now that you have all of the tools and materials, we can jump right into the project. Let's start by preparing the wood for the frame. We started with one piece of walnut lumber and surfaced two faces and one edge. If you are using previously surfaced lumber, you can omit this process. Next rip the board into four equal strips as shown on the image to the right. If you have a surface planer you may want to send all pieces through on edge and side-by-side to guarantee that they are identical. |
 |
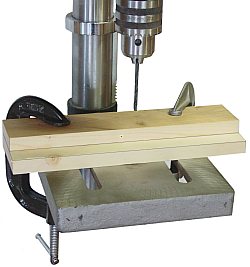
Now you need to drill a series of holes through the frame pieces. We want the holes to be equally spaced and to simplify this process, we will use a basic drilling jig. To make the jig, place one piece of flat scrap wood onto your drill press table. Clamp another straight piece on top of the first. This second piece will serve as a fence and its position is based on the thickness of your frame pieces. Measure the thickness of your frame pieces and place the fence half of this dimension behind the centerline of a drill bit in the chuck. So, since our frame pieces are 7/8" (22m) thick we clamped the fence 7/16" (11mm) away from the centerline of the drill bit. Essentially, this ensures that you will be drilling in the center of your frame pieces. Next you need to drill one hole in the end of each of the four frame pieces. Use a drill bit that will allow the string to be thread through it. This first hole should be twice the width of the frame pieces away from the ends. Our frame pieces are 1 3/4" (44mm) wide so we made the first hole 3 1/2" (88mm) away from the end. You can clamp a temporary stop block on the drilling jig to ensure that these holes are equally spaced from the ends on all four pieces. After making the four holes, remove the stop block. |
 |
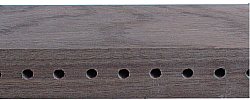
Next you need to make an odd number of holes equally spaced along each of the frame pieces. We recommend a distance of about 1/2" (13mm) between holes, but you can increase or decrease this as desired. The closer the holes are together, the tighter the weave, and the more work the weaving process will require. To make equally spaced holes, partially tap in a small brad to one side of the hole (made by the drill bit) in the drill jig. To make the holes, you simply slide the first hole that you made in the previous step, onto the head of the brad, and push the frame against the fence and against the brad and drill. Continue this process by indexing the frame pieces one hole at a time. In the end you want a frame piece that has an odd number of holes and the last holes should be equidistant from the ends of the piece. We stopped about 4" (101mm) from the ends and trimmed off the ends to the proper size. |
 |
To complete the frame, you need to make joints at the ends of the frame pieces. You can use any type of joint, but we chose a simple lap joint. The simplicity and antiquity of the joint seems appropriate. Use a miter gauge or a crosscut sled and make repeated passes to remove the necessary material. We simply set the table saw blade up half the thickness of the frame pieces. If you have a dado blade this process will be faster. If one end of a piece has the lap on the top, the other end should have the lap on the bottom; the best way to prevent making a mistake is to mark all the material that needs to be removed. |
 |
To assemble the frame simply apply a small amount of glue along the mating surfaces as described in the glue manufacturer's instructions. Make sure that the pieces are square to eachother and clamp the entire frame to a flat board or a flat worksurface. Using this technique you don't need any special clamps and you can achieve a surprisingly strong and attractive frame. |
 |
Once the glue has dried, you can unclamp and begin to sand the frame. You can also rout an edge profile around the interior and/or exterior surfaces of the frame. We sanded with 100 and 120 grit paper and then routed all edges with a roundover bit and then continued sanding with 180, 220, 320 and 400 grits. Once the frame has been sanded, it is ready for a finish. You should complete the finishing before you proceed with the weaving. You can use a stain and follow with a polyurethane. We used antique oil which is an oil/ varnish blend consisting of mineral spirits, oil, and a spar varnish. After wiping on with a brush and waiting for about 5 to 10 minutes, we wiped of the excess with a clean rag. We let it dry overnight and repeated this process two more times. For more information regarding finishing, consider Understanding Wood Finishing by Bob Flexner. |
Once the finish has dried, all that is left is the weaving. First you need to calculate the amount of string you will need. Measure the outside dimension of the frame and multiply that number with the number of holes in one of the frame pieces and then double that. Our frame is 21" (432mm) and we had 27 holes in each side of the frame. So we needed 1134" or 94 1/2'. You will need a little extra to wrap around the corners and to span from hole to hole, so we recommend that you add an additional 10% to this figure. In the end, we cut a piece about 105' long. Be careful in your estimations: underestimating would be very frustrating, and overestimating will take you much longer to weave. |
 |
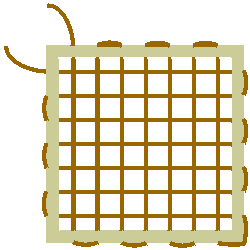
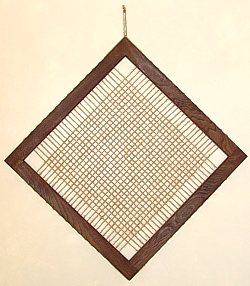
Next you need to begin the weaving process. Its best to tape one end of the cut string with some stiff tape so it will be easy to thread it through the holes. Leave about 10" excess after you thread the string through one of the holes at the corner of the frame. You can tie a temporary knot to make sure that it doesn't get pulled through the hole. String it through the hole on the opposing side of the frame and then return back at the next hole. You will have to pull the entire length of string through the frame to do this and your patience will be tested. Each step forward, however, means that there is that much less string that you will need to pull through. The biggest problem is tangling, especially at the beginning when you are working with a large quantity of string. There are many different ways you could avoid this tangling; we just asked a friend to walk with the end in a straight line and then return when we were ready for the next one. The image on the right illustrates the weaving process. Once you have reached the end, pull the string around the outside of the frame to the adjoining frame piece; thread the string through the first hole and begin the weaving. Go over one and then under the next until you reach the end: thread the string through the hole and pull until it is tight. Continue back and forth until you reach the end. After you have completed the last hole, you can align all of the strings so they are parallel and tighten them so that everything is taut. If you followed everything correctly, the beginning of the string should be at the same corner as the end. You can untie the temporary knot that you made and then tie the two strings together tightly at the corner of the frame. You can tie a loop (which can be used to hang the display on a wall) with the remaining string. |
|
design considerations |
|
materialYou can use any wood you choose so long as it is relatively strong and has the look that you are trying to achieve. We chose jute string because it has a very natural look and we liked the color. Other strings possess these characteristics and they are worth trying out. You could also try synthetic materials but keep in mind that pulling the string through the small holes involves plenty of rubbing which could damage the integrity of the string itself. Jute held up well to the rigors of the process. sizeWe made a moderately sized wall hanging. This can be increased or decreased as desired. Keep in mind that the more holes you have and the larger the frame, the more string you will have to handle and pull through the holes. Doubling the size would make this project considerably more difficult. |
 |
other ideasYou could simplify this project dramatically by not using one string. You could tie knots along the way preventing you from having to pull the entire length through each cycle of the weaving process. We endured and actually enjoyed the complexity; in the end, it seems to add to the project knowing that it was made from one piece of wood and one length of string. |
|
© 2000-2008
terms privacy policy |
home gallery |
| projects philosophy faq | ||