
|
home gallery |
| projects philosophy faq | |
 |
free plans: how to make a Curvy Stripe |
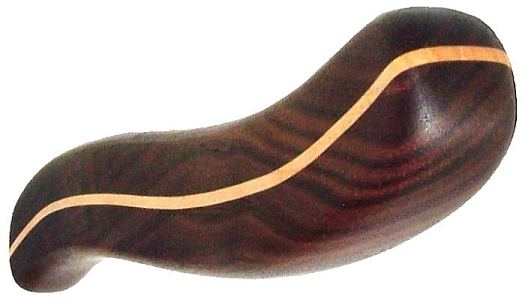
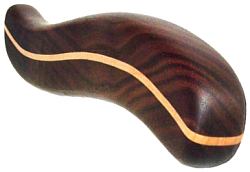
| Basic Description | In the free plan below, we illustrate a technique that that shows you how to incorporate a narrow stripe into almost any wood project. You begin with your primary wood, cut a curve, and then glue a thin sliver of a contrasting wood between. The result is a beautiful detail can be used to add sinuous curves to pulls, box tops, drawer fronts, table tops etc. |
| Materials | Wood, wood glue, finishing oil. A complete material list is provided below. |
| Tools | Table saw, bandsaw or scrollsaw, thickness planer, clamps, sandpaper. A complete tool list is provided below. |
| Cost | The plan itself is free! Estimated cost of materials: $1 |
| Time | 1 hour |
| Difficulty | Easy |
| Legal Notice | Use of this website constitutes acceptance of our terms of service policy. |

The first step involves acquiring the necessary materials and proper tools. It is best to get everything prepared and set-up before commencing because you become free to progress without unnecessary interruptions.
| Item | Qty. | Description |
| #1 | - | Base wood and contrasting wood for stripe. The base wood should be long enough for your thickness planer. |
| #3 | - | Wood glue; we used polyurethane glue but yellow glue is acceptable. |
| #4 | - | Finishing oil |
| Tool |
| table saw |
| bandsaw or scrollsaw |
| clamps |
| thickness planer |
| if you are starting with rough lumber, you will also need a jointer |
| sandpaper |
We recommend that you read through the entire plan and especially the design considerations section before acquiring/assembling all of the requisite tools and materials. There are several options with this project, and it is most prudent to be fully informed of them before making design decisions.
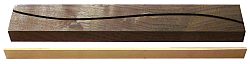
Now that you have all of the tools and materials, we can jump right into this project. Start with the base wood and surface it if it is rough. Clearly mark the curve on the wood. Note that the technique shown herein will only work with gentle curves. Sharp curves and small radiuses will not work! |
|
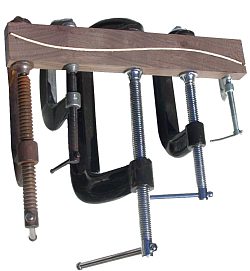
Next you need to clamp all of the pieces together. Keep in mind that clamps are doing two things for you during this glue-up: applying the necessary clamping force required by the glue and bending the strip into a curved shape. It is critical that you use a sufficient number of clamps. We used 5 C-clamps over a 12" (30cm) length. If you are using polyurethane glue, you can apply it to both sides of the strip and then clamp the assembly together. Yellow glue requires that you apply it to all mating surfaces. |
 |
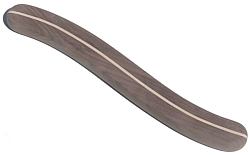
Once the glue has dried you can unclamp and send the piece through the thickness planer to clean up the surfaces. Now you have a board with a thin stripe through it. As discussed in the design considerations section below, you can use this to add an elegant detail to almost any wood project. |
 |
If you are using this technique to create a stripe in a piece of wood to be incorporated into another project, then you can perform the sanding and finishing whenever that project requires it. We made some additional bandsaw cuts to the board, and then routed a roundover to all edges creating a rather intriguing shape. Next, we performed all the requisite sanding: we sanded with 100, 120, 150, 180, 220, 320 and 400 grits. After sanding, it is ready for a finish. You can use a stain and follow with a polyurethane. We used antique oil which is an oil/ varnish blend consisting of mineral spirits, oil, and a spar varnish. After wiping on with a brush and waiting for about 5 to 10 minutes, we wiped of the excess with a clean rag. Make sure you wipe away any excess finish in the groove so that there isn't any interference with the photos that will be inserted. We let it dry overnight and repeated this process two more times. For more information regarding finishing, consider Understanding Wood Finishing by Bob Flexner. |
 |
design considerationsmaterialYou can use any wood you choose so long as the strip is flexible enough to bend into curve you have created. You should consider how the two woods look in tandem; we chose walnut and maple because they contrast significantly. To ensure strength and longevity, the grain of the base wood and the strip should go in the same direction. sizeThere isn't a size requirement other than the width of the strip. As described below, this technique could be used for a drawer pull or for a tabletop. |
 |
curveWith this technique, the curve must be gentle. The distance between the sides of the cut would vary too much if the curve was too drastic. ideasThis technique can be used in a wide variety of projects. You can use the technique to embellish almost any of the other wood projects described on this site. In addition you can incorporate a stripe as a detail to more common wood project including, furniture doors, drawers, pulls, knobs, table tops, box tops etc. |
|
© 2000-2008
terms privacy policy |
home gallery |
| projects philosophy faq | ||