
|
home gallery |
| projects philosophy faq | |
 |
free plans: how to make a Curved Photo Stand |
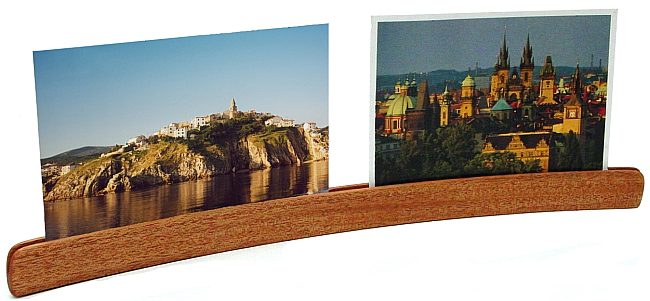
| Basic Description | This curvaceous sliver of wood is assembled from a set of thin strips; it can be used to display photos, cards and notes. The sinuous curve is much more than a design element: it provides stability and increases the rigidity of whatever you hold with the central groove. These 'curved photo stands' make great gifts, and they can easily be made out of leftover material. |
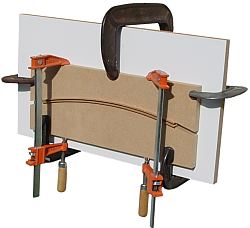
Before gluing the pieces together, this is your last chance to sand the interior faces of the groove so you may want to do that now. Once you are ready, apply glue to all the mating surfaces. If you are using polyurethane glue, you really don't need to use a lot. align the pieces with the narrower strip in the middle and begin to clamp the assembly together. A helper is very useful here but not required if you plan ahead. We simply clamped one part of the clamping jig to an additional piece of scrap (melamine works well because the glue won't stick as easily). You may also want to place a sheet of waxed paper between the clamping jig and the base to prevent the glue from binding everything together. Then place the glued pieces in order and lightly clamp the other part of the clamping jig to the base that you are using. Next begin to clamp the two parts of the clamping jig together - if you do this without the previous hold-down clamps, the jig will tend to snap apart. Once you have all the parts secured tightly, let the assembly dry thoroughly. Refrain from unclamping too early because you may lose some of the arc. |
 |
|
© 2000-2008
terms privacy policy |
home gallery |
| projects philosophy faq | ||