
|
home gallery |
| projects philosophy faq | |
 |
free plans: how to make a Curved Photo Stand |
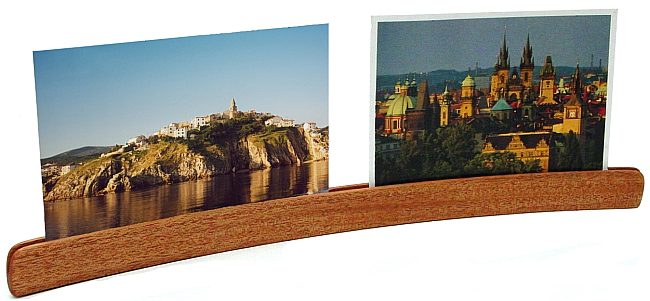
| Basic Description | This curvaceous sliver of wood is assembled from a set of thin strips; it can be used to display photos, cards and notes. The sinuous curve is much more than a design element: it provides stability and increases the rigidity of whatever you hold with the central groove. These 'curved photo stands' make great gifts, and they can easily be made out of leftover material. |
| Materials | Wood for stand and jig, wood glue, finishing oil. A complete material list is provided below. |
| Tools | Table saw, bandsaw or jigsaw, various clamps, sandpaper. A complete tool list is provided below. |
| Cost | The plan itself is free! Estimated cost of materials: $2 |
| Time | 1 hour |
| Difficulty | Easy |
| Legal Notice | Use of this website constitutes acceptance of our terms of service policy. |

The first step involves acquiring the necessary materials and proper tools. It is best to get everything prepared and set-up before commencing because you become free to progress without unnecessary interruptions.
| Item | Qty. | Description |
| #1 | - | Wood for photo stand. three thin strips of any length over 12" (30cm): we used strips that were 1/8" x 7/8" x 14" (3 x 22 x 352mm). |
| #2 | - | Wood for jig. The jig should be wider than the length of the strips: we used some leftover MDF (or plywood) that was 5/8" x 6" x 18" (16 x 152 x 452mm). You will also need a backing board for the jig - melamine is preferred but MDF or plywood will work as well. |
| #3 | - | Wood glue; we used polyurethane glue but yellow glue is acceptable. |
| #4 | - | Finishing oil |
| Tool |
| table saw |
| measuring tape |
| bandsaw or jig saw |
| clamps |
| if you are starting with rough lumber, you will need a jointer and surface planer |
| sandpaper |
We recommend that you read through the entire plan and especially the design considerations section before acquiring/assembling all of the requisite tools and materials. There are several options with this project, and it is most prudent to be fully informed of them before making design decisions.
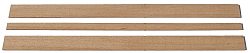
Now that you have all of the tools and materials, we can jump right into the project. Let's start by preparing the wood for the project. We started with one leftover piece of rough mahogany and surfaced the faces and edges. If you are using previously surfaced lumber, you won't need to do any surfacing. Next rip the wood into two thin strips about 1/8" (3mm) wide. If the wood you are using is particularly hard (and therefore won't bend easily), you should make slightly narrower strips. Rip a third strip between 1/16" to 3/32" (2 - 3mm). |
|
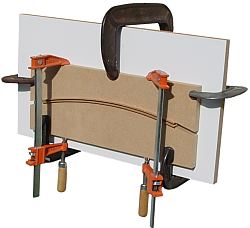
Next you need to prepare the clamping jig that will allow you to clamp the strips of wood in the desired orientation. A generous arc is critical because the curve serves two functions. First the curve provides stability to the photo stand insofar as it increases the footprint without using extra material. Second the curve, holds the cards or photos in a curved shape which introduces rigidity and helps them stand upright. The curve should be generous, but you won't be able to exceed the flexibility of the wood strips you are using. Try flexing the strips that you cut in step 1 and create the jig accordingly. We trimmed off another thin strip off the end of the piece of MDF or plywood to serve as a guide for drawing the arc. An extra set of hands can be helpful here, but it is not required (you can creatively use clamps to flex the strip into the desired shape). Draw a line and carefully cut with a bandsaw or jig saw. The image on the right displays the simple clamping jig. Note that an arc made with a strip of wood tends to straighten. |
 |
Before gluing the pieces together, this is your last chance to sand the interior faces of the groove so you may want to do that now. Once you are ready, apply glue to all the mating surfaces. If you are using polyurethane glue, you really don't need to use a lot. align the pieces with the narrower strip in the middle and begin to clamp the assembly together. A helper is very useful here but not required if you plan ahead. We simply clamped one part of the clamping jig to an additional piece of scrap (melamine works well because the glue won't stick as easily). You may also want to place a sheet of waxed paper between the clamping jig and the base to prevent the glue from binding everything together. Then place the glued pieces in order and lightly clamp the other part of the clamping jig to the base that you are using. Next begin to clamp the two parts of the clamping jig together - if you do this without the previous hold-down clamps, the jig will tend to snap apart. Once you have all the parts secured tightly, let the assembly dry thoroughly. Refrain from unclamping too early because you may lose some of the arc. |
 |
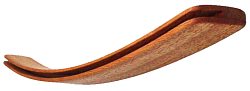
Once the glue has dried, you can unclamp and begin to sand the curved photo stand. Since the piece is so small you can simply round over all the edges and give a curved profile to the ends with a low grit sandpaper. Alternatively, you can provide a profile with a disc sander. Next, perform all the requisite sanding: we sanded with 100, 120, 150, 180, 220, 320 and 400 grits. Once the photo stand has been sanded, it is ready for a finish. You can use a stain and follow with a polyurethane. We used antique oil which is an oil/ varnish blend consisting of mineral spirits, oil, and a spar varnish. After wiping on with a brush and waiting for about 5 to 10 minutes, we wiped of the excess with a clean rag. Make sure you wipe away any excess finish in the groove so that there isn't any interference with the photos that will be inserted. We let it dry overnight and repeated this process two more times. For more information regarding finishing, consider Understanding Wood Finishing by Bob Flexner. |
 |
design considerations |
|
materialYou can use any wood you choose so long as it is flexible enough to bend into a sufficient arc. You could also use varying types of wood for the strips giving a striped pattern. If you do use different species of wood, it is probably best for the outside two strips to be the same type; you don't want the photo stand to warp as the wood expands and contracts. sizeThere isn't a size requirement; the most important aspect is to create a great enough arc (small radius) so that the photo stand has a large footprint and therefore remains stable. As long as the photo stand curves enough, the size doesn't matter. The thickness of the strips should be determined by the flexibility - if the strips are too thick they will snap when you clamp them. The groove needs to be wide enough to accept photographs or cards, but it shouldn't be too wide or the photographs will not be held sufficiently. As described in the plan, we recommend about 1/16" (2mm) |
|
other ideasYou can make various profiles in the ends of the curved photo stand. Another alternative is to use more than 3 strips. Using 5 strips you could create 2 parallel grooves that would accommodate for 2 rows of overlapping photos and/or cards. The central strip can be cut in a way that caps off the ends of the groove - it can also be cut to make divisions along the groove. |
|
© 2000-2008
terms privacy policy |
home gallery |
| projects philosophy faq | ||