
|
home gallery |
| projects philosophy faq | |
 |
free plans: how to make a Curved Panel |
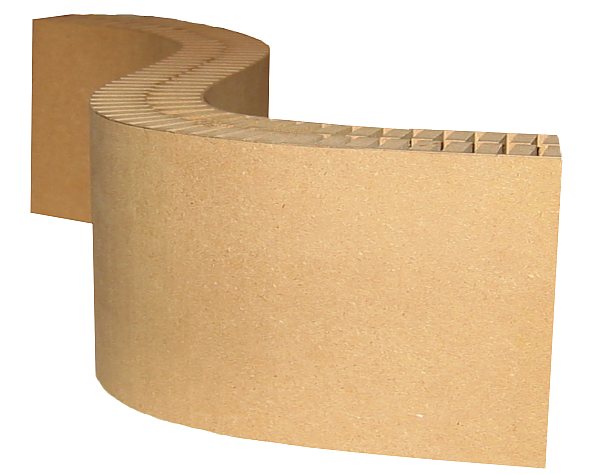
| Basic Description | The technique that we describe below allows you to introduce curves into a design. With properly placed cuts, you can create curved panels with remarkable strength. Such panels can be used for coffee table bases, room dividers, toys or anyplace else where straightness simply won't suffice. |
| Materials | Manufactured wood panel (preferably MDF), wood glue. A complete material list is provided below. |
| Tools | Table saw with miter gauge or crosscut sled, clamps, bandsaw. A complete tool list is provided below. |
| Cost | The plan itself is free! Estimated cost of materials: $9 |
| Time | 3 hours |
| Difficulty | Moderate |
| Legal Notice | Use of this website constitutes acceptance of our terms of service policy. |
| Similar Projects | For other curvy projects check out the curved photo stand, curvy stripe and shallow box. |

The first step involves acquiring the necessary materials and proper tools. It is best to get everything prepared and set-up before commencing because you become free to progress without unnecessary interruptions. |
 |
| Item | Qty. | Description |
| #1 | - | Wood for curved panel. Two pieces will be sandwiched together for the panel, so you will need twice the size of the finished panel. You can use any thickness of manufactured wood panel, MDF (medium density fiberboard) is recommended. We used 3/4" (19mm) thick MDF. |
| #2 | - | Wood glue |
| #3 | - | Wood putty (optional) |
| #4 | - | Paint (optional) |
| #5 | - | Wood for clamping jig (optional) |
| Tool |
| table saw |
| miter gauge or crosscut sled |
| bandsaw |
| clamps |
| putty knife for wood putty (optional) |
| painting supplies (optional) |
We recommend that you read through the entire plan and especially the design considerations section before acquiring/assembling all of the requisite tools and materials. There are several options with this project, and it is most prudent to be fully informed of them before making design decisions.
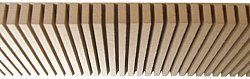
The process is of creating a curved panel is very straightforward. You simply need to cut a series of parallel cuts in the panel so that the table saw blade leaves a very thin amount of material at the bottom of each kerf. To lock the curve and to provide surprising rigidity, you glue another panel to the first with the grooved sides facing each other. In short you need to create two, identical panels with a series of parallel kerfs. We used a standard table saw blade that was 1/8" thick (3mm) and spaced the kerfs about 3/8" (10mm) apart. See the design considerations section below for more about the dimensioning. The most important dimension is the amount of material left at the bottom of each kerf. You can experiment on a test piece, but we recommend about 1/32" (1mm). Use a miter gauge or a crosscut sled to create the series of parallel cuts. Make sure you apply the same amount of downward pressure on the wood throughout the cutting process: slight variations in pressure will affect how deep your kerfs are. Note that table saw blades that cut square-bottomed kerfs work best. |
|
You will need two pieces for each curved panel. To simplify the process, you can make one larger piece and cut it in half to create the two requisite pieces. Experiment with a test piece to determine the amount of flexibility that your panel can yield. Be careful when flexing the panel, especially when bending it backward (away from the grooves); there is nothing to limit the bending in this direction and this makes the panel susceptible to breaking. A panel with less material at the bottom of each kerf will actually be more flexible and therefore less likely to break. You can glue the pieces together freehand, or if the final shape is important, you can make a simple curved clamping jig as shown on the right. Apply glue and clamp the two panels together with as many clamps as you can find. A helper is very beneficial during this step. After drying, you can patch the exposed edges of the panel with wood putty and follow with primer and then paint. |
 |
design considerations |
|
materialBased on our tests, MDF seems to work best because it is uniform and flexible. Other types of manufactured panels also work but the irregularities of standard lumber will lead to complications. You can apply veneer to a curved panel to simulate hardwood. size of panelThere isn't a size restriction, but larger panels will be harder to cut and clamp. Also, the larger the panel, the more help you will need for the gluing/clamping step. thickness of panel and kerf dimensionsWe used 3/4" (19mm) thick MDF so the completed curved panel was 1.5" (38mm) thick. You can use a thinner panel but you may have to change the kerf dimensions. The thickness of the material left at the bottom of the kerf remains critical and 1/32" (1mm) is a good guideline. Remember that the material that remains between the kerfs serve as the gluing surface and therefore cannot be undersized. You can use thinner table saw blades as well. It is best to experiment for your particular situation. |
|
© 2000-2008
terms privacy policy |
home gallery |
| projects philosophy faq | ||