
|
home gallery |
| projects philosophy faq | |
 |
free plans: how to make a Crawling Bug |
| Basic Description |
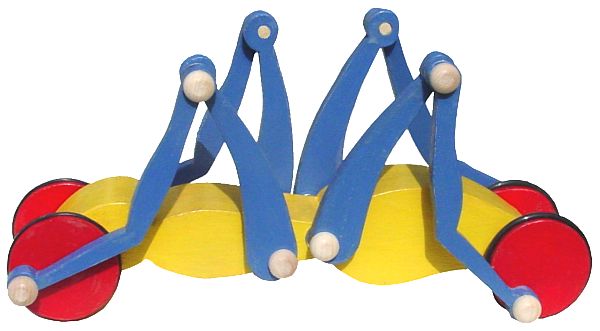
This is a fun toy that displays a unique crawling action when rolled or pushed across a surface. There are lots of little parts to deal with, and therefore it is more challenging to make than it may look. In the end, however, its a great toy that is as fun to make as it is to play with. As we do with most of our plans, we leave plenty of room for customization so your bug can reflect your tastes. |
| Materials | Wood, dowels, washers, paint, polyurethane, large O-rings, wood glue, wooden axle caps. A complete material list is provided below. |
| Tools | Bandsaw or scrollsaw, sandpaper, drill press and various drill bits, disk sander, oscillating spindle sander or drum sanding attachment for drill press, wood file, clamps. A complete tool list is provided below. |
| Cost | The plan itself is free! Estimated cost of materials: $9 |
| Time | 5 hours |
| Difficulty | Moderate |
| Legal Notice | Use of this website constitutes acceptance of our terms of service policy. |

The first step involves acquiring the necessary materials and proper tools. It is best to get everything prepared before commencing because you are free to progress without unnecessary interruptions. |
 |
| Item | Qty. | Description |
| #1 | - | The body requires 2 pieces of approx. 3/4" (19mm) thick hardwood or plywood (hardwood preferred) and the remaining pieces are made from 3/8" (10mm) hardwood or plywood (hardwood preferred). See the pattern (requires Acrobat Reader) for details and dimensions. |
| #2 | 3 feet (1m) | 1/4" (6mm) diameter wood dowel |
| #3 | 16 | steel or nylon washers with 1/4" (6mm) inside diameter |
| #4 | - | wood glue |
| #5 | 4 | Rubber O-Rings approx. 2" (51mm) outside diameter and 1/8" (3mm) wide |
| #6 | 12 | axle caps (available at many craft stores) for 1/4" (6mm) dowel; you can make these yourself as described in step 4 |
| #7 | - | optional: paint and small brush |
| #8 | - | optional: polyurethane |
| Tool |
bandsaw  or scrollsaw or scrollsaw |
| sandpaper |
| disc sander and/or belt sander |
| recommended: drum sanding attachment for drill press
or spindle sander |
| drill press with various drill bits |
| file |
| clamps |
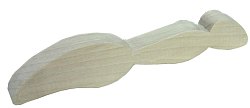
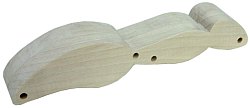
Let's begin by cutting out the pieces. You can print out the pattern (requires Acrobat Reader) and then transfer it to the wood you are using. We transferred the patterns by taping them to the wood and then tracing the cut lines with a hobby knife. Don't forget to mark the centers for the holes that will have to be drilled later. After removing the tape and remaining paper, we darkened the knife marks with a pencil. All of the pieces are to be made from the same thickness wood (approx. 3/8" or 1cm) except the two identical pieces that make up the body which are to be cut out from 3/4" (19mm) thick wood. A bandsaw or scrollsaw is perfect for this operation. You can sand the pieces to their final shapes using a disk sander and spindle sander (or drum sanding attachment for a drill press). |
 |
 |
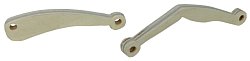
Next, we need to perform a few additional steps to all the pieces. The two pieces that make up the body need to be glued together. We used polyurethane glue but any wood glue will work fine. While the body is drying, you can drill the holes for the remaining parts. Follow the pattern by drilling the appropriate sized holes in the required locations. Note that the clearance holes should allow a dowel to spin freely, and the remaining ones should allow for a press fit. For simplicity, we made all the holes, through holes. If you want, you can make blind holes where appropriate but keep in mind that there will be right and left handed parts - not all of them will be identical. Once the body has dried, you can drill the required holes in it. |
 |
 | |
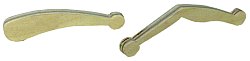
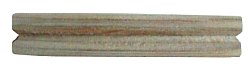
The four wheels need small grooves centered in the outer rim as shown in the image on the right. We created these shallow grooves by camping the pieces vertically in a vise and then filing around the perimeter with a square-shaped file; you will have to reposition the wood in the vise several times. A 1/16" (2mm) deep groove works well. There are other ways to create this groove, but this method seems to be the easiest. If you proceed methodically you can create a suitable groove that is used to locate the O-ring which will serve as a tire. |
 |
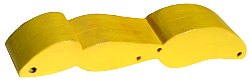
Next, you can paint the pieces if desired. We tied a piece of string across the workshop and threaded the pieces so that they were hanging in the air. Using a small hobby brush and craft paint, we gave two coats after some light sanding. You can also paint the axle caps, but we left ours unpainted. If you want to make your own axle caps, simply drill a blind hole in a round piece (1/2" (13mm) diameter and 3/8" (10mm) thick) and sand - the dowel should fit tightly but this press fit will be accompanied with glue during final assembly. Once the paint is dry we sanded again and wore through some of the edges (for an antique look) and followed with some polyurethane for durability. Try not to allow paint to drip into the holes; after everything dried, we redrilled all of the holes to ensure that there weren't any drops of paint or polyurethane that would interfere with the function of the toy. |
 |
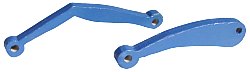 |
Now we are ready for final assembly. Begin the assembly by placing an O-rings around each wheel and confirm that they are properly seated in the grooves. Next, cut the dowel to the appropriate lengths - this will vary dependent on the thickness of your washers, and the depth of the axle caps. Getting the proper length of dowel may take some trial and error. Note that each joint adds some friction to the system and the sum of all of that friction combats the proper functioning of the toy. The goal, then is to minimize this friction and the easiest way to do this is to ensure that the dowels freely spin in the places that they should. If you need to decrease the diameter of a dowel, you can pinch a short lengths between your fingers (one end of the dowel on your thumb and the other on your forefinger) and sand the dowel until you have achieved the desired diameter. The wheels should be assembled out of phase: so if the left front wheel connection point is at the 3 o'clock position the right front wheel connection point should be at the 9 o'clock position. Wherever the dowel is to be fixed, place a small drop of glue into the press-fit holes shown in the pattern (in the body, in the wheels, in the tops of the thighs, and in each axle cap). Use a washer at each and every joint to space the pieces apart and to minimize friction. Note that washers are not required between the wood and the axle caps. |
MaterialsWe made the body out of poplar and the rest of the pieces out of plywood. In retrospect, hardwood would have been better for everything, but plywood was sufficient. SizeThe thickness of the wood used in the body is not too critical, but the width of the body gives the entire toy its lateral stability. It is critical that the remaining pieces be the same thickness or you will run into problems with alignment. If you opt to use store-bought wheels, make sure that you make all the leg parts out of wood with the same thickness as the wheels. Other IdeasYou can convert this project into a pull toy simply by attaching an eyehook to the front and tying a sting to that. You can embellish the bug by painting or affixing eyes and you can experiment with antennae etc. |
|
|
© 2000-2008
terms privacy policy |
home gallery |
| projects philosophy faq | ||