
|
home projects suggestions |
| philosophy newsletter faq | |
 |
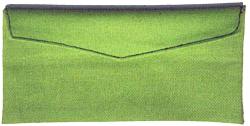
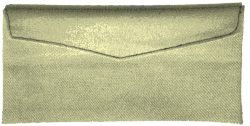
free plan to make a Cloth Envelope |
| Basic Description | This cloth envelope is a welcome retreat from the ordinary. In the free description below, we'll show you how to make an envelope that helps elevate a letter high above standard pieces of mail. The recipient will immediately know that there is something special inside. Use them to mail invitations, letters, poems or anything you want to send to someone that is important to you. |
| Materials | Fabric, thread, Tyvek tear-resistant paper. A complete material list is provided below. |
| Tools | Sewing machine (or sewing needle), scissors, measuring tape. A complete tool list is provided below. |
| Cost | The plan itself is free! Estimated cost of materials: $1 |
| Time | 1 hour |
| Steps | 1 2 3 4 5 |
| Difficulty | Easy |
| Legal Notice | Use of this website constitutes acceptance of our terms of service policy. |

The first step involves acquiring the necessary materials and proper tools. It is best to get everything prepared and set-up before commencing because you become free to progress without unnecessary interruptions. |
 |
| Item | Qty. | Description |
| #1 | 1 | durable fabric. A 11" x 11" (28 x 28cm) piece is enough for a standard sized envelope. See the design considerations section for more details. |
| #2 | - | sewing thread check link |
| #3 | 1 | 3 1/2" x 9" (9 x 23cm) piece of a tear-resistant Tyvek envelope, available at most office-supply stores |
| #4 | - | Spray adhesive (optional) if you will be gluing on the mailing label instead of sewing. |
This project is remarkably simple if you have access to, and are familiar with a sewing machine. If not, you can perform the sewing by hand, but you will need a little more patience.
| Tool |
| sewing machine, or sewing needle |
| scissors |
| measuring tape |
We recommend that you read through the entire plan and especially the design considerations section before acquiring/assembling all of the requisite tools and materials. There are several options with this project, and it is most prudent to be fully informed of them before making design decisions.
Now that you have all of the tools and materials, we can jump right into the project. Let's cut the fabric to size. These envelopes can be made to almost any reasonable size. Keep in mind that the width that you cut the fabric to will be slightly more (allowance for seams) than the width of the final envelope; the height of the fabric will be slightly more than double the height of the finished envelope. |
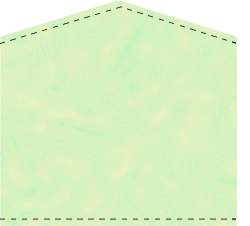 |
Once you have the fabric cut, sew seams on the top and bottom edges; you don't have to worry about the sides just yet. |
This step only applies to those that choose to sew the mailing label to the envelope as opposed to gluing it on. Sewing the label on adds some more time to the project, and it is also a bit tricky to get the label neatly centered on the envelope. We recommend that you cut the Tyvek to size by making it about 1" (25mm) narrower than the width of your fabric and 1" (25mm) shorter than your final envelope will be. This will leave a handsome border of fabric around the entire mailing label when you are done. Note that Tyvek is opaque and reversible so you can use almost any part of the Tyvek envelope that you have. We used a large Tyvek mailer and were able to easily make six mailing labels out of each one. Although it may be tempting, we recommend against sending the label through a computer printer - the heat can melt the label. You'll have to either handwrite the addresses or print out another adhesive label to affix to the Tyvek. |
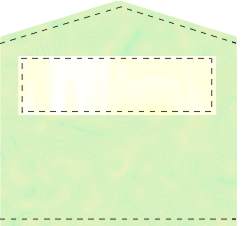 |
We pinned the Tyvek to the fabric so that its position would be maintained throughout the process. You can complete the sewing of the label in one step by stopping at each corner and rotating the envelope 90 degrees to continue sewing along the periphery of the mailing label. |
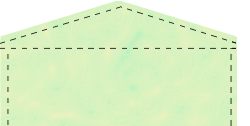
Next we are going to sew the sides. Fold up the bottom to the desired position so that your envelope is inside-out. Sew the sides and then flip the envelope inside-out to hide the exposed edges of the fabric. Note that if you sewed the mailing label on in step 3 it will be inside during this step - after flipping the envelope inside-out, it will be in the proper position. |
 |
Next, flip the envelope inside-out. If you already sewed the mailing label on, you are ready to write on the address and affix postage. If not, reread step 3 for instructions on cutting the mailing label. Confirm that it is the desired size and spray adhesive on the back of the label per the glue manufacturer's instructions. Firmly press it to the envelope and let it dry. |
 |
The final step is to insert your note or letter, and sew the flap shut. We just used a thread and needle and put a few stitches in a few places along the flap of the envelope. We describe other techniques of closing the envelope in the design considerations section at the end of this plan. |
Affix the stamp as you ordinarily would. You can write the 'from' and 'to' addresses before you attach the mailing label, or you can prepare the envelopes in advance and easily write on the mailing labels after the envelope is completed. Sometimes it helps to temporarily slide something rigid into the envelope when you are writing on it. |
 |
We haven't had a problem mailing these envelopes. We're not sure how postal services, worldwide will view a cloth envelope. As long as it is rigid, securely sealed, and the address and stamp are in the proper place, we don't think you will have a problem. It is probably wisest, though, to send a test mailing, perhaps to yourself to confirm that your local postal service can process it. If you do run into any difficulty with the mailing, please let us know.
These are perfect whenever you have an important message. A cloth envelope immediately rises in importance when it is received. Recipients typically say that all of the other mail loses its significance in the presence of a cloth envelope. They can be used for an important letter, a note, a get-well, a card, an invitation, a poem, etc. Be creative!
The cloth envelope that we show in the plan is just a basic version; there are many options and embellishments that you can include.
You can use any fabric you like but it should be durable enough to handle the rigors of the mail. If you are gluing on the mailing label, make sure that your glue works well on the fabric of choice. Some glues do not work well on heavily textured fabrics. If your fabric is flimsy, we recommend that you either put a rigid cardstock insert into the envelope or simply use rigid paper for your note or letter. This rigidity will make it much easier for the post office to handle. |
|
|||||||
There are really no limitations to the size of the envelope. Keep in mind, though, that as you increase the size it becomes less rigid, so you may need to use a cardboard (or similar) insert. The post office also has restrictions on the size of letters, but we don't think that anyone is considering to make one that large!
We seal our envelopes by sewing in a few stitches along the flap of the envelope. You can also experiment with zippers, buttons, glue, double-sided tape, ribbon or string tied through button-holes, or wax. Whatever you choose, you should try a few tests and maybe a test mailing or two before you mail the final product. If privacy is an issue, you will have to stay away from using a zippers and buttons because anyone would be able to open and close the envelope without a sign.
If you enjoyed this project, you may want to sign up for our free newsletter for weekly updates including new project notification. You can also email a friend about this project or website.
| home projects suggestions philosophy newsletter faq | ||
|
terms of service © 2000-2002 UNIQUEPROJECTS | ||
